To Remove Blade

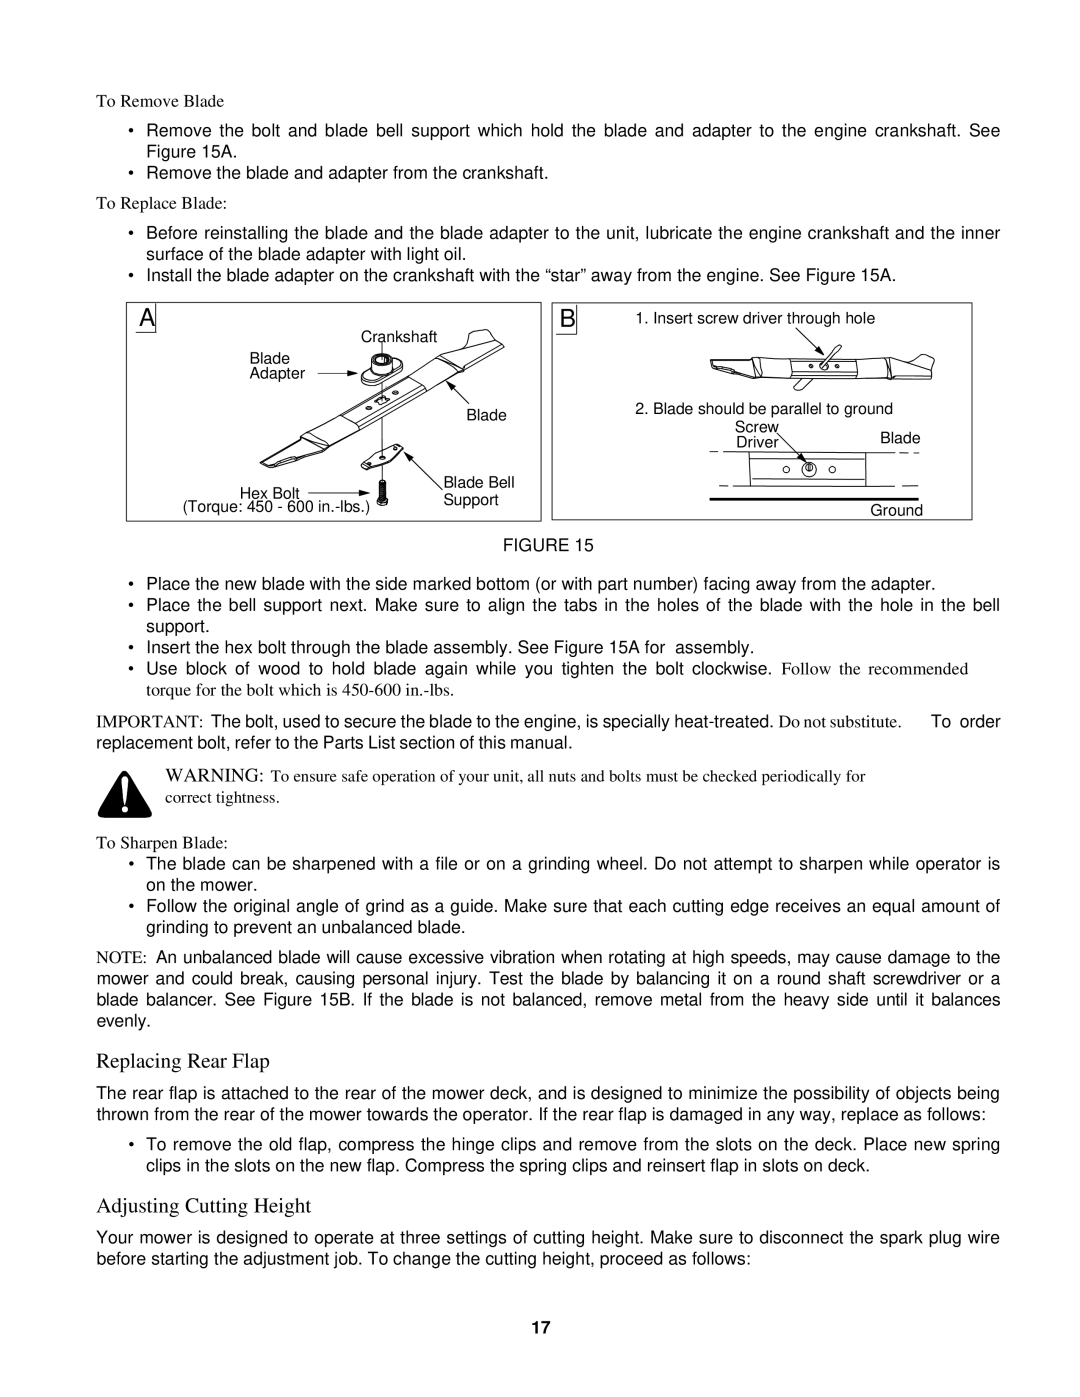
Remove the bolt and blade bell support which hold the blade and adapter to the engine crankshaft. See Figure 15A.

Remove the blade and adapter from the crankshaft.

To Replace Blade:

Before reinstalling the blade and the blade adapter to the unit, lubricate the engine crankshaft and the inner surface of the blade adapter with light oil.

Install the blade adapter on the crankshaft with the “star” away from the engine. See Figure 15A.

A


Crankshaft


Blade


Adapter


Blade


Hex Bolt


Blade Bell


Support

(Torque: 450 - 600 in.-lbs.)


B

1.Insert screw driver through hole

2.Blade should be parallel to ground

Screw

DriverBlade

Ground

FIGURE 15

Place the new blade with the side marked bottom (or with part number) facing away from the adapter.

Place the bell support next. Make sure to align the tabs in the holes of the blade with the hole in the bell support.

Insert the hex bolt through the blade assembly. See Figure 15A for assembly.

Use block of wood to hold blade again while you tighten the bolt clockwise. Follow the recommended torque for the bolt which is 450-600in.-lbs.

IMPORTANT: The bolt, used to secure the blade to the engine, is specially heat-treated. Do not substitute. To order replacement bolt, refer to the Parts List section of this manual.

WARNING: To ensure safe operation of your unit, all nuts and bolts must be checked periodically for correct tightness.

To Sharpen Blade:

The blade can be sharpened with a file or on a grinding wheel. Do not attempt to sharpen while operator is on the mower.

Follow the original angle of grind as a guide. Make sure that each cutting edge receives an equal amount of grinding to prevent an unbalanced blade.

NOTE: An unbalanced blade will cause excessive vibration when rotating at high speeds, may cause damage to the mower and could break, causing personal injury. Test the blade by balancing it on a round shaft screwdriver or a blade balancer. See Figure 15B. If the blade is not balanced, remove metal from the heavy side until it balances evenly.

Replacing Rear Flap

The rear flap is attached to the rear of the mower deck, and is designed to minimize the possibility of objects being thrown from the rear of the mower towards the operator. If the rear flap is damaged in any way, replace as follows:

To remove the old flap, compress the hinge clips and remove from the slots on the deck. Place new spring clips in the slots on the new flap. Compress the spring clips and reinsert flap in slots on deck.

Adjusting Cutting Height

Your mower is designed to operate at three settings of cutting height. Make sure to disconnect the spark plug wire before starting the adjustment job. To change the cutting height, proceed as follows:

17

Page 17
Image 17
Yard Machines 570 manual Replacing Rear Flap, To Remove Blade, To Replace Blade, To Sharpen Blade

570 specifications

The Yard Machines 570 is a robust and versatile lawn mower designed for both residential and light commercial use. Known for its reliable performance, it offers several features tailored to meet the needs of homeowners and landscapers alike.

One of the standout features of the Yard Machines 570 is its powerful engine. Equipped with a reliable 140cc OHV engine, it provides the necessary torque and power to tackle even the toughest lawns. This engine is designed for easy starting, ensuring that users can get to work quickly without the frustration of a cumbersome ignition process.

Another significant characteristic of the Yard Machines 570 is its adjustable cutting height. With multiple height settings, users can customize the mowing experience to their specific lawn needs. This flexibility allows for optimal cutting, whether navigating through thick grass or achieving a perfectly manicured finish.

The design of the Yard Machines 570 is also noteworthy. Its low-profile design enhances maneuverability, allowing gardeners to navigate around obstacles such as trees and flower beds with ease. Additionally, the mower comes equipped with a 21-inch cutting deck, ensuring efficient coverage and reduced time spent mowing.

Technologically, the Yard Machines 570 integrates a reliable bagging system, enabling effective collection of grass clippings. This feature not only keeps the lawn tidy but also allows for easy disposal or composting of organic waste. For those who prefer a natural approach, the mower also supports side discharge, spreading clippings back onto the lawn for added fertilization.

Durability is another hallmark of the Yard Machines 570. Constructed with a sturdy steel frame and deck, it is designed to withstand the rigors of regular use. The wheels are built for stability and ease of movement, featuring a robust design that can handle various terrains.

Maintenance is straightforward with the Yard Machines 570, as it requires minimal effort to keep in optimal condition. With easy access to the engine and other key components, users can perform routine checks and maintenance tasks without hassle.

In conclusion, the Yard Machines 570 stands out for its blend of power, efficiency, and user-friendly features. Whether tackling a small yard or maintaining larger spaces, it provides a reliable and effective solution for lawn care needs, combining modern technology with practical design. This mower is an excellent choice for those seeking reliable performance and ease of use in their outdoor maintenance routine.