various parts during assembly.
5.On relieving 15R units, gently and firmly press vent seal into piston using a blunt instrument.
6.Install lip seal onto piston with the lips of the seal facing away from the support flange. Then insert control spring and piston assembly into bonnet.
7.On 15R units, place balancing
8.On 15R units, tighten seat from 0.6 to 0.8 Nm (5 to 7
9.Make sure that the control spring is still uncompressed before turning on the air supply Turn on air supply, then slowly adjust the knob clockwise to increase downstream pressure until the desired pressure has been reached.
10.To decrease regulator pressure setting, always reset from a pressure lower than the final setting desired. For example, lowering the secondary pressure from 550 to 410 kPa (80 to 60 psig) is best accomplished by dropping the secondary pressure to 350 kPa (50 psig), then adjusting upward to 410 kPa (60 psig).
11.When the desired secondary pressure setting has been reached, push the adjusting knob down to lock it.
12.Check for leaks. If leaks occur, shut off the air supply, exhaust system air pressure, and make necessary adjustments to eliminate leakage.
Servicing Filter Element:
Note: See Figure 1 to aid with this procedure.
1 . Unscrew threaded bowl and element holder. Then remove filter element, deflector, and gaskets.
2.Clean all internal parts, bowl, and body before
3.Install deflector, filter element, and gaskets.
4.Attach element holder. Torque 0.9 to 1.4 Nm (8 to 12
5.To assist with retaining bowl’s
6.Screw bowl into body until it is stopped by body; then back off bowl 1/8 turn.
7.Apply pressure to the system and check for leaks. If leaks occur, shut off the air supply,
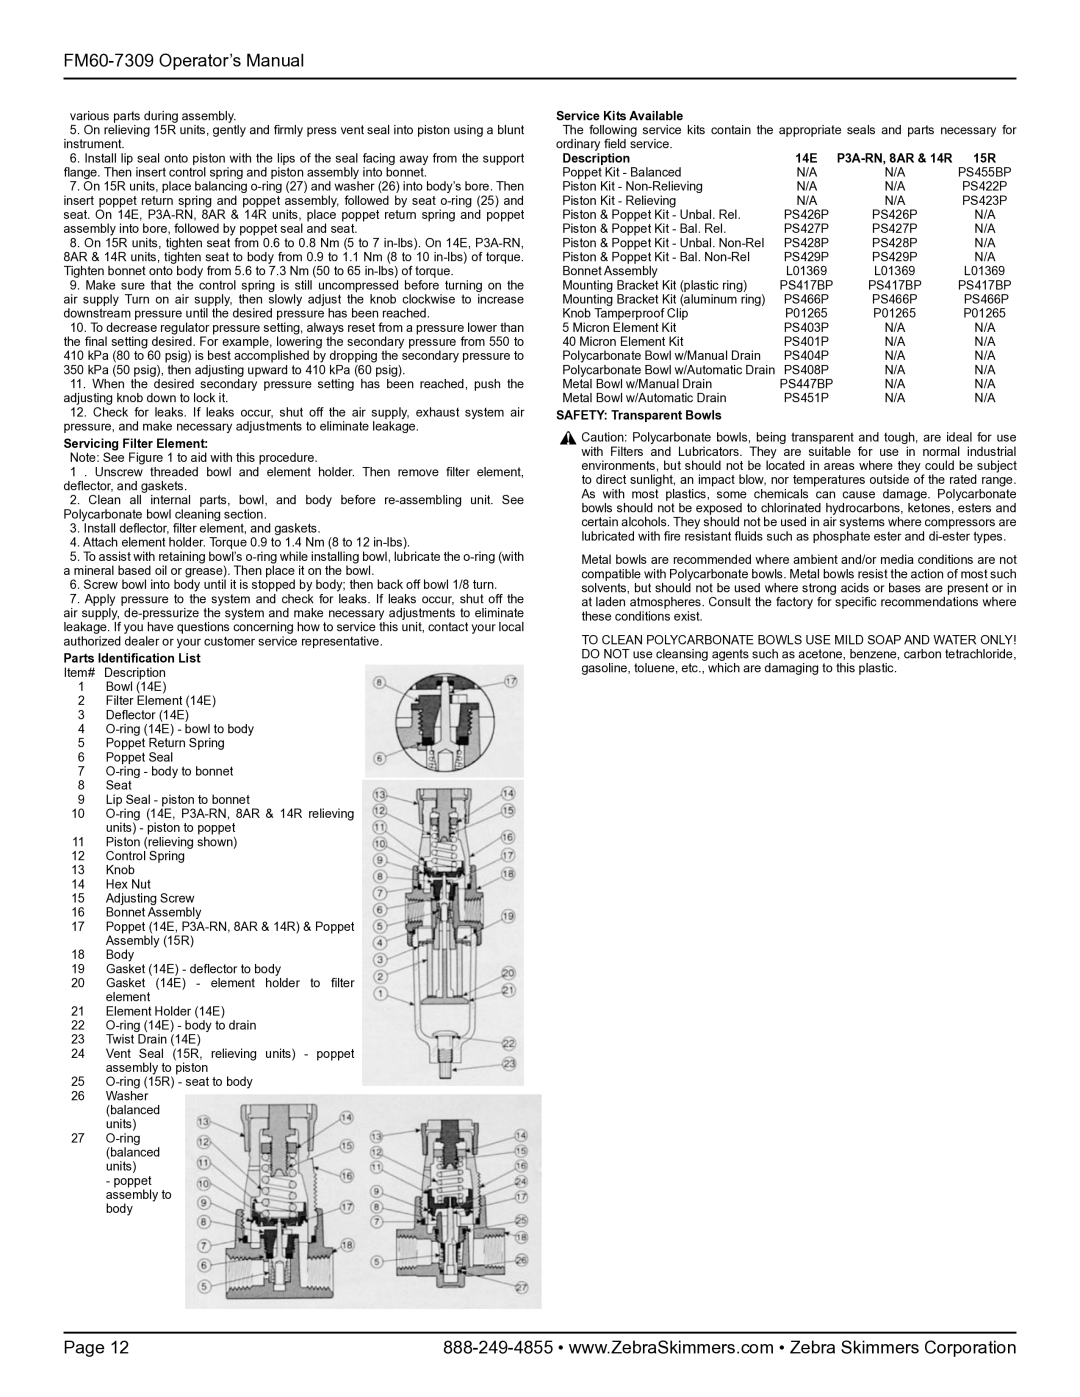
Parts Identification List
Item# Description
1Bowl (14E)
2Filter Element (14E)
3 Deflector (14E)
4
5 Poppet Return Spring
6 Poppet Seal
7
8Seat
9Lip Seal - piston to bonnet
10
11Piston (relieving shown)
12Control Spring
13Knob
14Hex Nut
15Adjusting Screw
16Bonnet Assembly
17Poppet (14E,
18Body
19Gasket (14E) - deflector to body
20Gasket (14E) - element holder to filter element
21Element Holder (14E)
22
23Twist Drain (14E)
24Vent Seal (15R, relieving units) - poppet assembly to piston
25
26Washer (balanced units)
27
- poppet
assembly to body
Service Kits Available
The following service kits contain the appropriate seals and parts necessary for
ordinary field service. |
|
|
|
|
Description | 14E |
| 15R | |
Poppet Kit - Balanced | N/A |
| N/A | PS455BP |
Piston Kit - | N/A |
| N/A | PS422P |
Piston Kit - Relieving | N/A |
| N/A | PS423P |
Piston & Poppet Kit - Unbal. Rel. | PS426P | PS426P | N/A | |
Piston & Poppet Kit - Bal. Rel. | PS427P | PS427P | N/A | |
Piston & Poppet Kit - Unbal. | PS428P | PS428P | N/A | |
Piston & Poppet Kit - Bal. | PS429P | PS429P | N/A | |
Bonnet Assembly | L01369 |
| L01369 | L01369 |
Mounting Bracket Kit (plastic ring) | PS417BP | PS417BP | PS417BP | |
Mounting Bracket Kit (aluminum ring) | PS466P | PS466P | PS466P | |
Knob Tamperproof Clip | P01265 |
| P01265 | P01265 |
5 Micron Element Kit | PS403P | N/A | N/A | |
40 Micron Element Kit | PS401P | N/A | N/A | |
Polycarbonate Bowl w/Manual Drain | PS404P | N/A | N/A | |
Polycarbonate Bowl w/Automatic Drain | PS408P | N/A | N/A | |
Metal Bowl w/Manual Drain | PS447BP | N/A | N/A | |
Metal Bowl w/Automatic Drain | PS451P | N/A | N/A | |
SAFETY: Transparent Bowls
![]() Caution: Polycarbonate bowls, being transparent and tough, are ideal for use with Filters and Lubricators. They are suitable for use in normal industrial environments, but should not be located in areas where they could be subject to direct sunlight, an impact blow, nor temperatures outside of the rated range. As with most plastics, some chemicals can cause damage. Polycarbonate bowls should not be exposed to chlorinated hydrocarbons, ketones, esters and certain alcohols. They should not be used in air systems where compressors are lubricated with fire resistant fluids such as phosphate ester and
Caution: Polycarbonate bowls, being transparent and tough, are ideal for use with Filters and Lubricators. They are suitable for use in normal industrial environments, but should not be located in areas where they could be subject to direct sunlight, an impact blow, nor temperatures outside of the rated range. As with most plastics, some chemicals can cause damage. Polycarbonate bowls should not be exposed to chlorinated hydrocarbons, ketones, esters and certain alcohols. They should not be used in air systems where compressors are lubricated with fire resistant fluids such as phosphate ester and
Metal bowls are recommended where ambient and/or media conditions are not compatible with Polycarbonate bowls. Metal bowls resist the action of most such solvents, but should not be used where strong acids or bases are present or in at laden atmospheres. Consult the factory for specific recommendations where these conditions exist.
TO CLEAN POLYCARBONATE BOWLS USE MILD SOAP AND WATER ONLY! DO NOT use cleansing agents such as acetone, benzene, carbon tetrachloride, gasoline, toluene, etc., which are damaging to this plastic.
Page 12 |