Crown Audio CL Series Choose Input Wire and Connectors, Choose Output Wire and Connectors

Page 7

CH and CL Series Power Amplifiers

2 Setup

2.4Choose Input Wire and Connectors

You have three choices of input connectors: 1/4-inch (6.35-mm) phone, 3-pin XLR, or barrier strip. You can also use either bal- anced or unbalanced wiring.

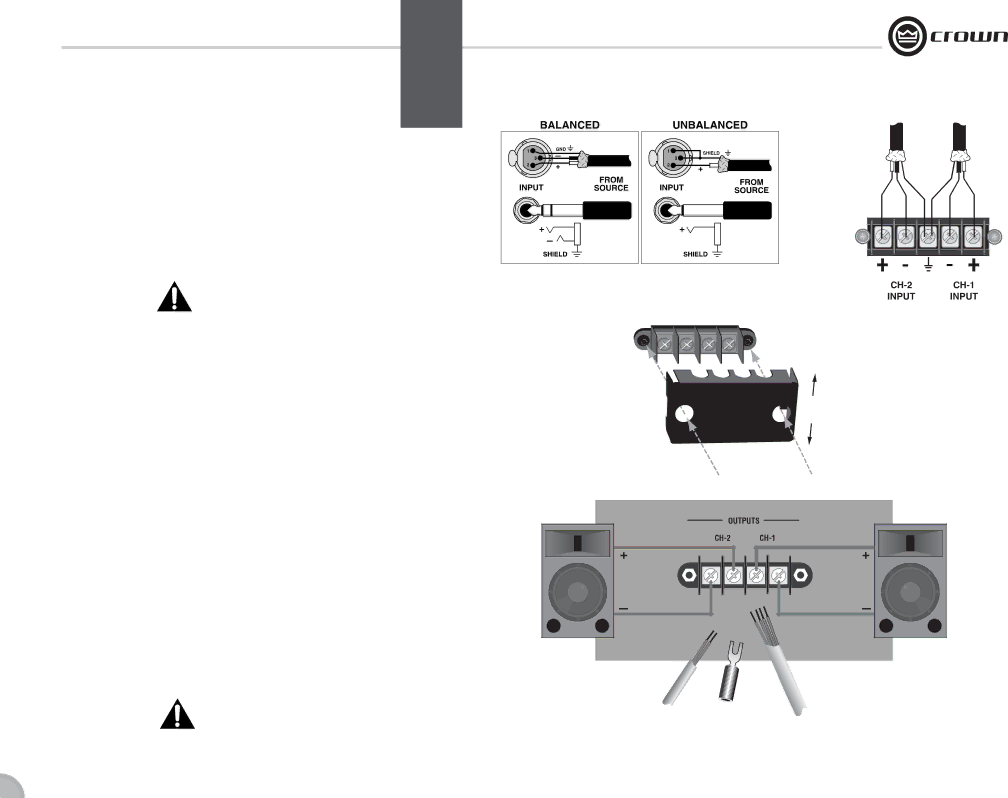
Figure 2.3 shows balanced connector pin assignments for XLR and phone. Figure 2.4 shows unbalanced connector pin assign- ments for XLR and phone.

Figure 2.5 shows barrier strip input wiring for a balanced signal. Both channels should be wired using a common center terminal for ground connection.

NOTE: Custom wiring should only be performed by qualified personnel.

Figure 2.3 Balanced

Figure 2.4 Unbalanced

Input Connector

Input Connector

Wiring

Wiring

2.5Choose Output Wire and Connectors

Crown recommends using professionally constructed, high- quality, two- or four-conductor, heavy gauge speaker wire and connectors. You may use terminal forks or bare wire for your out- put connectors (see Figure 2.7). CH and CL Series amplifier ter-

Figure 2.6 How to

Remove the No-Touch

Figure 2.5 Barrier Strip Input Wiring:

Balanced Signal In

2. SLIDE then

minal strips accept up to 10 AWG terminal forks which fit over a #8 screw.

To prevent the possibility of short circuits, wrap or otherwise insulate exposed loudspeaker cable and connectors. Also, a no- touch cover, which covers the terminal strips, is provided to help prevent short circuits. To remove this cover,

1.Loosen screws inside top and bottom holes of cover (see Fig- ure 2.6).

2.Slide cover up or down, then pull it off away from the amplifier.

Using the guidelines below, select the appropriate size of wire based on the distance from amplifier to speaker.

Distance

Wire Size

up to 25 ft.

16 AWG

26-40 ft.

14 AWG

41-60 ft.

12 AWG

Over 60 ft.

10 AWG

3. Reinstall no-touch cover to maintain safety.

CAUTION: Never use shielded cable for output wiring.

Cover

PULL OFF

1.LOOSEN SCREWS

Figure 2.7 CL Series and CH4 Output Connector Wiring

Operation Manual

page 7

Image 7
Contents Some models may be exported under the name Amcron CH and CL SeriesUse only with a cart, stand, tripod, bracket, or Important Safety InstructionsEMC Standards Safety StandardCrown International, Inc European Representatives Name and AddressTable of Contents How to Use This Manual FeaturesWelcome Unpack Your Amplifier Install Your Amplifier SetupChoose Output Wire and Connectors Choose Input Wire and ConnectorsReinstall no-touch cover to maintain safety Model CH4 Models CH1 and CH2 Switch SettingsRefer to .5 for output connector pin assign- ments Wire Your System Models CH1 & CH2 Stereo ModeModels CH1 & CH2 140V Bridge Mode Model CH4 Bridge Mode Model CH4 Stereo ModeInputs Connect input wiring to Channel Models CL1 & CL2 Stereo Models CL1 & CL2 Bridge ModeModel CL4 Bridge Mode Model CL4 Stereo ModeInputs Connect input wiring to CH1 Connect to AC Mains All Models How to Parallel the Inputs in Stereo ModeStartup Procedure Screw terminalOperation PrecautionsCH and CL Series Front Panel Controls and Indicators Operation Speed Fan-On-Demand If the amplifier output stage stops operating IndicatorsControls Advanced Features Options SST-3632 SST-4622SST-4632 Location of Fault Jack Fault MonitoringAttenuation in dB Precision Detented Level ControlsCH1, CH2, CL1 and CL2 Principles of OperationModels CL1 & CL2 Circuit Block Diagram Power Indicator LED is driven from the low-voltage supplyModel CH4 Circuit Block Diagram CH4 and CL4 Audio Signal PathModel CL4 Circuit Block Diagram Power Supply Operation Amplifier output wires have developed a short circuit TroubleshootingFlashing 120V/60 Hz Units, Bridge mono mode Specifications600W KHz at rated THD Ohms 560WOhms 450W Ohms 275WModel CL1 & CL2 CH and CL Series Power Amplifiers Models CH4 & CL4 Damping Factor Typical Output Impedance Following equation is used to calculate thermal dissipation AC Power Draw Thermal DissipationAC Power Draw Thermal Dissipation AC Power Draw Thermal Dissipation CL2 Service 12/01 WarrantyWorldwide Except USA & Canada Mo/day/yr FaxThis page Intentionally Left Blank Individual or Business Name Phone # Fax # Model‰ Personal/Consumer ‰ Business/Corporate