Snapper 42" Single-Stage Snowthrower manual Removal

Page 23

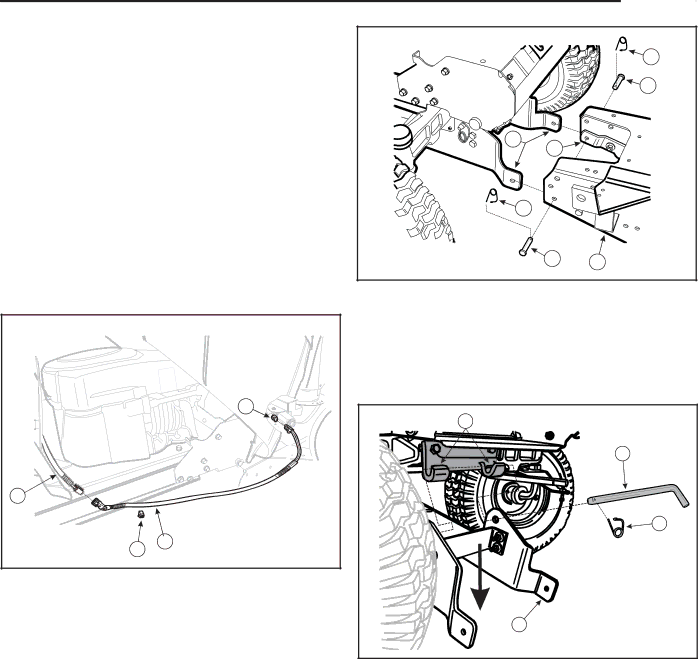
7.Disconnect the final wiring harness (B, Figure 24).

8.Remove both quick clips (E, Figure 25) and snow thrower mounting pins (D).

9.Move the snow thrower assembly (A, Figure 25) out of the way.

10.Turn the front wheels fully to the left. Remove the latch pin quick clip (D, Figure 26) and slide the latch pin (A) to the left.

CAUTION

Make sure to support the front of the hitch assembly as it will be loose when the latch pin has been removed.

D

A

B

C

Figure 24. Belt Routing

A.Upper Wiring Harness

B.Final Wiring Harness

C.Mounting Clip

D.Chute Rotation Motor Connector


Removal


E


D

B


C


E


D

A


Figure 25. Snow Thrower Installation

A.Snow Thrower Assembly

B.Hitch Mounting Arms

C.Snow Thrower Mounting Tabs

D.Mounting Pins

E.Quick Clips

C

A

D

B

Figure 26. Latch Pin Removal

A.Hitch Latch Pin

B.Hitch

C.Frame Support Fingers

D.Quick Clips

21

Image 23
Contents OPERATOR’S Manual Page Table of Contents Training Safety Rules InformationChildren Safety DecalsSafety Decals Tractor Controls Required AccessoriesRequired Accessories Recommended AccessoriesControl Functions Starting & Stopping General Operating InstructionsChecks Before Starting Engine & Ground Speed SelectionOff-Season Storage General Operating InstructionsSnow Removal Suggestions Daily StorageGeneral Lubrication Schedule For Normal CareTroubleshooting Warning Troubleshooting Adjustments, & ServiceElectric Chute Rotator Gear Skid Shoe AdjustmentBelt Tension Adjustment Troubleshooting, Adjustments, & ServiceLift Adjustment Belt Replacement Qty Description Initial Setup AssemblyChute Assembly Initial Setup & AssemblyInstall Hitch Support Shaft Hair Pin Cotter Install Hitch Onto TractorAttaching Blower to Tractor Attaching Lift ARM Assembly to Tractor Install Reflectors Attaching Chute Motor Wiring HarnessSnow Thrower Removal RemovalRemoval Removal Page Page Page O D U C T S