White Outdoor 31AH7Q3G190 manual Assembling Your Snow Thrower, Unpacking, Loose Parts, Assembly

Page 5

SECTION 2: ASSEMBLING YOUR SNOW THROWER

NOTE: Any reference in this manual to the left or right side of the snow thrower is observed from the operator’s position.

Unpacking

Remove screws from the top sides and ends of the shipping crate.

Set panel aside to avoid tire punctures or personal injury.

Remove and discard plastic bag that covers unit.

Remove any loose parts included with unit (i.e., Operator’s Manual, etc).

Roll unit out of crate.

Loose Parts

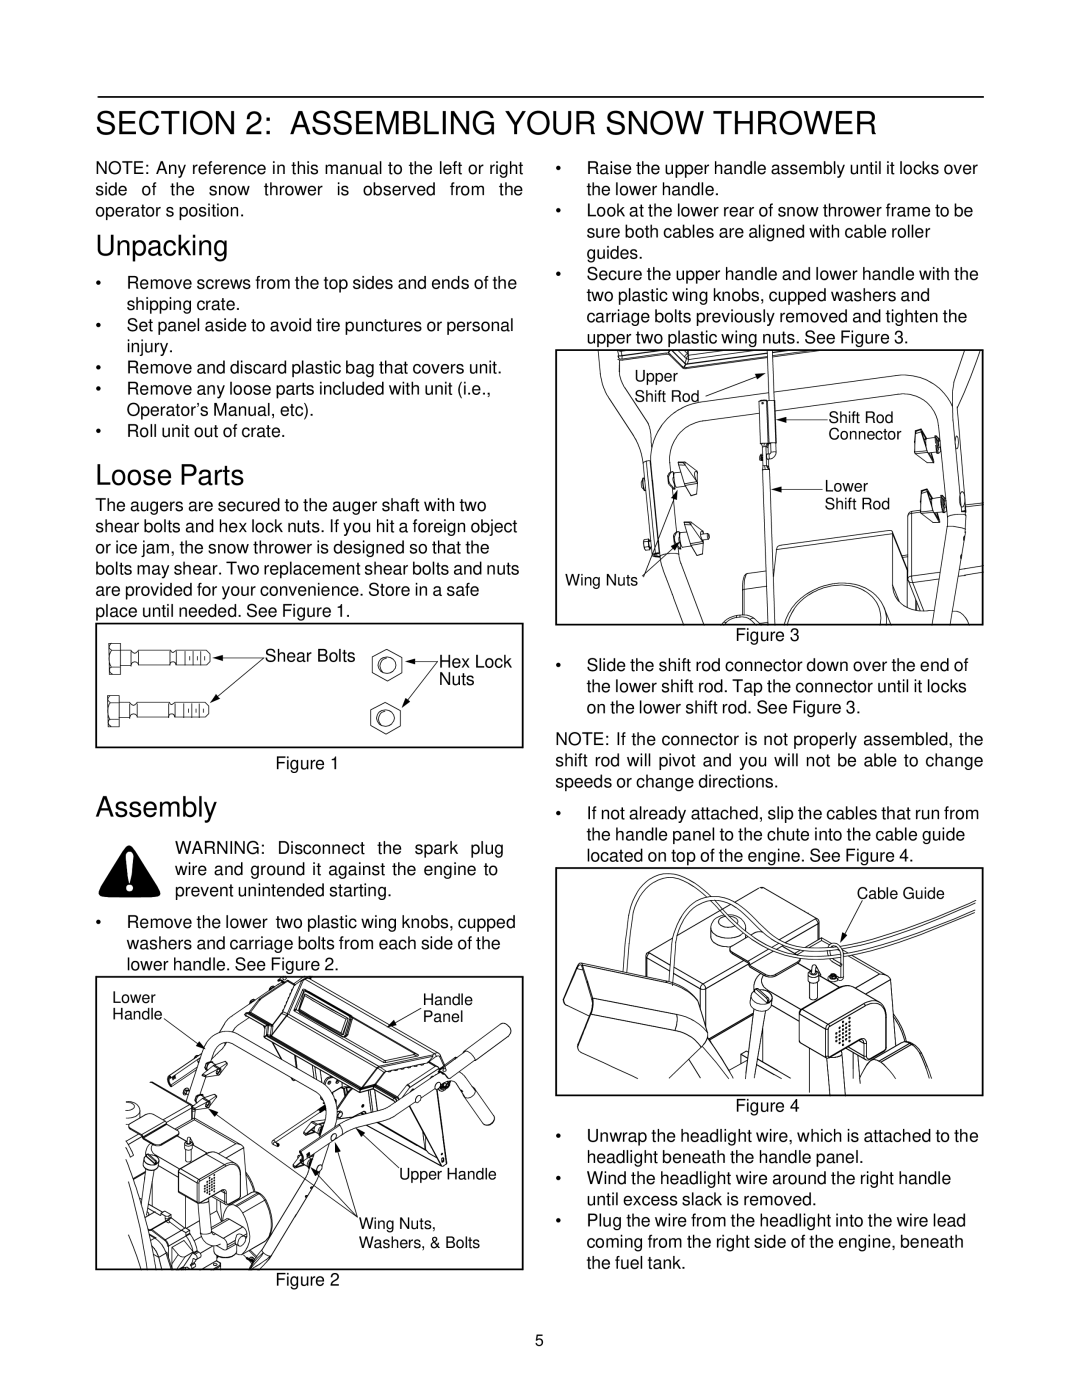
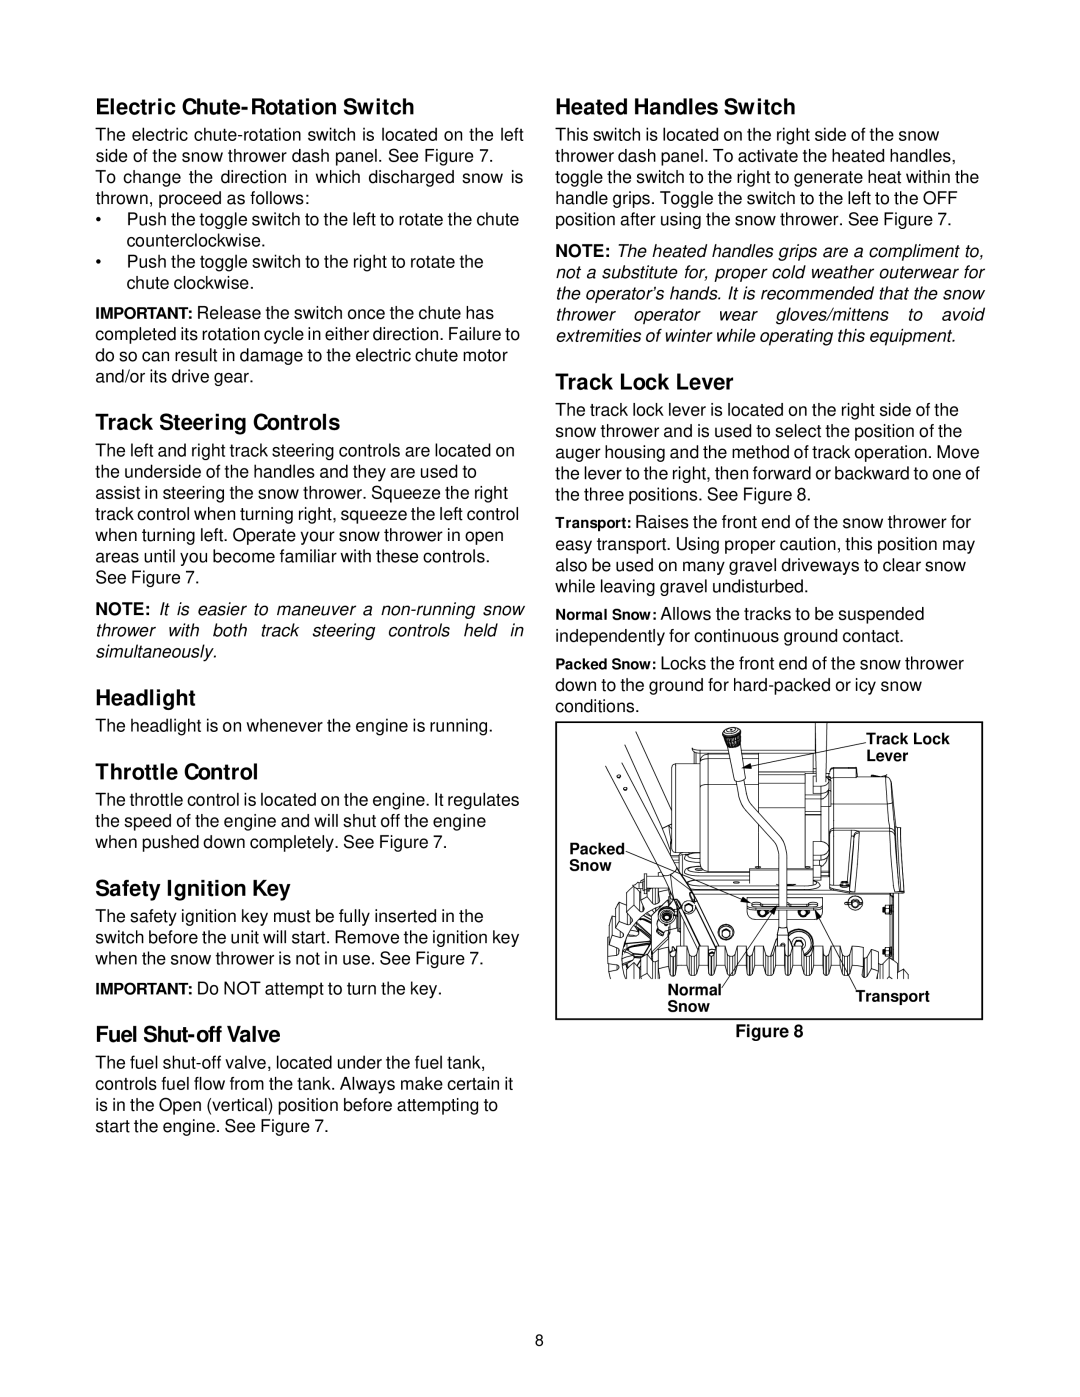
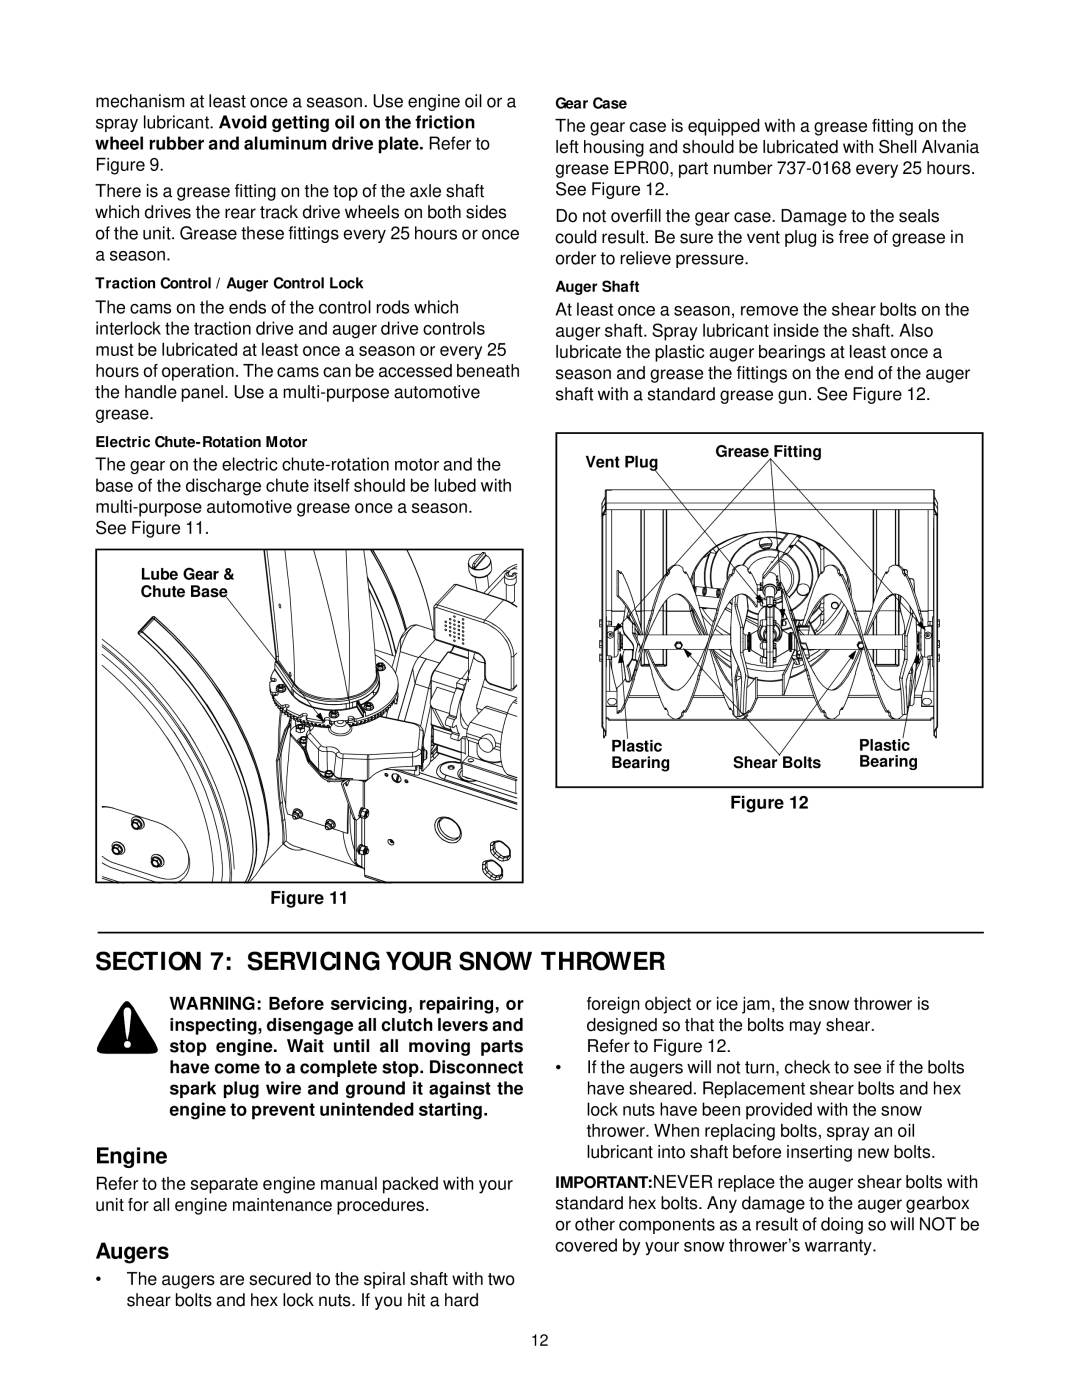
The augers are secured to the auger shaft with two shear bolts and hex lock nuts. If you hit a foreign object or ice jam, the snow thrower is designed so that the bolts may shear. Two replacement shear bolts and nuts are provided for your convenience. Store in a safe place until needed. See Figure 1.

Shear Bolts


Hex Lock


Nuts

Figure 1

Raise the upper handle assembly until it locks over the lower handle.

Look at the lower rear of snow thrower frame to be sure both cables are aligned with cable roller guides.

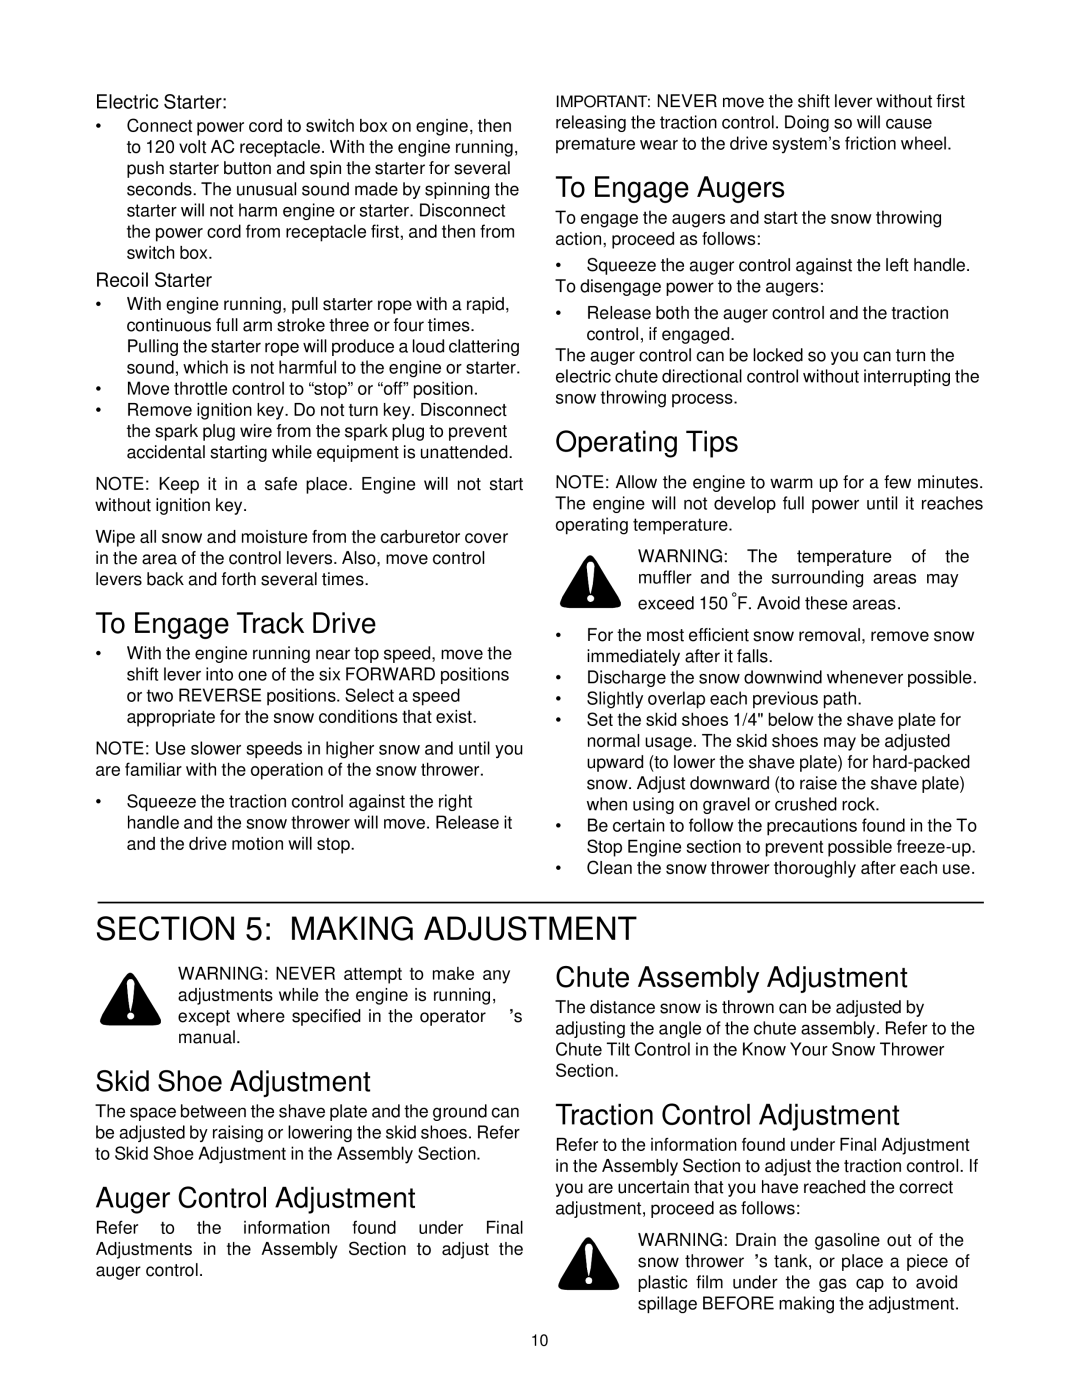
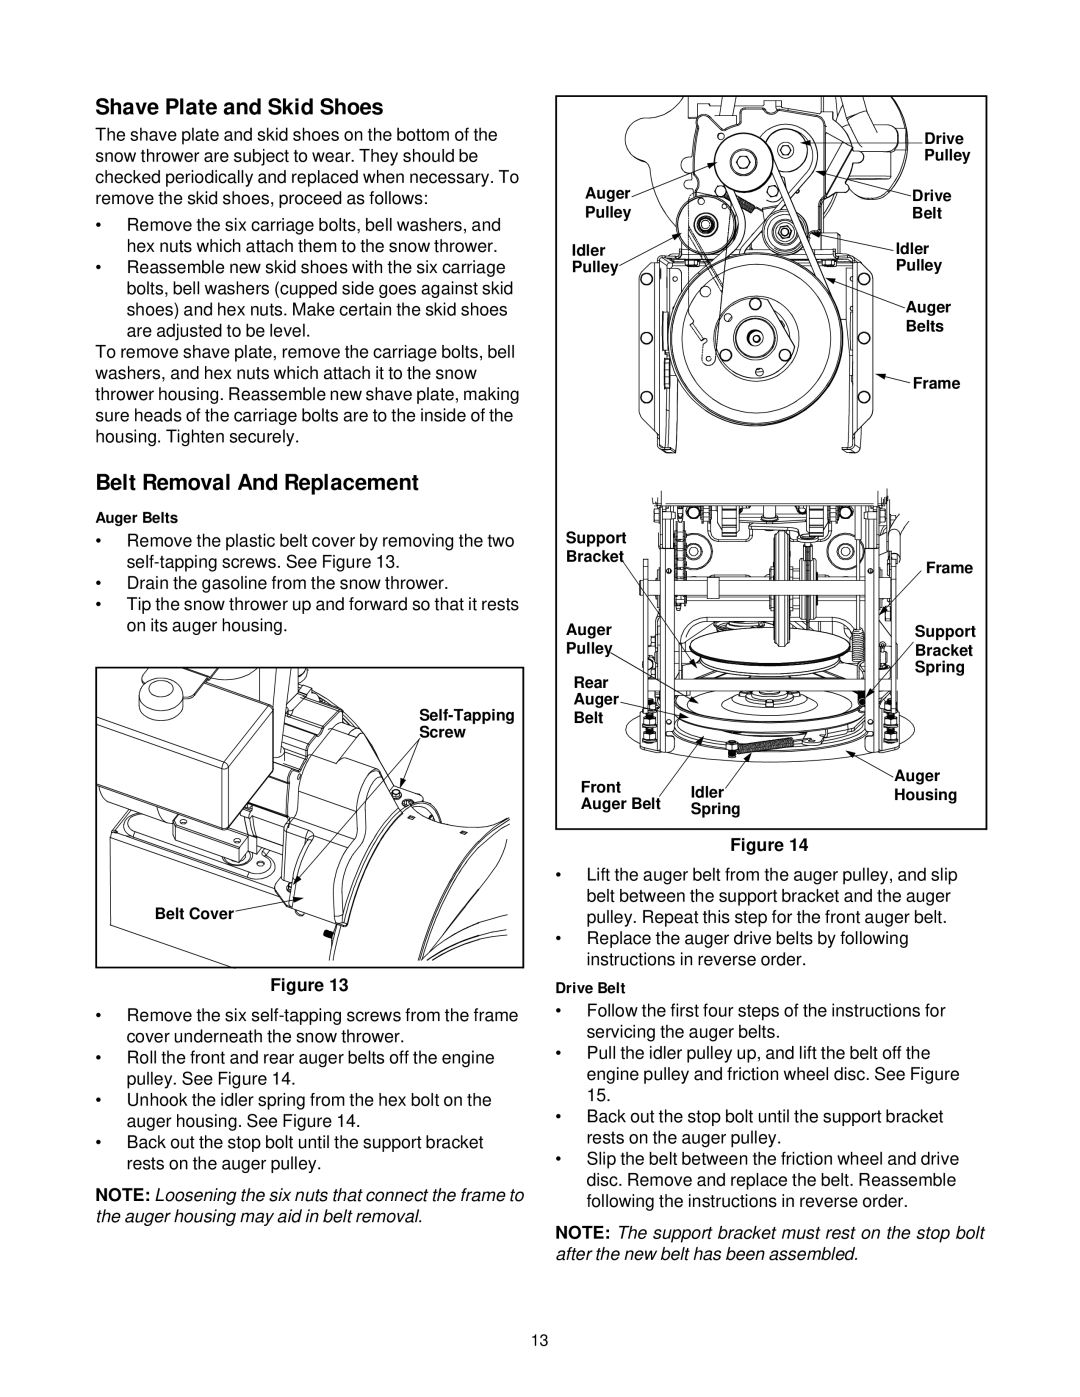
Secure the upper handle and lower handle with the two plastic wing knobs, cupped washers and carriage bolts previously removed and tighten the upper two plastic wing nuts. See Figure 3.

Upper

Shift Rod

Shift Rod

Connector

Lower

Shift Rod

Wing Nuts

Figure 3

Slide the shift rod connector down over the end of the lower shift rod. Tap the connector until it locks on the lower shift rod. See Figure 3.

NOTE: If the connector is not properly assembled, the shift rod will pivot and you will not be able to change speeds or change directions.

Assembly

WARNING: Disconnect the spark plug wire and ground it against the engine to prevent unintended starting.

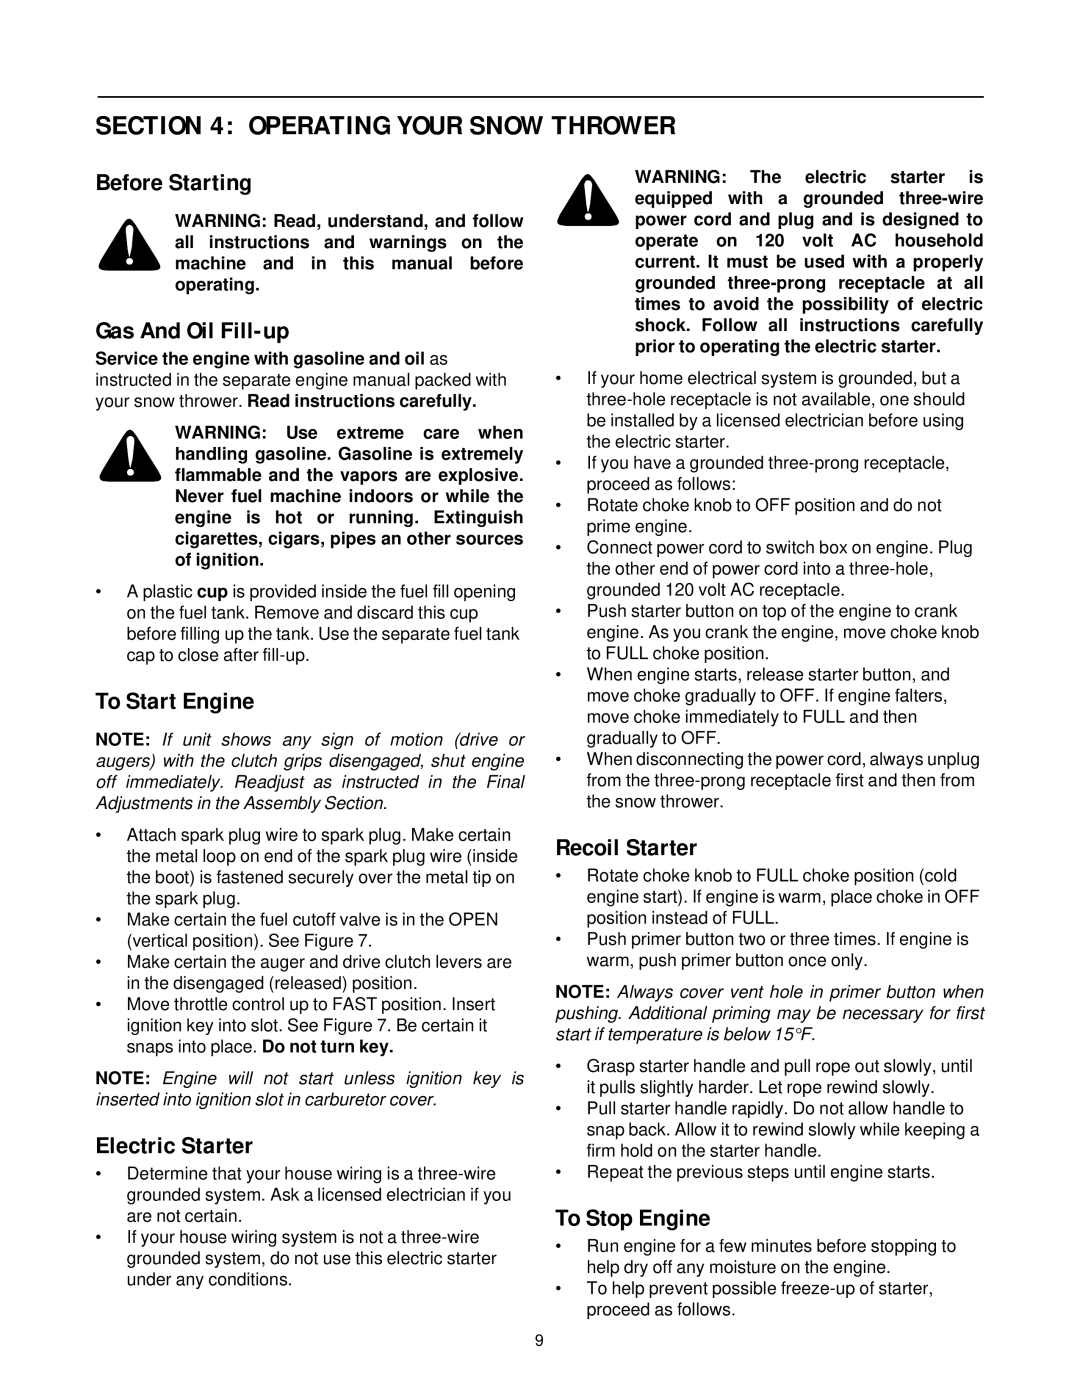
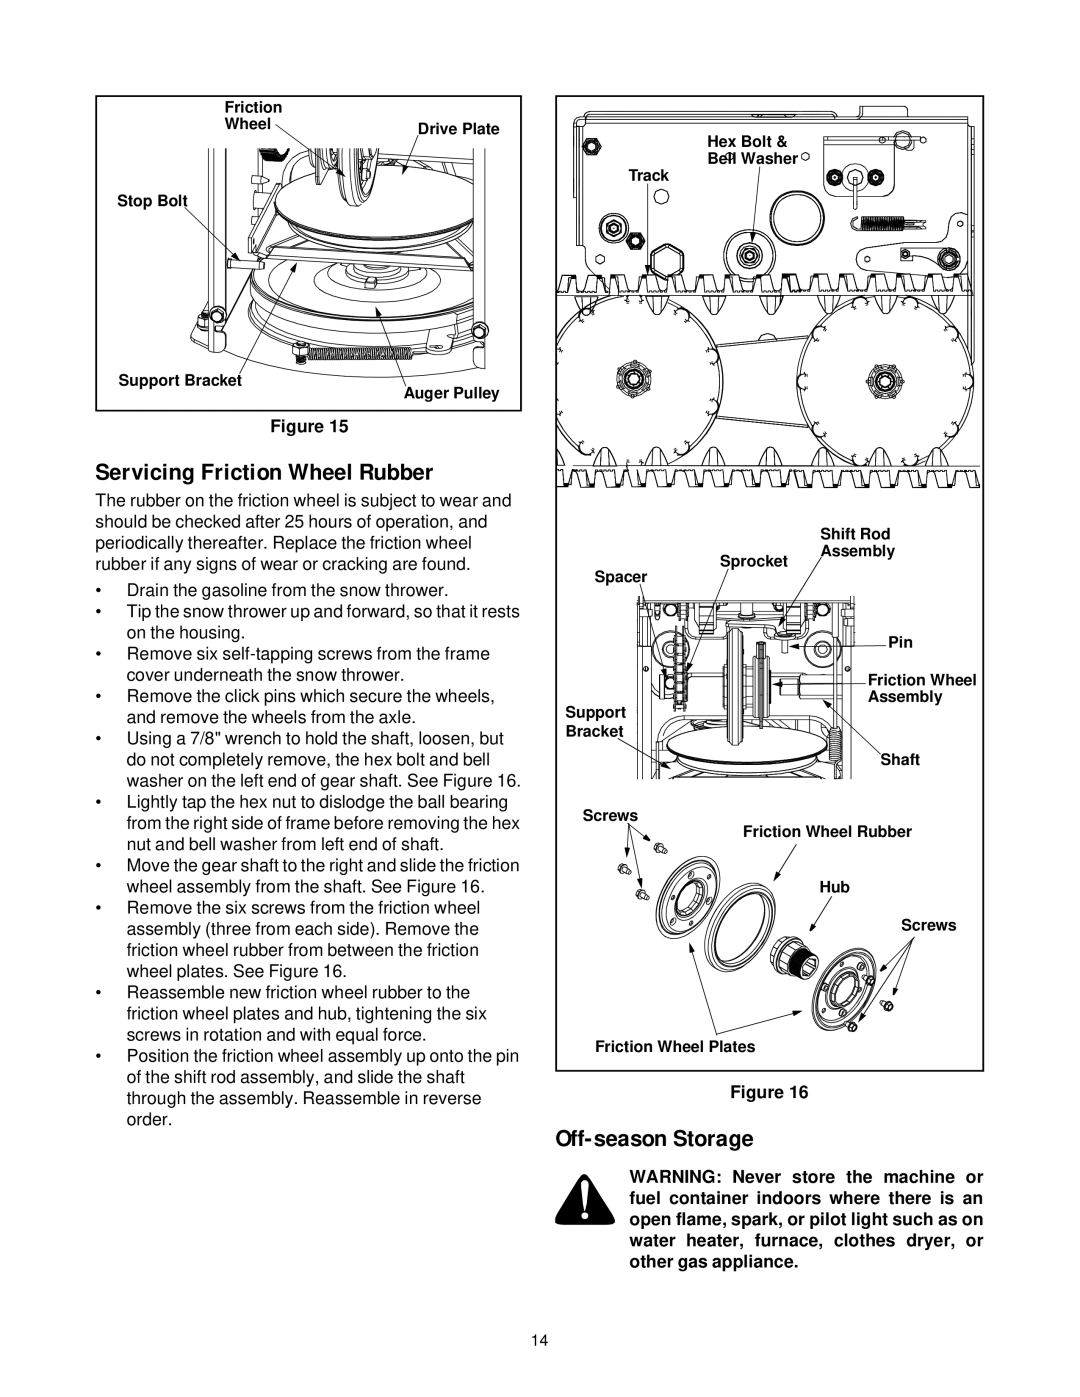
Remove the lower two plastic wing knobs, cupped washers and carriage bolts from each side of the lower handle. See Figure 2.

Lower

Handle

Handle

Panel


Upper Handle


Wing Nuts,


Washers, & Bolts

Figure 2

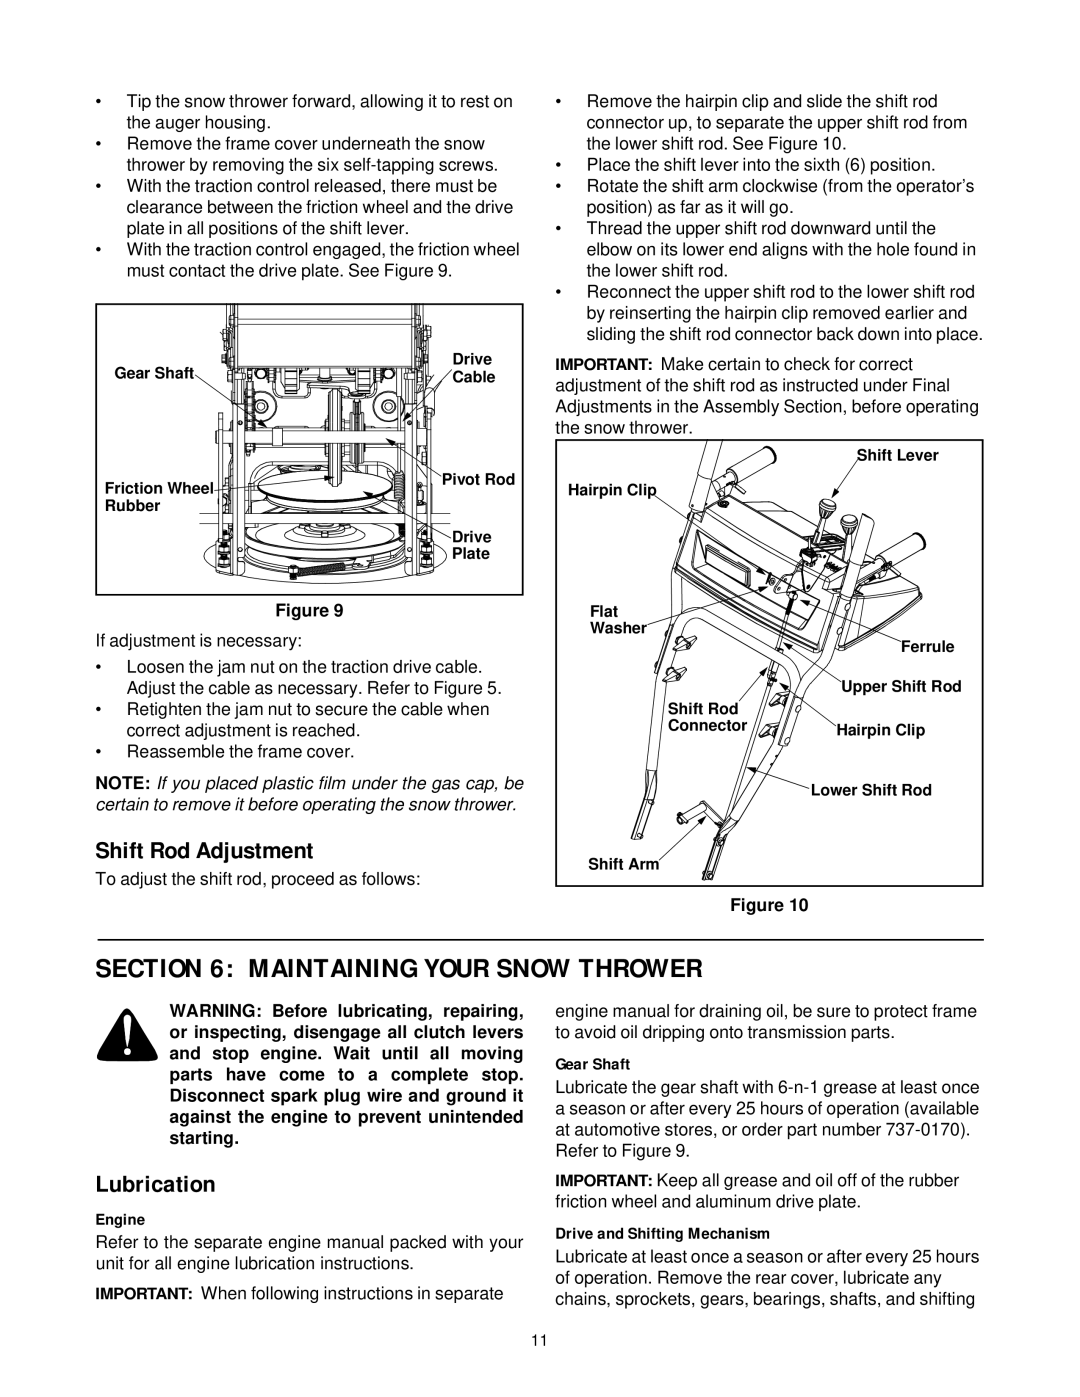
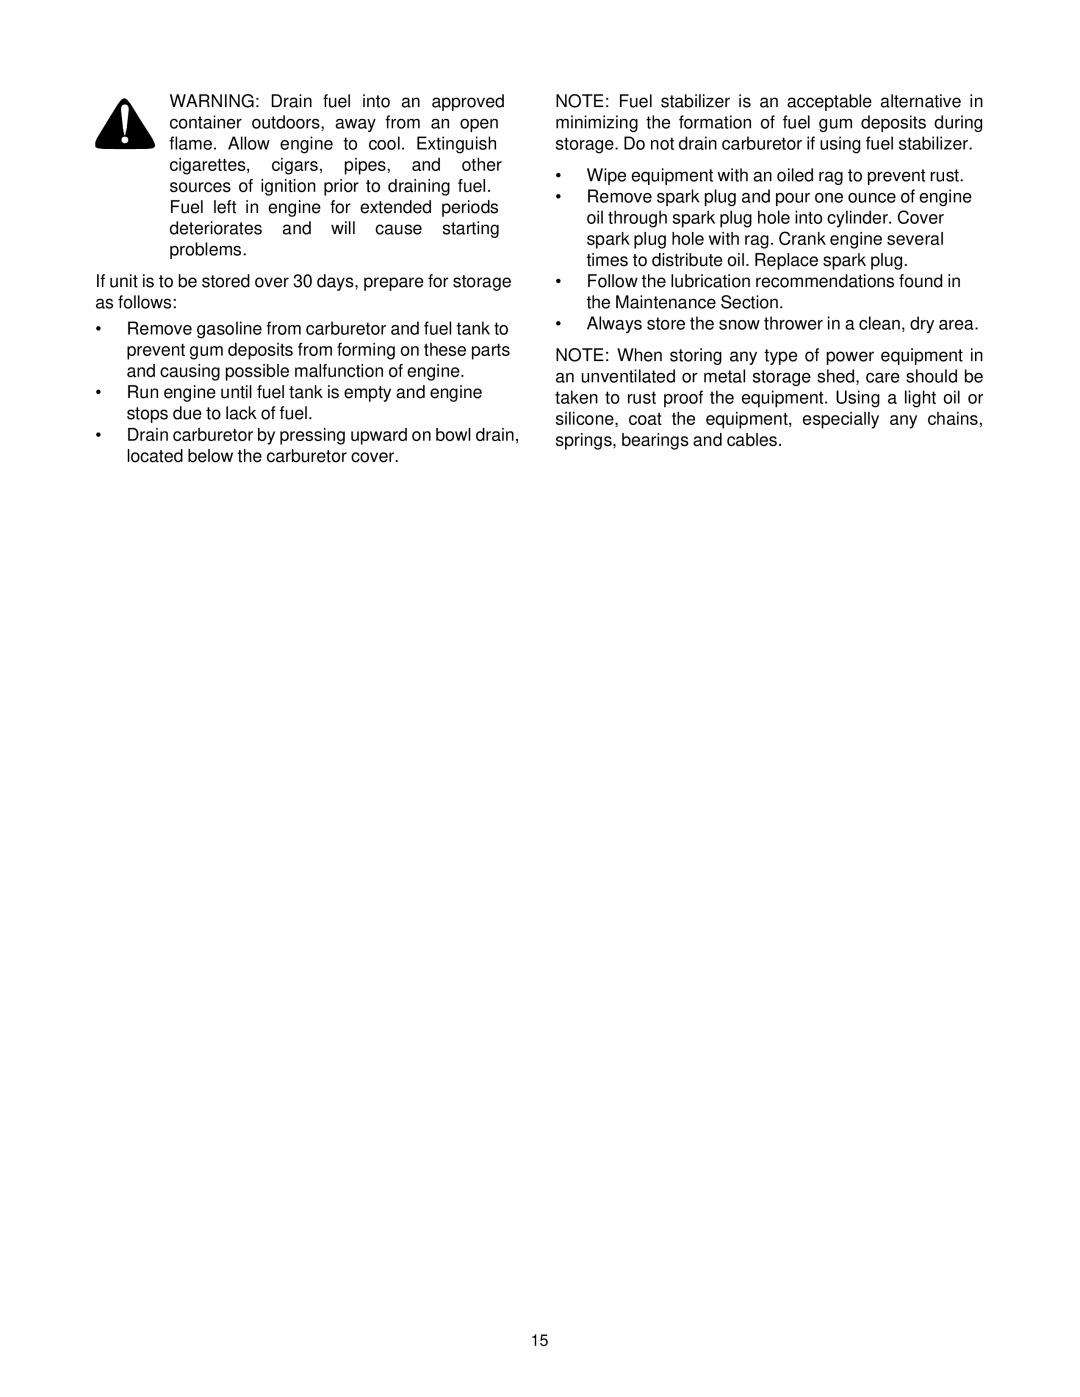
If not already attached, slip the cables that run from the handle panel to the chute into the cable guide located on top of the engine. See Figure 4.

Cable Guide

Figure 4

Unwrap the headlight wire, which is attached to the headlight beneath the handle panel.

Wind the headlight wire around the right handle until excess slack is removed.

Plug the wire from the headlight into the wire lead coming from the right side of the engine, beneath the fuel tank.

5

Image 5
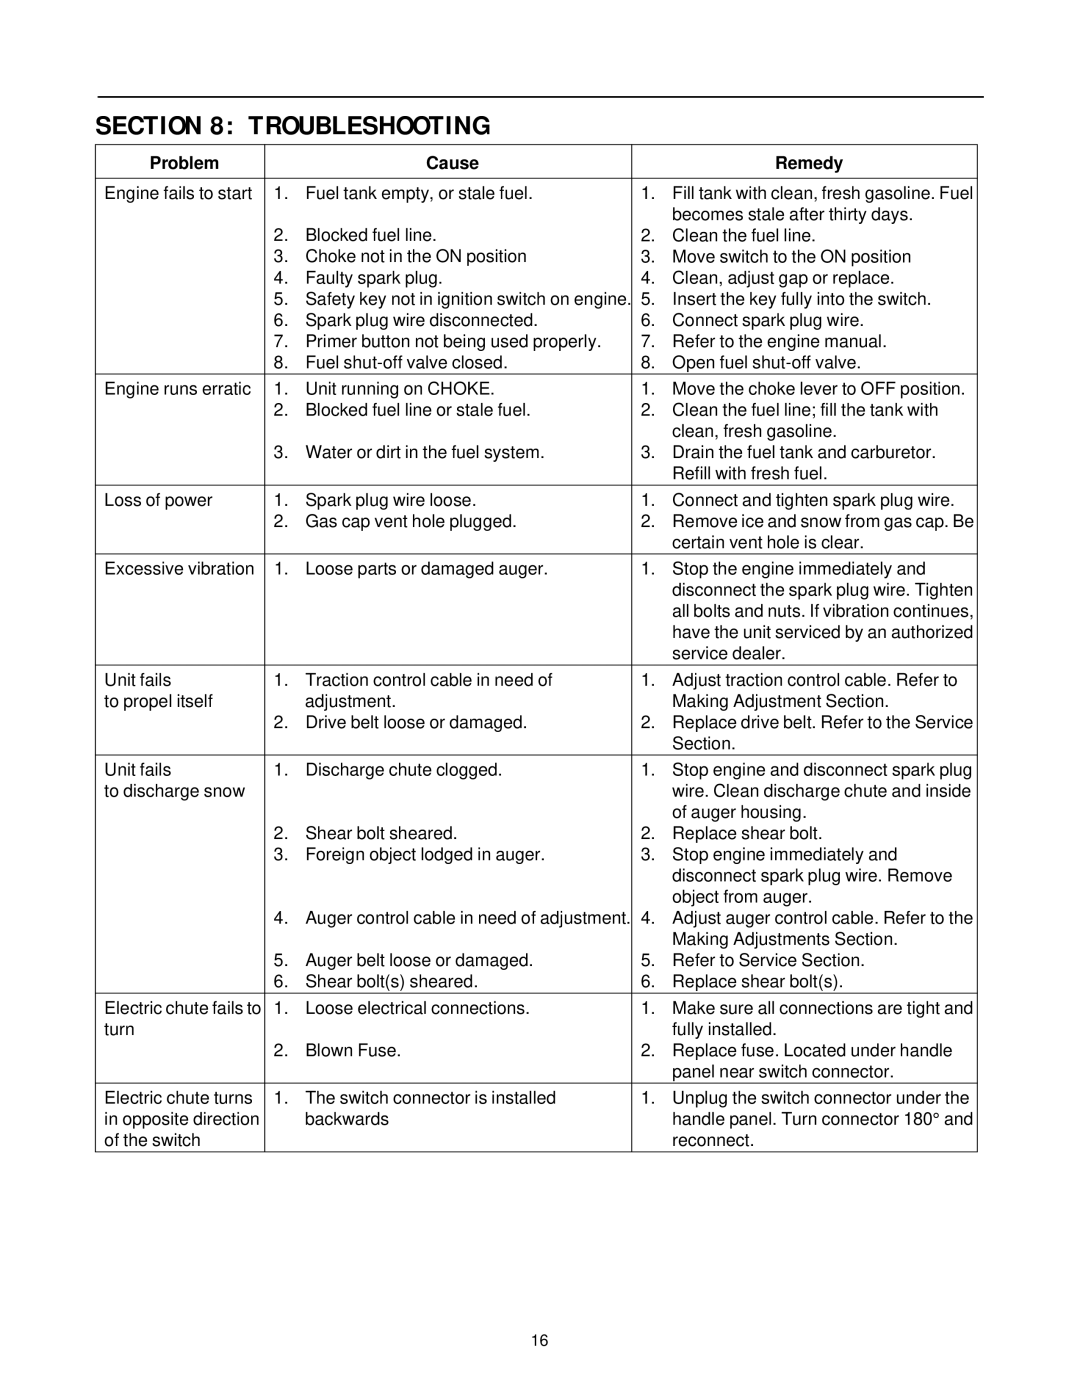
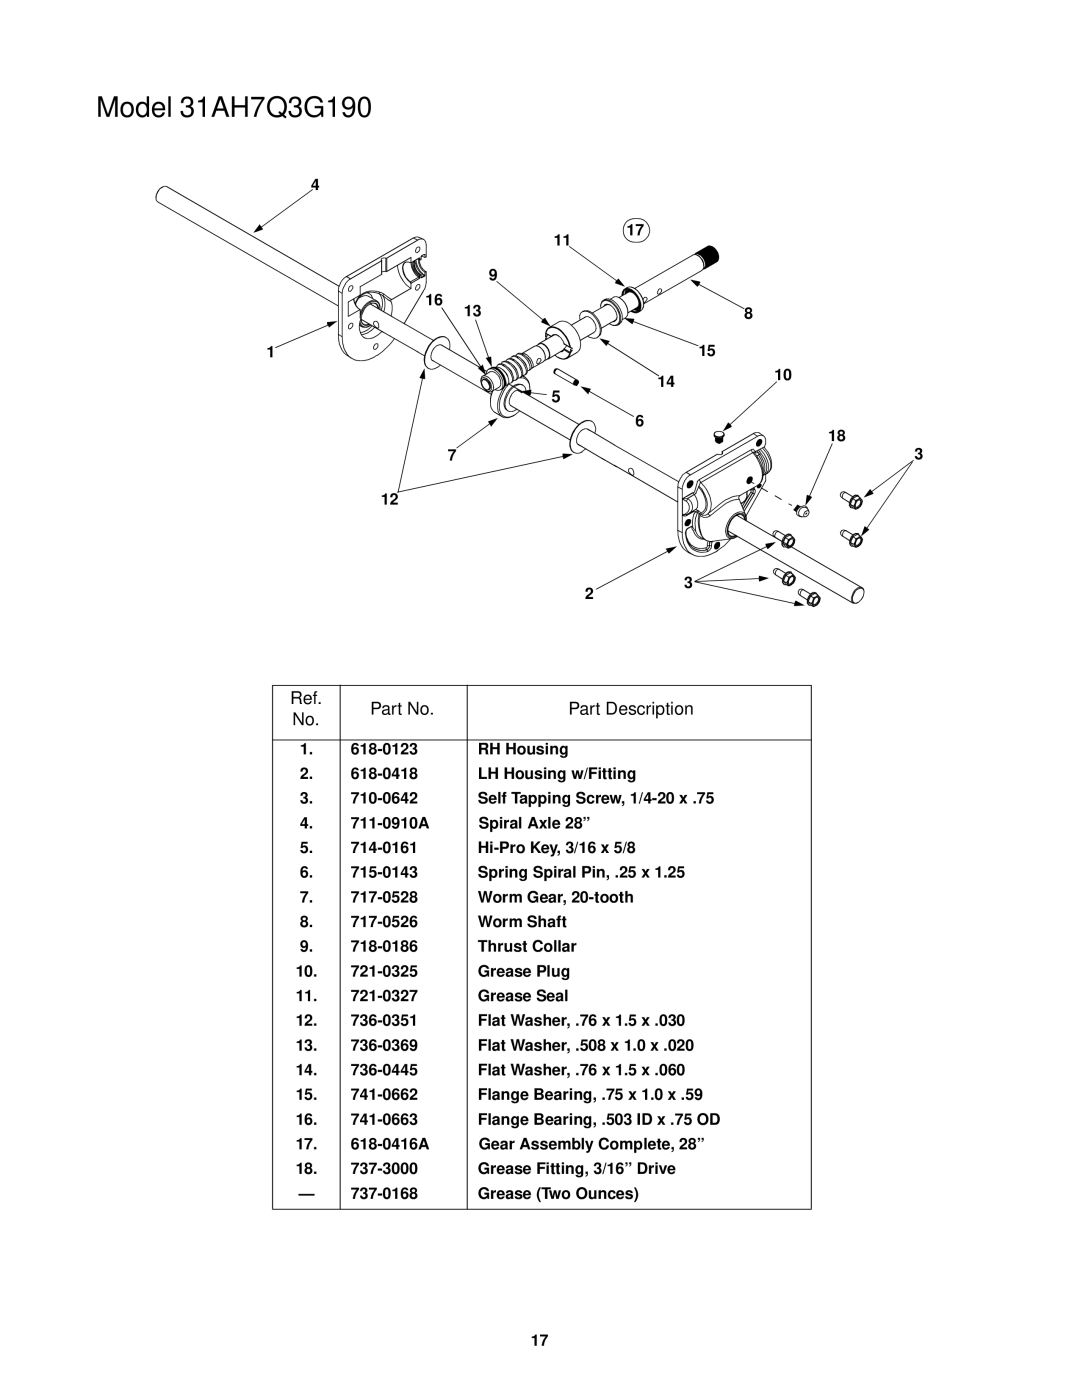
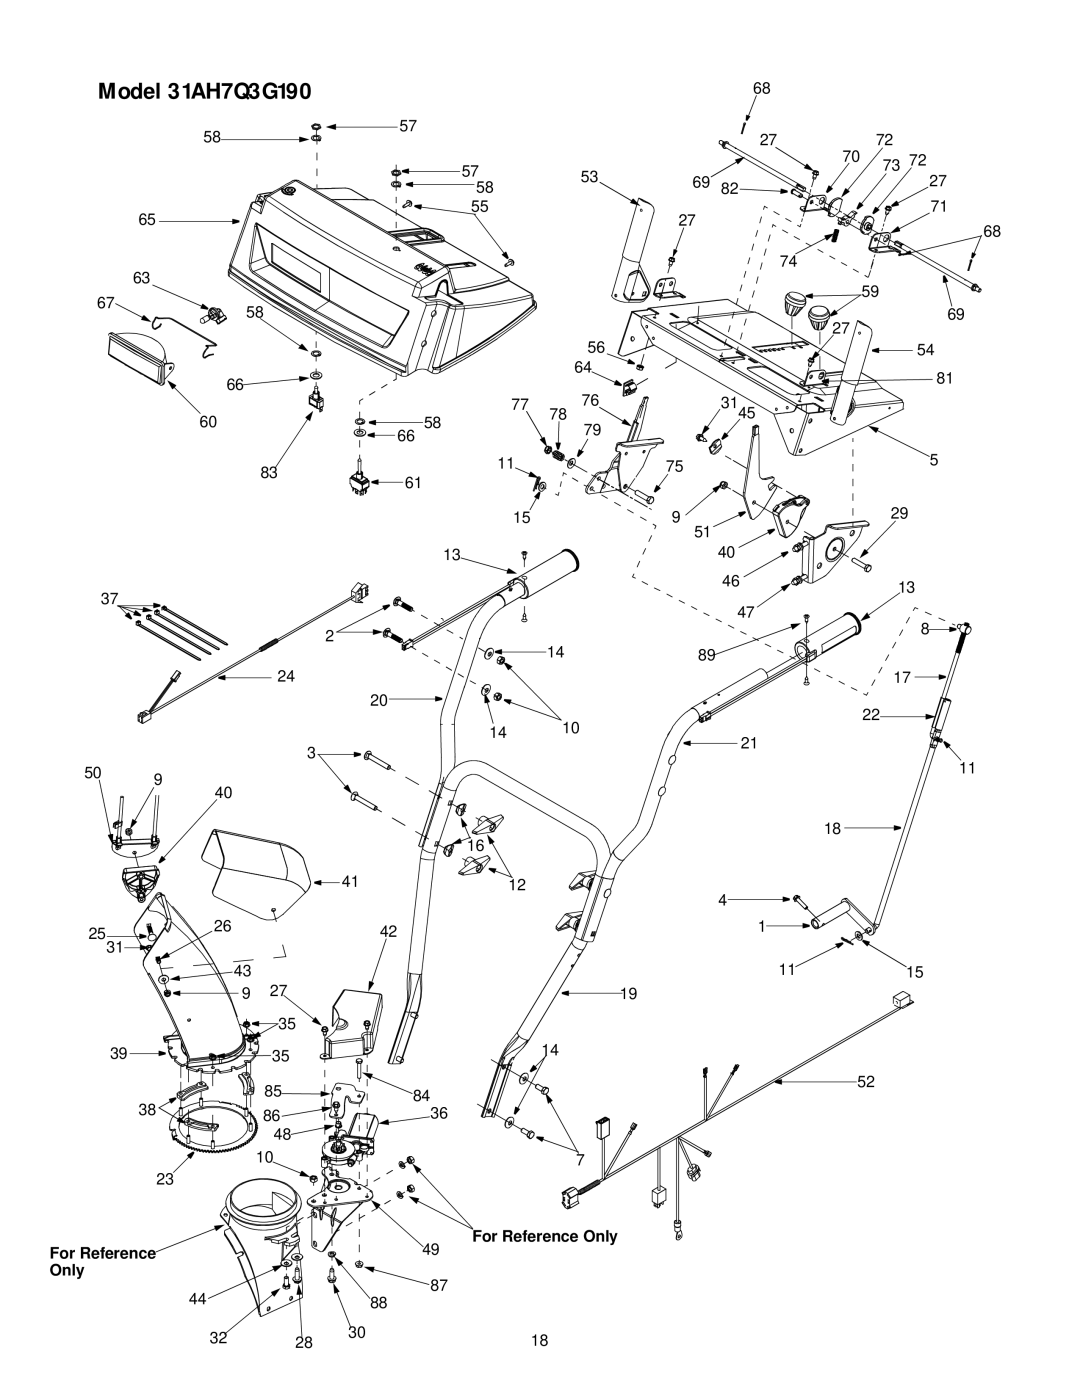
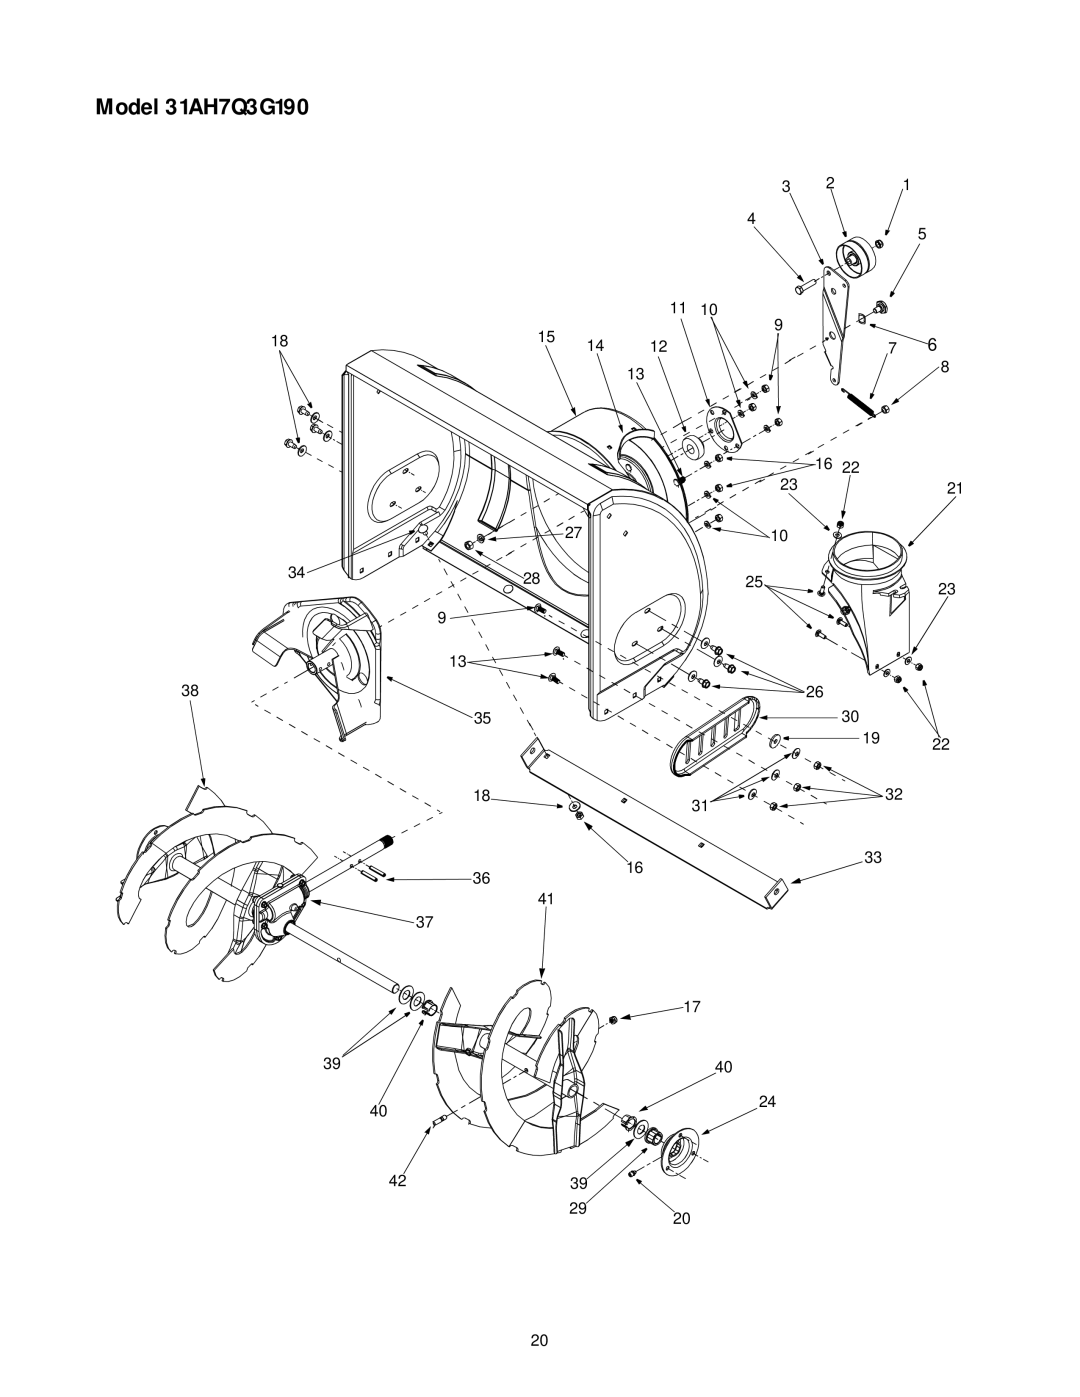
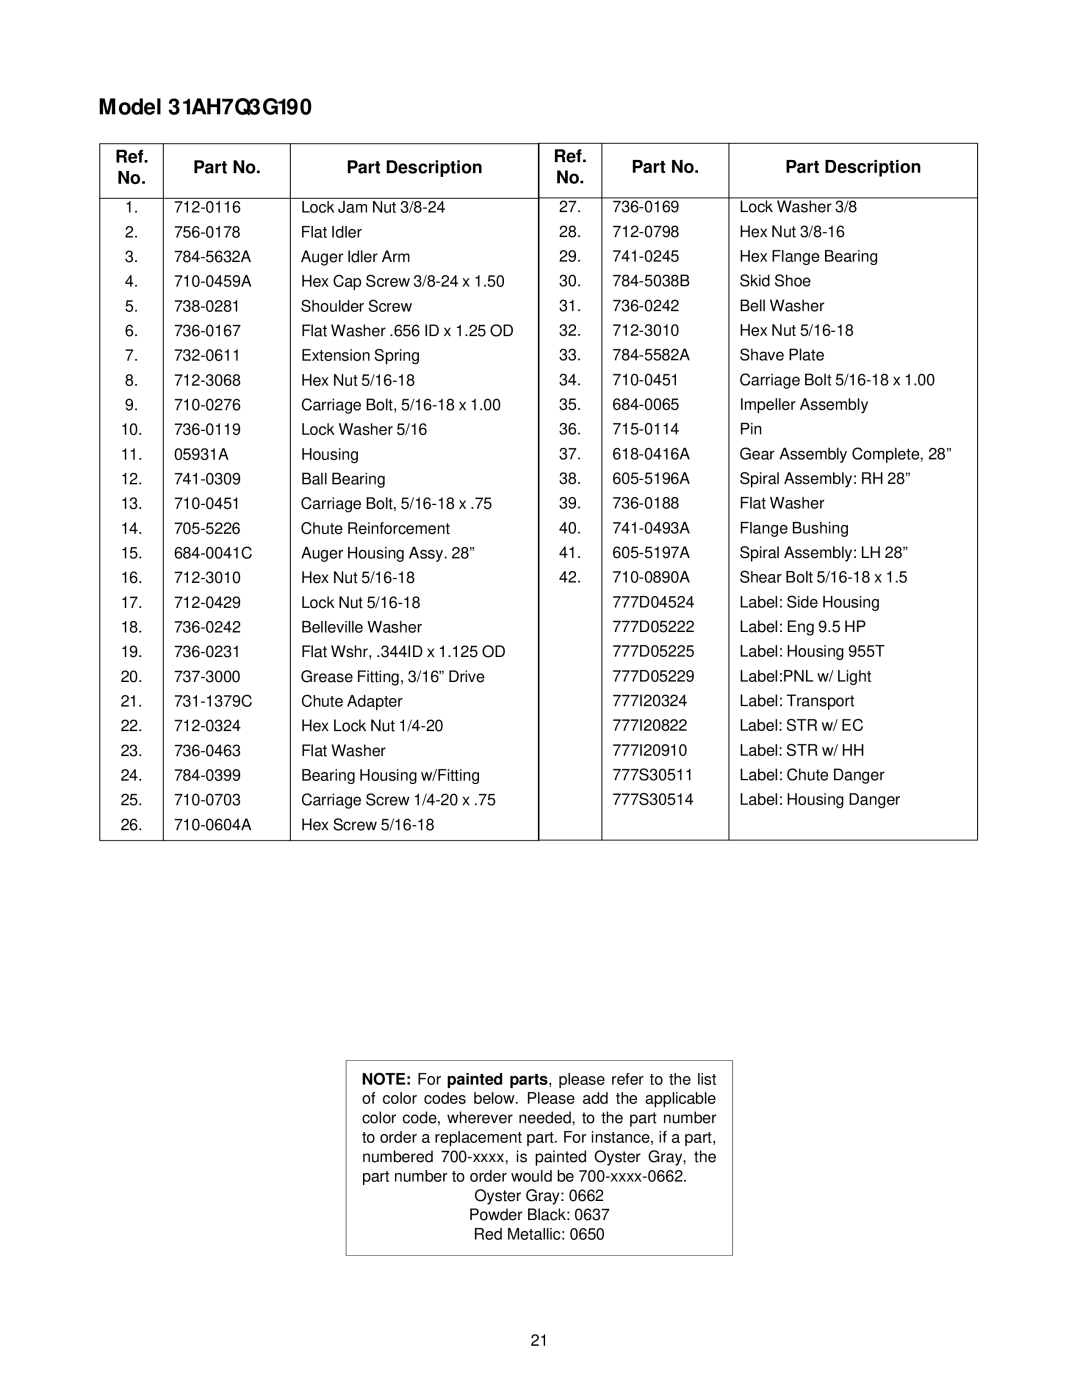
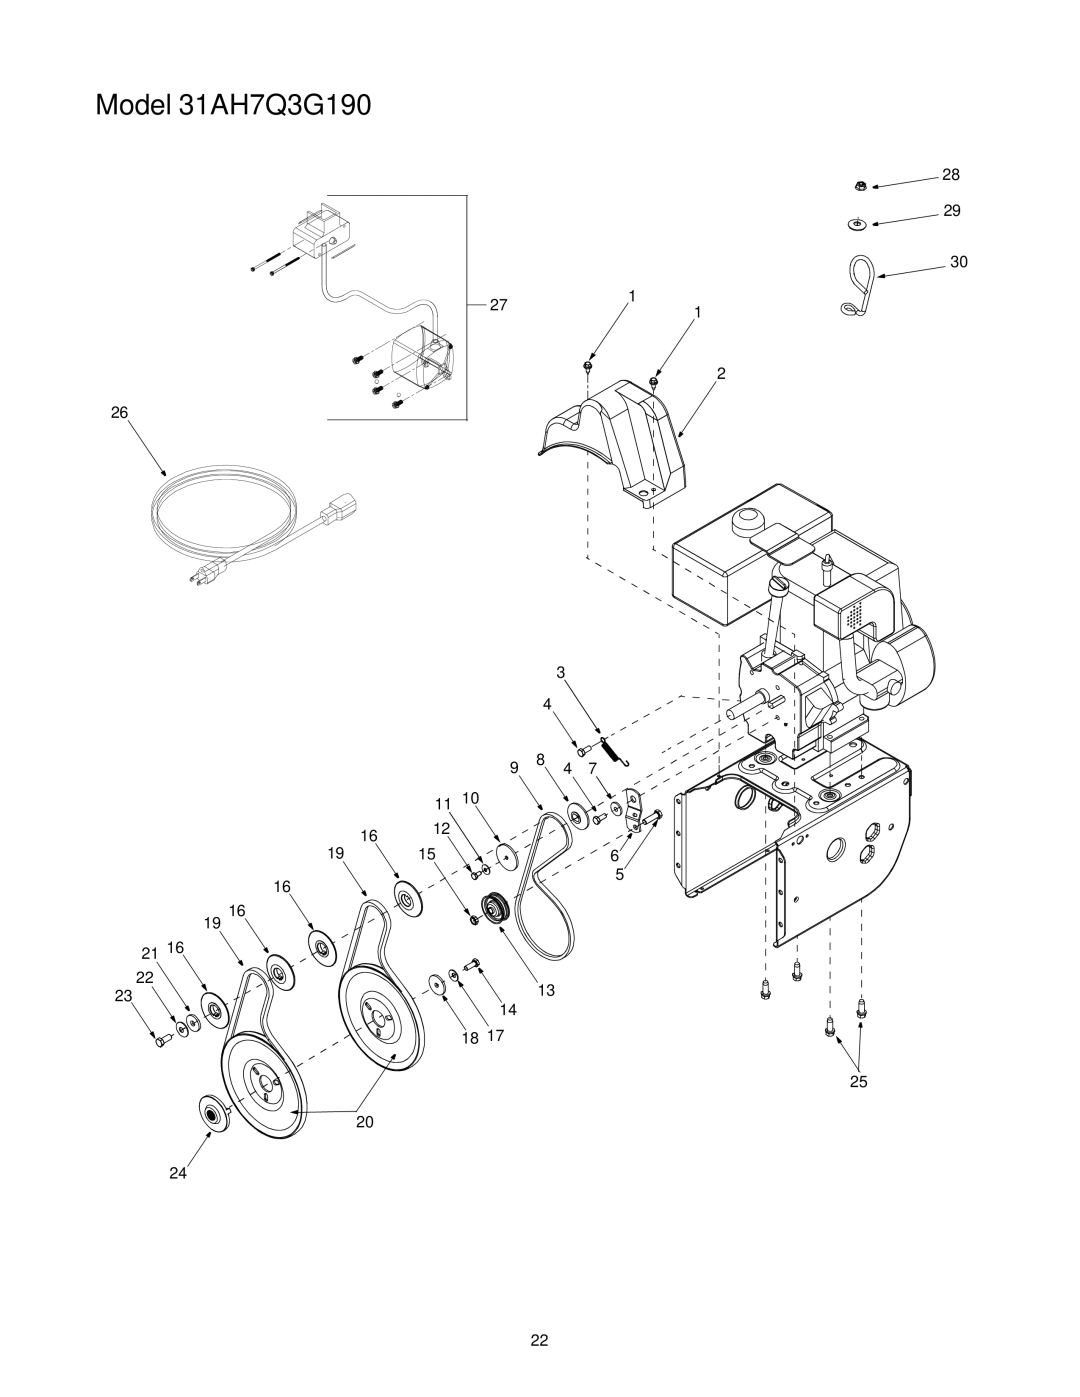
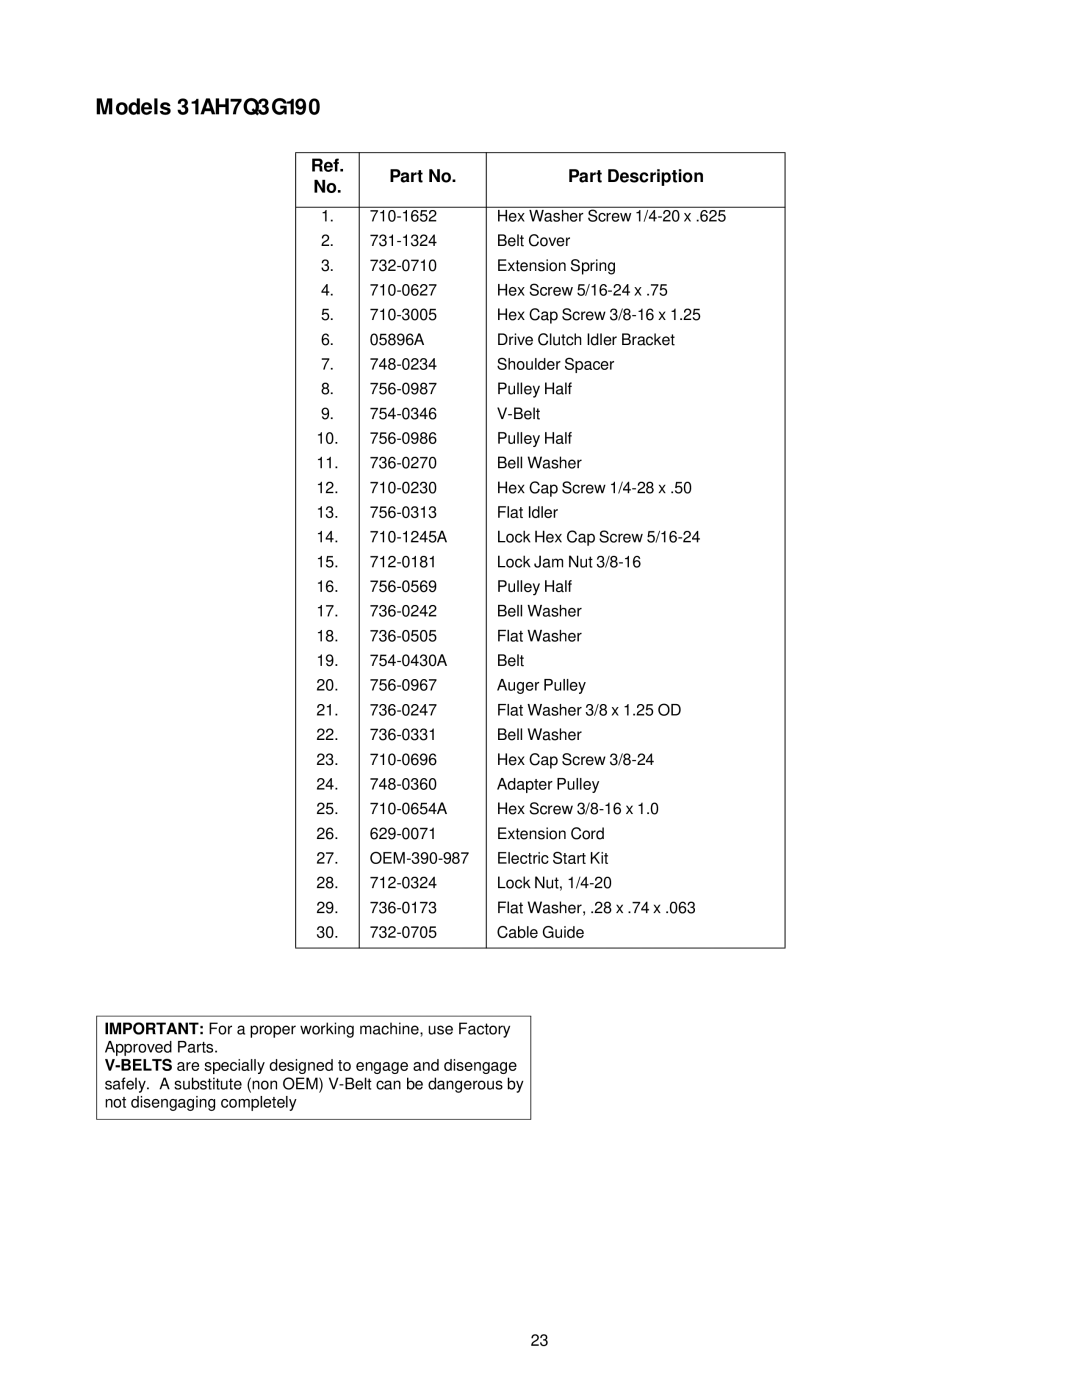
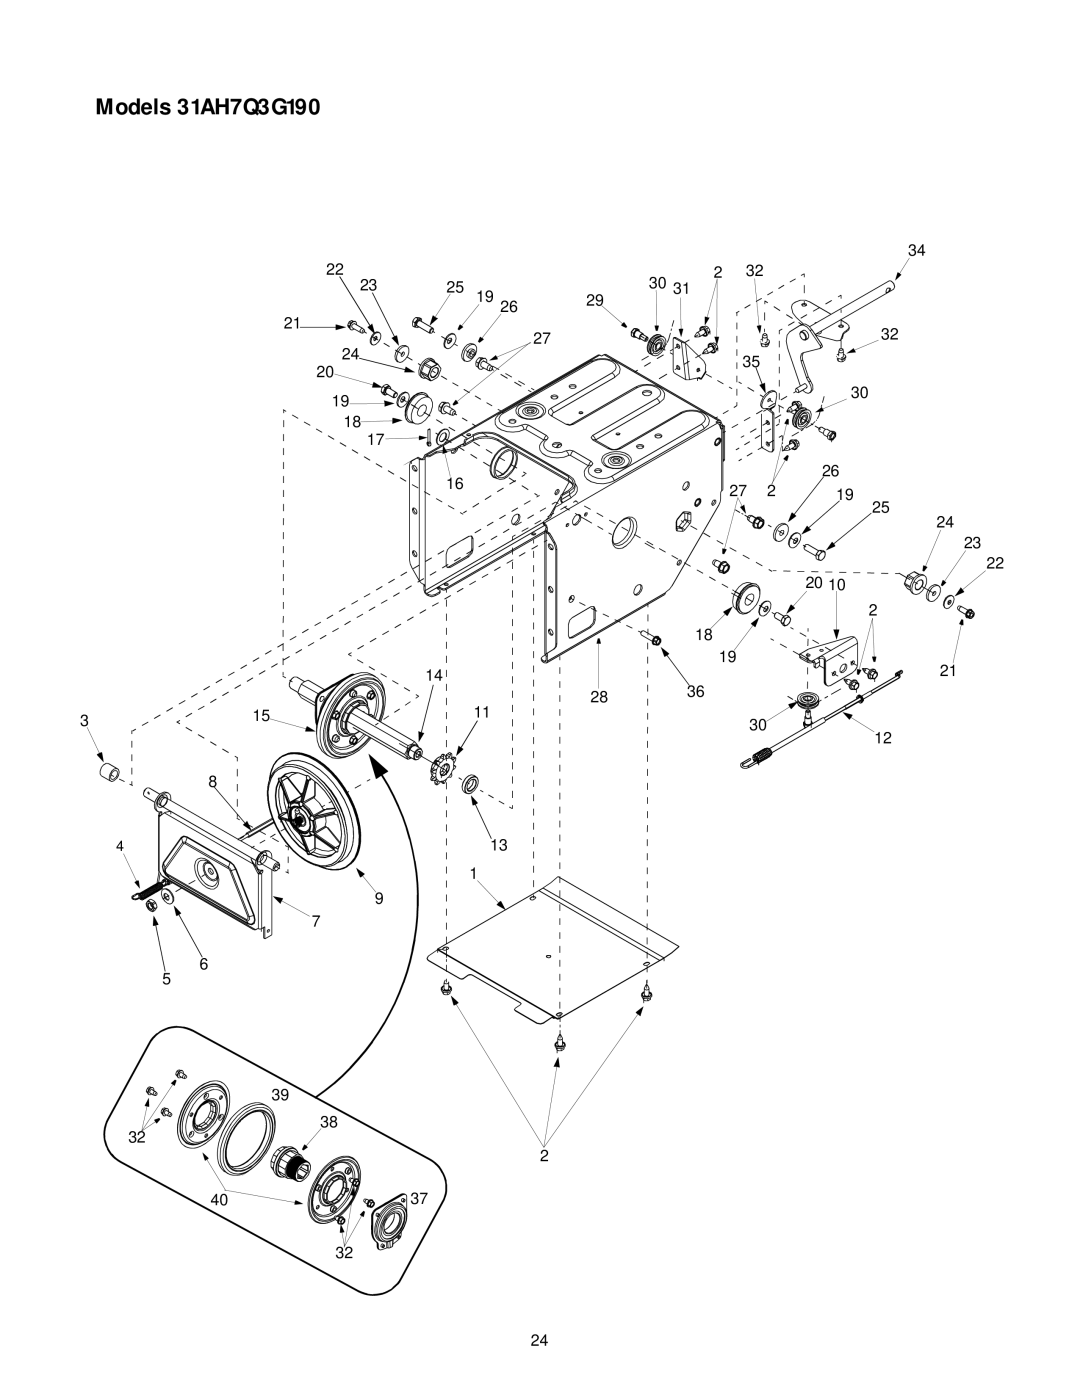
Contents OPERATOR’S Manual Table of Contents Training Important Safe Operation PracticesPreparation OperationMaintenance And Storage Assembling Your Snow Thrower AssemblyUnpacking Loose PartsAuger Control Adjustment Final AdjustmentsSkid Shoe Adjustment Traction Control and Shift Lever AdjustmentChute Tilt Control Know Your Snow ThrowerAuger Drive Control Skid ShoeSafety Ignition Key Electric Chute-Rotation SwitchHeated Handles Switch Track Steering ControlsOperating Your Snow Thrower Auger Control Adjustment Skid Shoe AdjustmentChute Assembly Adjustment Traction Control AdjustmentLubrication Shift Rod AdjustmentMaintaining Your Snow Thrower Augers Servicing Your Snow ThrowerEngine Shave Plate and Skid Shoes Belt Removal And ReplacementAuger Belts Drive BeltOff-season Storage Servicing Friction Wheel RubberPage Problem Cause Remedy TroubleshootingPart Description Model 31AH7Q3G190For Reference Only 17 -0620A Shift Rod Upper 18 -0621 Shift Rod Lower 749-0951 2321 Oyster Gray Powder Black Red Metallic Model 31AH7Q3G190 Models 31AH7Q3G190 22 20 Model 31AH7Q3G190 Models 31AH7Q3G190 Models 31AH7Q3G190 MANUFACTURER’S Limited Warranty for

31AH7Q3G190 specifications

The White Outdoor 31AH7Q3G190 is a versatile and robust snow blower designed to tackle the toughest winter conditions. Built to cater to homeowners looking for an efficient solution to their snow removal needs, this model combines power, durability, and user-friendly features.

One of the standout features of the 31AH7Q3G190 is its 24-inch clearing width, allowing users to clear a wide path quickly and effectively. This wide auger ensures that even heavier snow accumulations can be handled with ease, making it ideal for areas with significant snowfall. The snow blower boasts a powerful 208cc engine, providing the necessary torque and reliability needed to handle various snow conditions, from light flurries to heavy, wet snow.

The snow blower is equipped with a 6-speed transmission, offering operators the flexibility to adjust their speed as needed. This feature allows for efficient maneuvering, whether on flat driveways or sloped surfaces. Additionally, the unit features an adjustable chute that can rotate 180 degrees, giving users precise control over snow direction. This is particularly valuable when clearing driveways or sidewalks, enabling users to avoid unwanted snow piles.

For enhanced usability, the 31AH7Q3G190 is designed with electric start technology, ensuring that starting the machine is hassle-free. This is a particularly attractive feature for those who may struggle with traditional pull-start mechanisms in cold weather. The snow blower’s heavy-duty construction also includes reinforced handles that provide comfort and stability during operation, while the large, rugged tires offer superior traction, allowing users to traverse snowy terrains without slipping.

Safety is also a priority with this snow blower. It includes features such as an operator presence control, which ensures that the machine only operates when the user is in control. This minimizes the risk of accidents during operation, adding an extra layer of security.

In summary, the White Outdoor 31AH7Q3G190 snow blower combines power, efficiency, and user-centered design. Its durable build, powerful engine, and functional features make it an excellent choice for homeowners needing a reliable snow removal solution. Whether dealing with light dustings or heavy snowfalls, this snow blower delivers performance and convenience, ensuring that winter weather doesn't become a burden. Its combination of innovation and practicality stands as a testament to quality engineering, making it a valuable addition to any winter toolkit.