CONNECTING PROJECTOR
CONNECTING TO COMPUTER
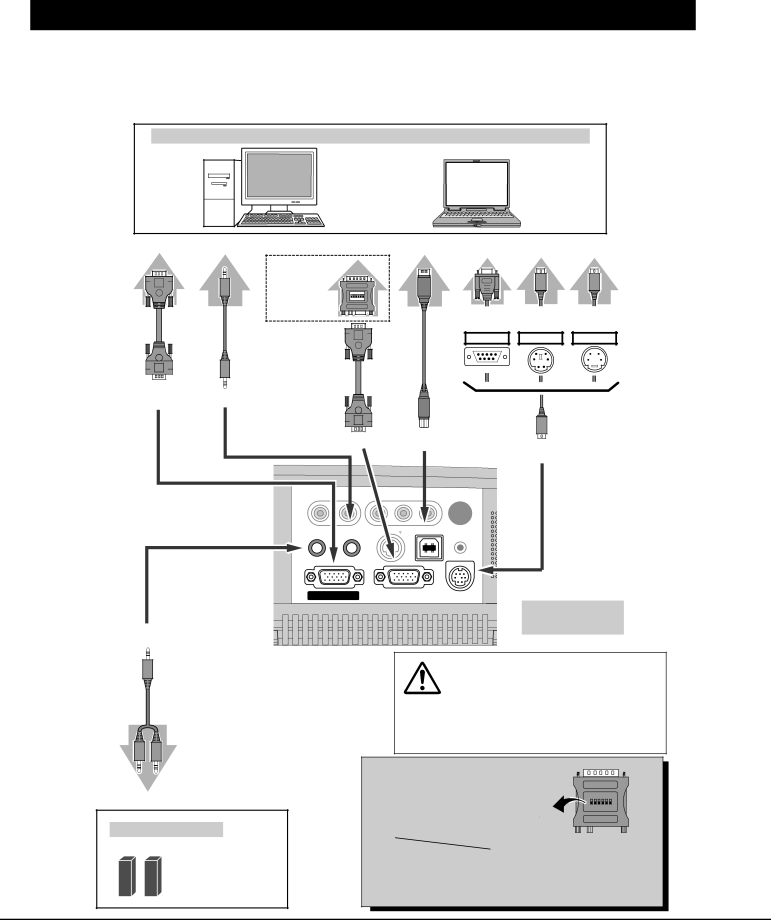
Cables used for connection (✽ = Cable or adapter is not supplied with this projector.)
• VGA Cable (HDB 15 pin) | • USB Cable ✽ |
• Control Cable for PS/2 Port | • MAC Adapter (When connecting to Macintosh computer) ✽ |
• Control Cable for Serial Port ✽, or ADB Port ✽ | • Audio Cables (Mini Plug (stereo) x 1) ✽ |
| Desktop type | Laptop type | |
Monitor Input Audio Output | Monitor Output | USB port | Serial port PS/2 port ADB port |
MAC Adapter ✽
Set slide switches |
according to the
| chart below. |
|
|
|
|
|
|
|
VGA Cable ✽ |
|
| Control Cable | Control Cable | Control Cable |
|
| |
Audio |
| for Serial Port ✽ | for PS/2 Port | for ADB Port ✽ |
|
| ||
|
|
|
|
|
|
|
| |
| Cable ✽ |
| Terminal | Terminal | Terminal |
|
| |
| (stereo) |
|
|
|
|
|
|
|
|
| USB |
|
|
|
|
|
|
| VGA Cable | Cable ✽ |
|
|
|
|
| |
MONITOR OUT | AUDIO IN COMPUTER |
|
|
| Use one of these Control | |||
|
|
|
|
| Cables corresponding with | |||
|
|
|
|
| the | terminal | of | your |
| COMPUTER IN | USB |
| computer. |
|
| ||
|
|
|
|
|
| |||
CONTROL PORT
R – AUDIO IN – L
VIDEO
(MONO) Y – Pb / Cb – Pr / Cr
EXT.SP(8Ω) (STEREO)
AUDIO IN | S – VIDEO | USB |
COMPUTER |
| RESET |
|
|
MONITOR OUT | COMPUTER IN CONTROL PORT |
EXT. SP(8Ω)(STEREO)
Audio Cable
(stereo) ✽
Terminals
of the Projector
NOTE :
When connecting the cable, the power cords of both the projector and the external equipment should be disconnected from AC outlet. Turn the projector and peripheral equipment on before the computer is switched on.
Audio Input
Speaker Terminal
External Speaker
◆MAC ADAPTER (Not supplied)
Set switches as shown in the table ON |
|
|
|
|
|
|
|
|
|
|
|
|
|
|
|
| ||||||
below depending on RESOLU- |
|
|
|
|
|
|
|
|
|
|
|
|
|
|
|
|
|
|
| |||
|
|
|
|
|
|
| ON |
|
|
|
| DIP |
|
|
| |||||||
TION MODE that you want to use |
|
|
|
|
|
| 1 | 2 | 3 |
| 4 |
| 5 | 6 |
|
|
|
| ||||
before you turn on projector and |
|
|
|
|
|
|
|
|
|
|
|
|
|
|
|
|
|
| ||||
OFF |
|
|
|
|
|
|
|
|
|
|
|
|
|
|
|
| ||||||
computer. |
|
|
|
|
|
|
|
|
|
|
|
|
|
|
|
|
|
|
|
|
| |
|
|
|
|
|
|
|
|
|
|
|
|
|
|
|
|
|
|
|
|
| ||
|
| 1 |
| 2 | 3 | 4 |
|
|
|
| 5 |
|
|
|
| 6 |
| |||||
| 13" MODE (640 x 480) | ON |
| ON | OFF | OFF |
| OFF |
|
|
| OFF | ||||||||||
| 16" MODE (832 x 624) | OFF |
| ON | OFF | ON |
| OFF |
|
|
| OFF | ||||||||||
| 19" MODE (1024 x 768) | OFF |
| ON | ON | OFF |
| OFF |
|
|
| OFF | ||||||||||
| 21" MODE (1152 x 870) | ON |
| ON | ON | ON |
| OFF |
|
|
| OFF | ||||||||||
12