Connecting the A-9755/A-9555—Continued
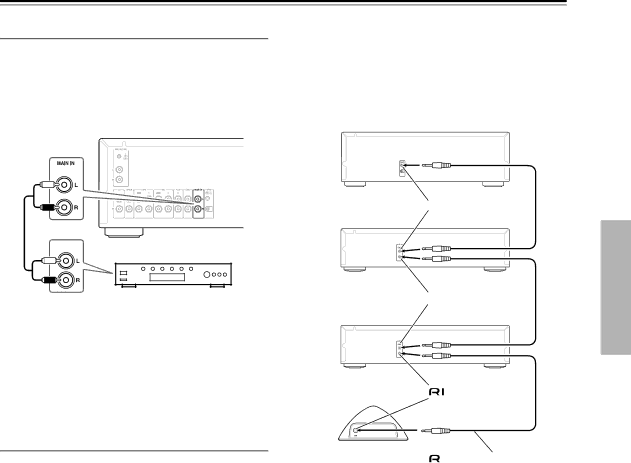
Connecting a Preamp (A-9755 only)
The
In this case, use an analog audio cable to connect the
With ![]() (Remote Interactive), you can control your
(Remote Interactive), you can control your ![]()
•To use![]() , you must make an analog audio con- nection between the
, you must make an analog audio con- nection between the
PRE OUT
Notes:
Onkyo CD player
![]()
![]() connector
connector
![]()
![]() connector
connector
•Do not connect a component that does not have an output volume control, because the sound will be out- put at maximum volume and may damage the
•To turn on the MAIN IN function, press the [POWER AMP DIRECT (MAIN IN)] button for 3 seconds until the indicator lights up (page 17).
Connecting 
 Components
If you connect other Onkyo components to the
![]() and audio cables, you can use the following system functions.
and audio cables, you can use the following system functions.![]() cables are special cables solely for use with Onkyo
cables are special cables solely for use with Onkyo
products (no ![]() cables are supplied with the
cables are supplied with the
Auto Power On
When you turn on the power or start playback on a com- ponent that’s connected to the
Direct Change
When playback is started on an audio component con-
nected via ![]() , the
, the
Remote Control Operation
You can control all components in your system by using the
Onkyo cassette |
|
deck, etc. | connector |
Remote Interactive |
| Remote control cable |
Dock, etc. |
| |
|
|
Notes:
•Push each plug in all the way to make a good connec- tion.
•Use only dedicated ![]()
![]() cables for
cables for ![]()
![]() connections
connections
(no ![]()
![]() cables are supplied with the
cables are supplied with the
•The ![]()
![]() jacks. They’re all the same, so you can use either of them.
jacks. They’re all the same, so you can use either of them.
•![]()
![]() jacks should be connected only to Onkyo compo- nents. Connecting them to another manufacturer’s component may cause the
jacks should be connected only to Onkyo compo- nents. Connecting them to another manufacturer’s component may cause the
•Some components may not support all ![]()
![]() functions. See the manuals supplied with your other Onkyo components for more information.
functions. See the manuals supplied with your other Onkyo components for more information.
•When using the
function), the ![]()
![]() system functions are unavailable.
system functions are unavailable.
13