Mitsubishi Electronics HC3100 Viewing video images, Connecting to a video player, etc, EN-14

Page 14

Viewing video images (continued)

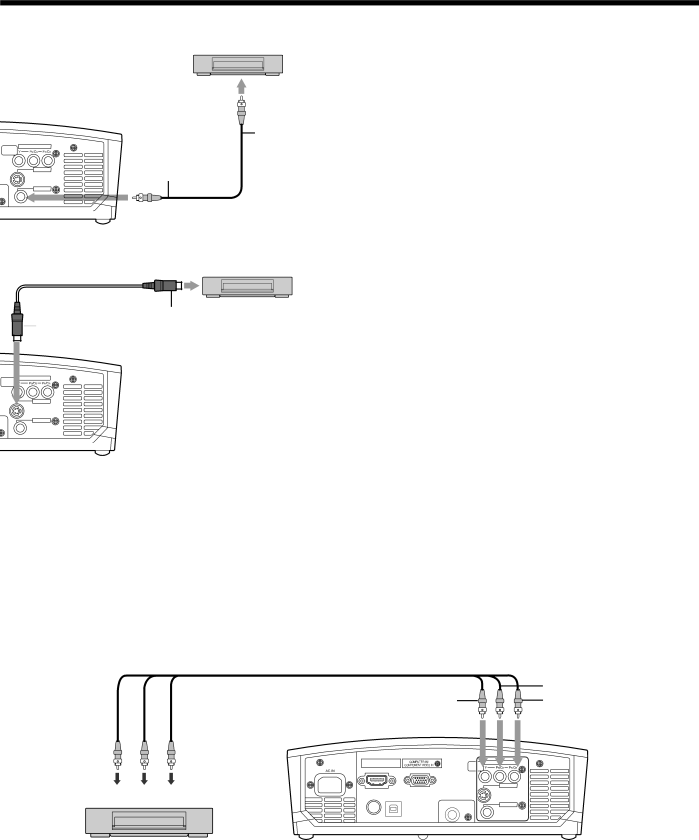
Connecting to a video player, etc.

Video player, or the like

1.Connect one end of the optional video cable to the VIDEO IN terminal of the projector.

2.Connect the other end of the video cable to the video output terminal of the video equipment.

COMPONENT VIDEO IN

S-VIDEO IN

VIDEO IN

S-video cable (option)

1 To S-VIDEO IN terminal

2

To video out- put terminal

1To VIDEO IN terminal

Video cable (option)

Video player, or the like

2To S-video output terminal

When the video equipment is equipped with the S-video output terminal, make the connection as follows:

1.Connect one end of the optional S-video cable to the S-VIDEO IN terminal of the projector.

2.Connect the other end of the S-video cable to the S-video output terminal of the video equipment.

COMPONENT VIDEO IN

S-VIDEO IN

VIDEO IN

Also read the instruction manual of the equipment to be connected.

Contact your dealer for details of connection.

When a TV tuner or VCR is connected:

When you use this projector with a TV tuner or VCR connected, no image may appear or a message of NO SIGNAL may appear on the screen when you change the channel via any channel that is not being received. In such a case, set the channels of the TV tuner or VCR again. To avoid such symptom, use the TV tuner or VCR with its channel skip function (that is a function not to display channels that are not being received) enabled.

Connecting to a DVD player or HDTV decoder

To connect this projector to video equipment that has component video output terminals, such as a DVD player, use the COMPONENT VIDEO IN terminals.

Component cable (option)

Y

PB/CB PR/CR

HDMI IN

PR/CR PB/CB

Y

SERIAL USB


VIDEO IN


S-VIDEO IN

TRIGGER

VIDEO IN

DVD player or HDTV decoder

The terminal’s names Y, PB, and PR are given as examples of when a HDTV decoder is connected.

The terminal’s names vary depending on the connected devices.

Images may not be projected correctly depending on the type of the DVD player you use.

Though it may take some time before an image is displayed on the screen depending on the type of the input signal, such symptom is not a malfunction.

When connecting a HDTV decoder having RGB output terminals, set COMPUTER INPUT to RGB in the SIGNAL menu.

EN-14

Image 14
Contents HC3100 Risk of Electric Shock Do not Open When using the projector in EuropeEN-2 Contents Important safeguards EN-4EN-5 Preparing your projector Checking accessoriesInserting the batteries into the remote control EN-7 OverviewControl area Terminal panel Preparing your projector Remote controlUsing the picture quality adjusting buttons Bottom sideReception angle Using the remote controlOperational range of the remote control EN-9Basic setup Setting up your projectorSetting up the screen Adjusting the projection angleTrigger terminal With the Installation menu See page 24 for menu settingTo cancel the menu EN-11Screen size and projection distance Setting up your projectorWhen the aspect ratio of the screen is EN-12Basic home theater system connection Connecting the projector to video equipmentViewing video images EN-13When a TV tuner or VCR is connected Connecting to a video player, etcConnecting to a DVD player or Hdtv decoder Viewing video imagesConnection for video equipment having a DVI-D terminal EN-15Connection for video equipment having an Hdmi terminal Plugging in the power cord EN-16Projecting images EN-17EN-18 When projected images are distorted to a trapezoidTo stop projecting Following casesWith the remote control Setting the aspect ratioHow to change the settings With the Feature menuViewing computer images Connecting the projector to a computerPlugging the power cord EN-20Projecting images EN-21Viewing computer images When connecting to a notebook computerExample of the setting procedure for external output Auto Position buttonMenu operation EN-23Menu operation How to set the menusAvailable settings in the menus EN-24Installation menu EN-25Feature menu EN-26AV memory EN-27To adjust the color Color and Tint Adjusting projected imagesTo adjust the brightness Contrast and Brightness To sharpen or soften the projected image SharpnessTo adjust the ratio of change in brightness Gamma Mode To adjust the tone of white Color TempAbout color temperature EN-29EN-30 Adjusting projected imagesTo adjust the vertical position To enable the password function Advanced featuresPassword function To cancel the password functionCleaning Using filterInstallation Cleaning the filterEN-33 Interval of lamp replacementReplacing the lamp Replacing the lamp Cleaning of the projector and the ventilation slotsCleaning of the lens To replace the lampEN-35 TroubleshootingNo image appears on the screen ProblemSolution Images are not displayed correctly Problem Solution TroubleshootingNo image appears on the screen Problem Solution EN-36Others Problem Solution EN-37Abnormal condition IndicatorsNormal condition EN-38EN-39 Dimension drawings unit mmSpecifications Specifications ConnectorsReplacement part Option/not included in the box EN-40Mitsubishi Projector Contact Information