RCA DRS7000N manual Setup

Page 48

TruSurround is a trademark of SRS Labs, Inc. TruSurround technology is incorporated under license agreement from SRS Labs, Inc.

Chapter 5: The Menu System
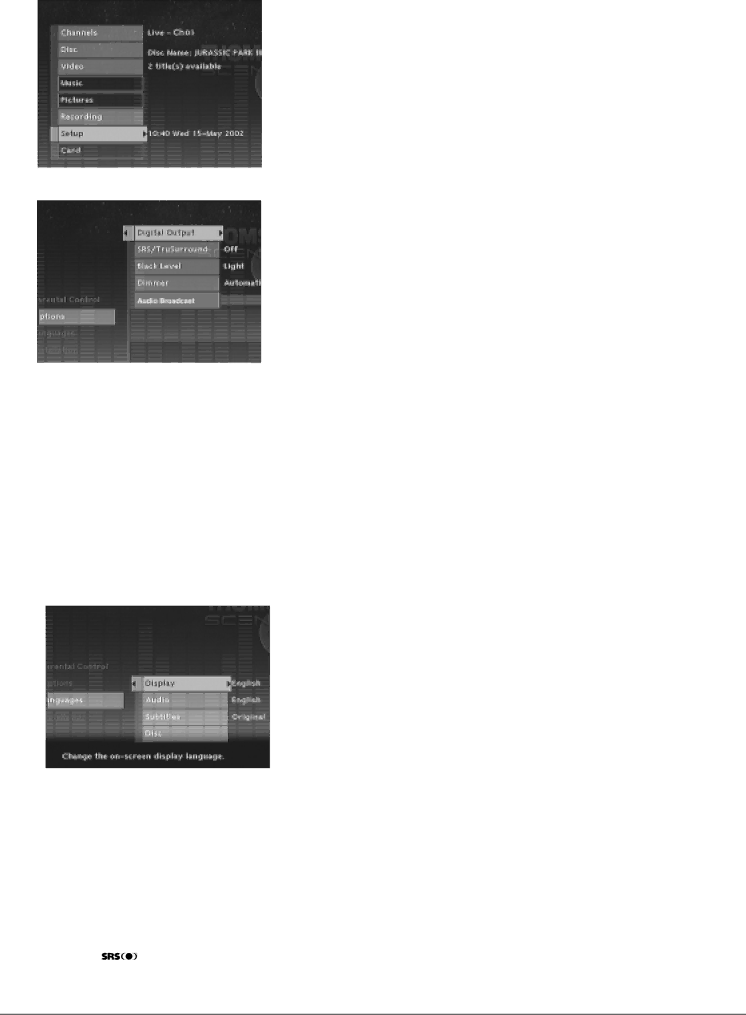
Setup

The Setup menu contains many submenus that are explained on the following pages. The following list is an overview. Follow the instructions at the bottom of the screen.

Note: To return to a previous menu, press the left arrow button.

Parental Controls: set ratings limits and a password for DVD discs. For details, go to page 47.

Options: Contains settings and menus for audio features, as well as black level settings and dimmer options for the front display of your Digital Media Recorder.

Digital Output: If you connected your Digital Media Recorder to a receiver via the DIGITAL AUDIO OUT jack (COAXIAL or OPTICAL) on the back of the player, choose the type of receiver (or decoder) you have: Dolby Digital and/or DTS.

Note: If you select DTS, and you don’t have a DTS receiver connected to the Digital Media Recorder you won’t hear any audio.

SRS/TruSurround: The TruSurround® feature simulates a six-speaker listening experience through just two speakers. The default setting is Off. To turn on the Virtual Surround® feature highlight SRS/TruSurround, and press OK. Highlight On and press the OK button.

Black Level: Adjusts how bright the picture appears. Choose between Dark and Light. Use the arrow buttons to highlight a choice and the OK button to select the choice that’s highlighted.

Dimmer: Adjusts the brightness of the display on the front of the Digital Media Recorder. Use the arrow buttons to highlight a setting, and the OK button to select the option that’s highlighted. The choices follow:

Automatic (the display automatically dims during playback); Bright; Dim.

Audio Broadcast: Selects audio format from the broadcast signal — Mono, Stereo, SAP (Second Audio Program). If you select SAP and the program you record is available with SAP audio, both SAP and mono audio will be recorded. During playback, you can decide which audio you want to play — SAP on the right channel or Mono on the left channel.

Languages: Selects different languages for on-screen menus, subtitles and audio language of certain discs.

Display: the language that appears when you access this menu the first time reflects the option you chose during the interactive setup. To change the language of the on-screen displays (menus), use the arrow buttons to highlight a language and press OK to select it.

Audio: the language that appears when you access this menu the first time reflects the option you chose during the interactive setup. You can change the audio language by highlighting an option and pressing the OK button.

Subtitles: Some movies on DVD discs have subtitles. Set up your default settings in this menu. You can quickly override these settings while playing a disc by using the Info Display (go to page 35 for information).

Automatic: matches the language you selected during interactive setup.

Off: subtitles won’t appear on the screen.

On: if the title (movie) has subtitles available, they will appear automatically.

Original: subtitle language will match the original audio (dialogue) language of the title (movie).

Disc: Many discs have their own menu that appears on the screen. You can select the language in which you want the disc menu displayed. In order for your setting to take effect, the disc’s menu must have been created with the corresponding language option.

Note: Currently, very few Region 1 discs have multiple language disc menus.

45

Image 48
Contents Users Guide Important Information Product RegistrationTable of Contents Connections and Setup Position cables properly to avoid audio interferenceConnection Pictures Types of discs your DVD player can playComponents Cables Needed CoaxialAudio/video To watch one program while you record another To play a videotapeConnection Digital Media Recorder + TV + VCR optional Go toTo play a disc or a show you’ve Recorded to the Digital Media RecorderConnection Digital Media Recorder + TV + Cable Box Connect the VCR to the TV optionalTo watch TV satellite programming Than the one pictured hereConnection Digital Media Recorder + TV + Satellite Receiver Connect the satellite receiver to the TVPlease Read This Before Using the Digital Audio Jacks Digital Media Recorder’s Audio JacksOutput Audio L left R rightLink cable Setup and Connections Install Batteries in the RemoteComplete the Interactive Setup Turn on the TV and Digital Media RecorderGuide Plus+ setup Connection List3d. Confirming Your Settings Satellite ReceiverChannel Search Channel ListWhat to Expect Turn on the Digital Media Recorder to Watch TVGuide Plus+ Program Guide How to find your TV’s Video Input Channel Button/Switch On the TVButton on TV remote Channel NumberChapter Remote Control Explanation of ButtonsRemote Control Find out if the remote can operate your TVProgramming the Remote to Operate your TV Television Codes 1003, 1004, 1006, 1019, 1020Remote Control VCR CodesCable Box SatelliteAudio Receivers RCA and Dimensia Using the Recorder’s Features Using the Recorder’s Features Setting up timer recordings to record programs automatically Recording from the Guide Plus+ on-screen programming guideCopying music or pictures to the Digital Media Recorder Copying from a disc to the Recorder’s hard disk driveCopying music or pictures from a compact flash card Renaming picture and/or music filesPlaying programs you’ve recorded Using the Guide Plus+ System About Guide Plus+ System Program GuideGuide Plus+ System Menu Bar Listings Guide SortAction buttons Locking the Video WindowSetup NewsMessages Promotions and AdvertisingPlaying Discs Chapter Using Different Menus Regional CodingTo Load and Play Discs Playing Discs Search OptionsPlayback options Quick Fast Forward and Quick ReverseUsing the On-Screen Info Display Time display Chapter Audio Angle Title Subtitles RepeatTime display Track Playing Discs DVDs Time DisplaySelecting a Title on DVDs or a Track on CDs Selecting a ChapterUsing the Repeat Feature Repeating Titles, Chapters, or TracksAB Repeat Changing the Audio LanguagePlay Mode Feature Audio CDs Changing the Camera AngleRandom ProgramPlaying Discs Audio CDs Playing Video CDs VCDsIntroScan Playback Control PBCPlaying Discs MP3s Playing MP3 DiscsFor more help and recommendations about MP3 files, go to Playing Discs Jpeg files Viewing Jpeg filesSlide Show Saving Jpeg files to the hard disk driveMenu System How to navigate through on-screen menus Menu SystemOverview of the Digital Media Recorder’s Menu System Main MenuChannels Disc MenuVideo MusicPictures RecordingsSetup Memory Card Using Parental Controls PasswordLock and Unlock Rating Limits To set RatingsUnrated Titles Additional Information Troubleshooting Additional InformationNo sound or distorted sound Can’t advance through a moviePicture is distorted and/or fuzzy Play doesn’t beginLost the remote control Remote won’t workCan’t program the remote Can’t get to Digital Media Recorder’s main menuMaintenance of Cabinet Cleaning DiscsHandling Cautions Formation of CondensationBack of the Digital Media Recorder Explanation of Jacks from left to rightFront Panel Controls Underneath the doorExplanation of Input Jacks and Cables Component Video Y, Pb, Pr Jacks and CablesVideo Jacks and Cables Audio/Video Jacks and Cables RCA-typeLimited Warranty What your warranty coversHow you get service For how long after your purchaseWhat your warranty does not cover Limitation of WarrantyHow state law relates to warranty If you purchased your product outside the United StatesAccessory Information Memory Card Readers* Not PicturedThis page intentionally left blank This page intentionally left blank Thomson multimedia Inc North Meridian Street Indianapolis, Trademarks Registered Marcas RegistradasTocom 1590938A Rev Thomson multimedia Inc