THE MENU SYSTEM
THE OPTIONS MENU
SETTING THE AUDIO INPUTS
The Cinema Screen’s audio sources are programmable to the each of the display’s video sources. For example, you can program AUDIO1 source to work with the RGB2 video source.
This feature is generally used only for commercial applications.
1.From the main menu, highlight and select OPTIONS. The OPTIONS menu is displayed.
2.Highlight the one of the audio input options.
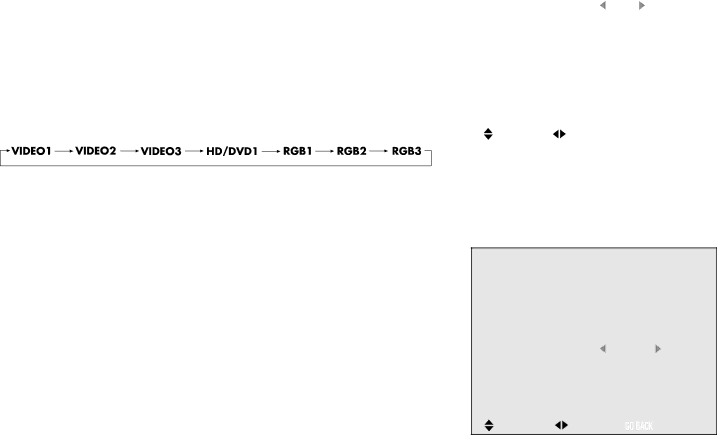
3.Use the ![]() button to scroll through the available video sources. The modes scroll as follows:
button to scroll through the available video sources. The modes scroll as follows:
4.When the desired mode is selected, press the ![]() button to return to the OPTIONS menu items. You can continue making adjustments within the OPTION menu, press GO BACK to return to the previous menu or press MENU or CLEAR to exit the menu system.
button to return to the OPTIONS menu items. You can continue making adjustments within the OPTION menu, press GO BACK to return to the previous menu or press MENU or CLEAR to exit the menu system.
SETTING THE BNC CONNECTORS
By default, the BNC inputs are set to RGB1, or composite video. If the component you are connecting to the BNC jacks doesn’t have composite video jacks, you can set the BNC inputs to act as component video.
1.From the main menu, highlight and select OPTIONS. The OPTIONS menu is displayed.
2.Highlight the BNC SELECT option.
3.Use the ![]() button to toggle between RGB2 (composite) and CMPNT2. (component).
button to toggle between RGB2 (composite) and CMPNT2. (component).
4.Once you’ve selected the desired setting, press the ![]() button to return to the OPTIONS menu items or press CLEAR to return to the main menu.
button to return to the OPTIONS menu items or press CLEAR to return to the main menu.
The factory defaults are as follows:
•RGB1 – AUDIO1
•VIDEO INPUTS – AUDIO 2
•COMPONENT INPUTS – AUDIO3
If you use the reset option, the settings will return to the factory default settings.
|
|
| O P T I O N S | ||||
AUDIO INPUT |
|
|
|
| |||
|
|
|
| : RGB1 | |||
| AUDIO1 |
|
| ||||
| AUDIO2 |
| : VIDEO1 | ||||
| AUDIO3 |
| : CMPNT1 | ||||
BNC SELECT | : RGB2 | ||||||
RGB SELECT | : RGB | ||||||
HD SELECT |
| : | 1080A | ||||
RGB3 ADJUST | : | 1 |
|
| |||
SEL. | ADJ. |
|
|
| RETURN | ||
|
|
| |||||
|
|
|
|
|
|
|
|
This is the OPTIONS menu with the AUDIO1 input option highlighted.
OPTIONS
| AUDIO INPUT |
|
|
|
|
| AUDIO1 | : RGB1 | |||
| AUDIO2 | : VIDEO1 | |||
| AUDIO3 | : CMPNT1 | |||
|
| : CMPNT2 | |||
| BNC SELECT | ||||
| RGB SELECT | : RGB | |||
| HD SELECT | : | 1080A | ||
| RGB3 ADJUST : | 1 |
|
| |
| SEL. | ADJ. |
|
| RETURN |
|
|
| |||
This is the OPTIONS menu with the BNC SELECT option highlighted.
35