Panasonic Official Manual for VIERA Models

Page 45

(Continued)

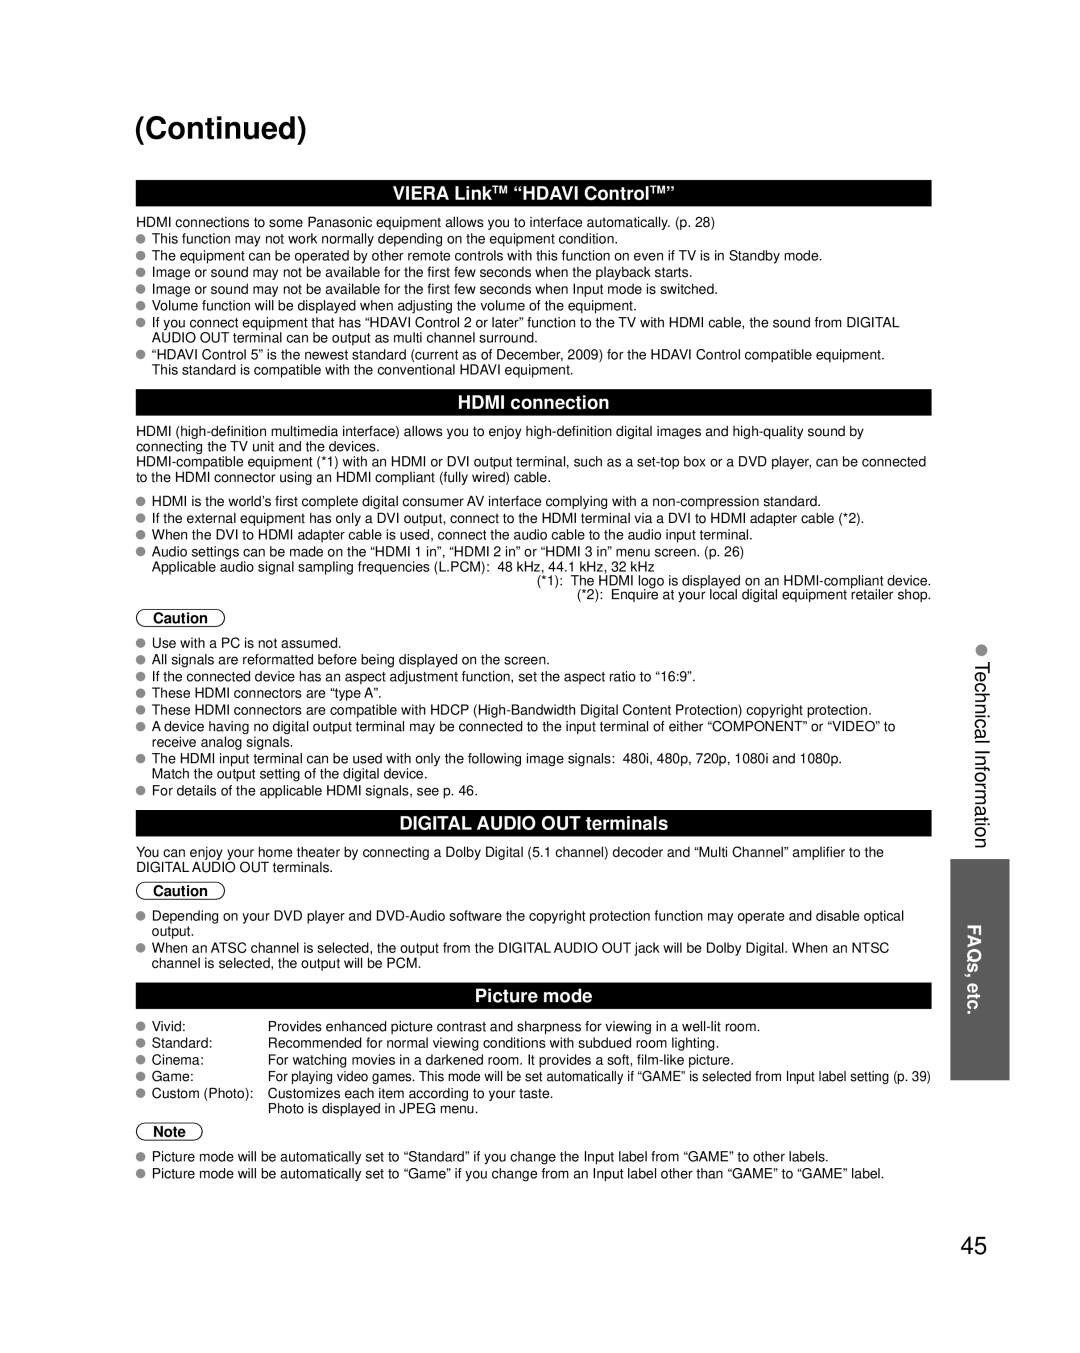
VIERA LinkTM “HDAVI ControlTM

HDMI connections to some Panasonic equipment allows you to interface automatically. (p. 28) This function may not work normally depending on the equipment condition.

The equipment can be operated by other remote controls with this function on even if TV is in Standby mode. Image or sound may not be available for the first few seconds when the playback starts.

Image or sound may not be available for the first few seconds when Input mode is switched. Volume function will be displayed when adjusting the volume of the equipment.

If you connect equipment that has “HDAVI Control 2 or later” function to the TV with HDMI cable, the sound from DIGITAL AUDIO OUT terminal can be output as multi channel surround.

“HDAVI Control 5” is the newest standard (current as of December, 2009) for the HDAVI Control compatible equipment. This standard is compatible with the conventional HDAVI equipment.

HDMI connection

HDMI (high-definition multimedia interface) allows you to enjoy high-definition digital images and high-quality sound by connecting the TV unit and the devices.

HDMI-compatible equipment (*1) with an HDMI or DVI output terminal, such as a set-top box or a DVD player, can be connected to the HDMI connector using an HDMI compliant (fully wired) cable.

HDMI is the world’s first complete digital consumer AV interface complying with a non-compression standard.

If the external equipment has only a DVI output, connect to the HDMI terminal via a DVI to HDMI adapter cable (*2). When the DVI to HDMI adapter cable is used, connect the audio cable to the audio input terminal.

Audio settings can be made on the “HDMI 1 in”, “HDMI 2 in” or “HDMI 3 in” menu screen. (p. 26) Applicable audio signal sampling frequencies (L.PCM): 48 kHz, 44.1 kHz, 32 kHz

(*1): The HDMI logo is displayed on an HDMI-compliant device. (*2): Enquire at your local digital equipment retailer shop.

Caution

Use with a PC is not assumed.

All signals are reformatted before being displayed on the screen.

If the connected device has an aspect adjustment function, set the aspect ratio to “16:9”. These HDMI connectors are “type A”.

These HDMI connectors are compatible with HDCP (High-Bandwidth Digital Content Protection) copyright protection.

A device having no digital output terminal may be connected to the input terminal of either “COMPONENT” or “VIDEO” to receive analog signals.

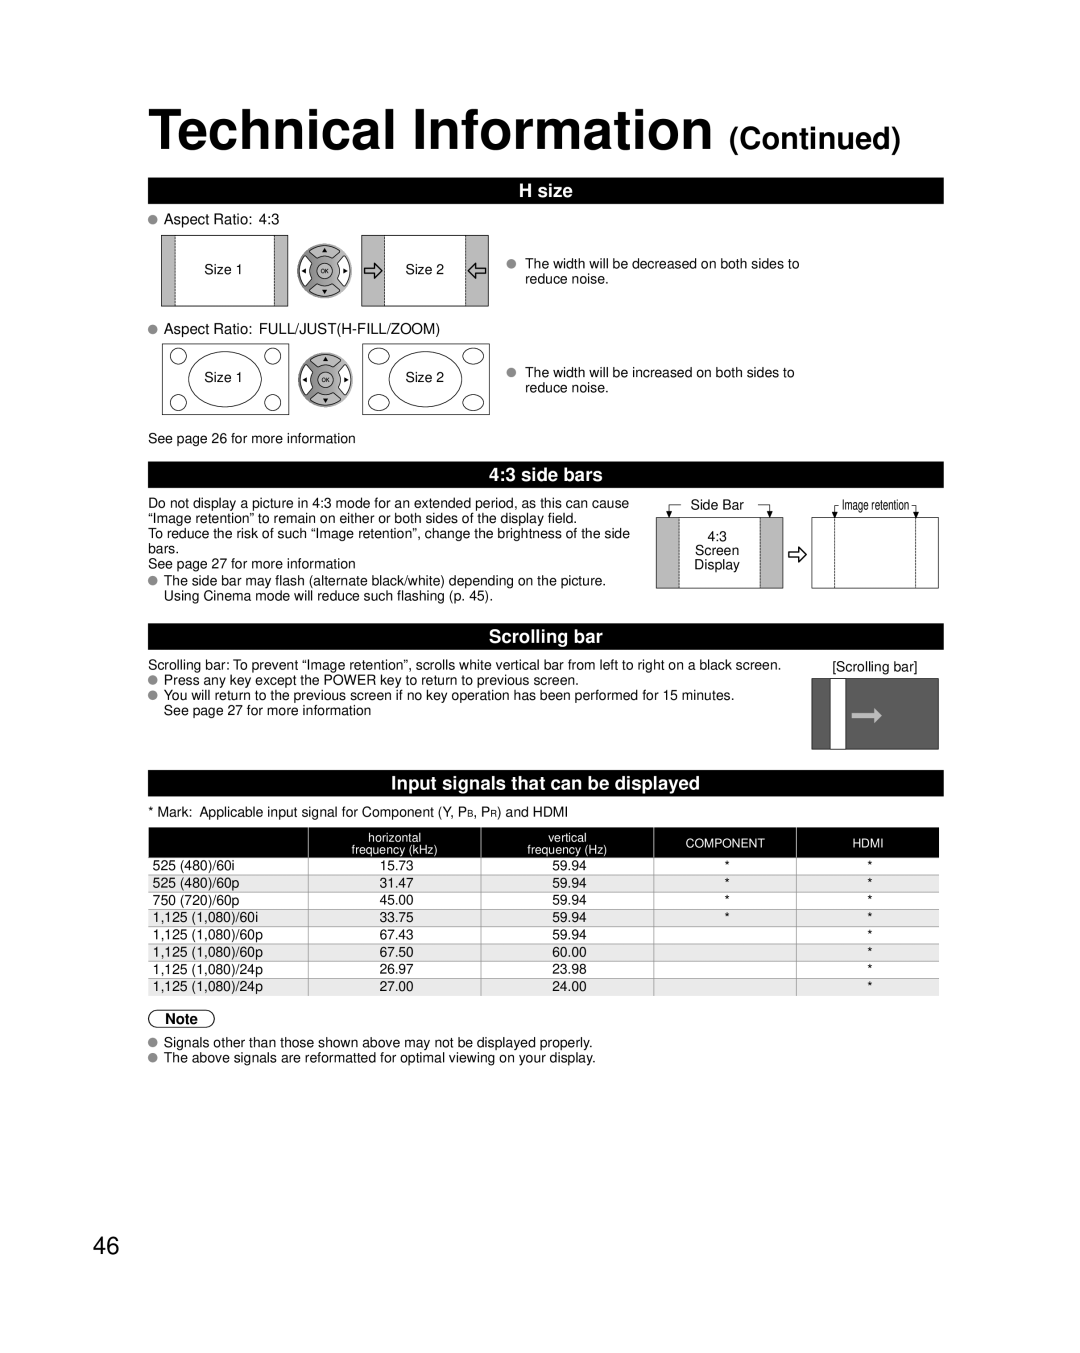
The HDMI input terminal can be used with only the following image signals: 480i, 480p, 720p, 1080i and 1080p. Match the output setting of the digital device.

For details of the applicable HDMI signals, see p. 46.

DIGITAL AUDIO OUT terminals

You can enjoy your home theater by connecting a Dolby Digital (5.1 channel) decoder and “Multi Channel” amplifier to the DIGITAL AUDIO OUT terminals.

Caution

Depending on your DVD player and DVD-Audio software the copyright protection function may operate and disable optical output.

When an ATSC channel is selected, the output from the DIGITAL AUDIO OUT jack will be Dolby Digital. When an NTSC channel is selected, the output will be PCM.


Picture mode

Vivid:

Provides enhanced picture contrast and sharpness for viewing in a well-lit room.

Standard:

Recommended for normal viewing conditions with subdued room lighting.

Cinema:

For watching movies in a darkened room. It provides a soft, film-like picture.

Game:

For playing video games. This mode will be set automatically if “GAME” is selected from Input label setting (p. 39)

Custom (Photo): Customizes each item according to your taste.

Photo is displayed in JPEG menu.

Note

Picture mode will be automatically set to “Standard” if you change the Input label from “GAME” to other labels.

Picture mode will be automatically set to “Game” if you change from an Input label other than “GAME” to “GAME” label.

Technical Information

FAQs, etc.

45
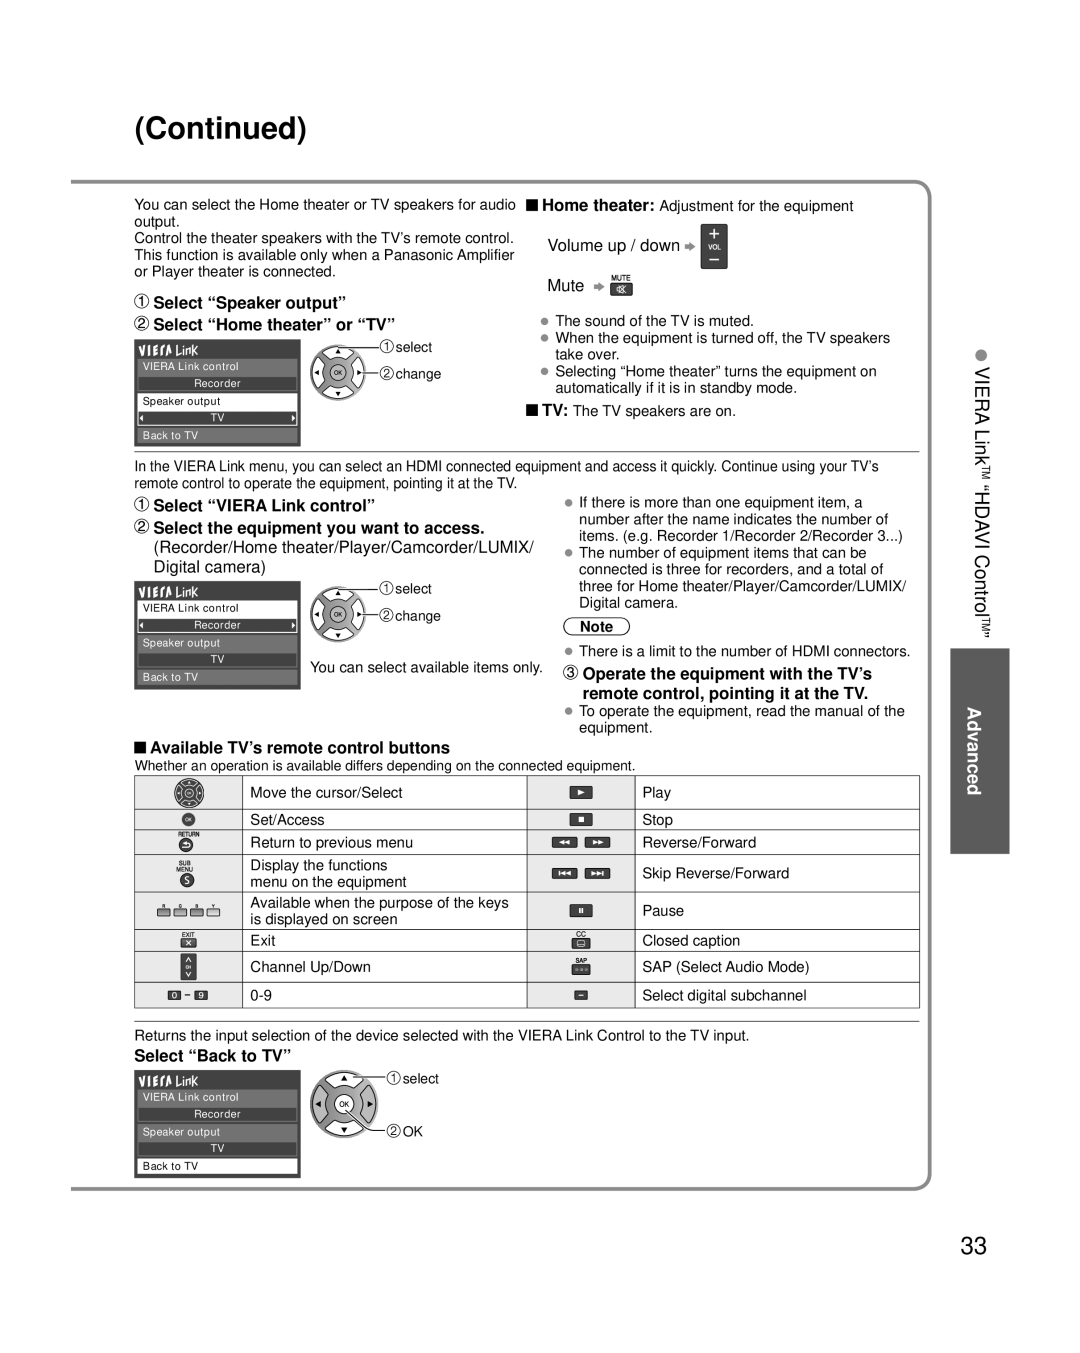
Image 45
Contents Viera English EspañolViera Link is a trademark Sdhc Logo is a trademark Experience an amazing level of multimedia excitementContents Important Safety Instructions Safety PrecautionsSet up Including on shelves above, etcHandling the power supply cord AC Power Supply CordWhen Moving the Plasma TV To prevent fire or electric shockTune Into Safety Do not display a still picture for a long time Channel number and other logos Image displayed in 43 modeTypical still images SD Card photo Video gameAccessories Accessories/Optional AccessoryOptional Accessory AccessoriesQuick Start Guide Attaching the pedestal to TVBottom view Do not disassemble or modify the pedestalTo attach AC cord connectionTo remove Red blue green GreenBasic Connection Connecting Antenna To watch TVQuick Guide VHF/UHF AntennaAV Equipment AV cable connectionsBlu-ray Disc player PlayerIdentifying Controls TV controls/indicatorsBack of the TV Front of the TVTurn the TV On with the Power button First Time SetupConfigure your viewing mode Select your languageStart First Auto channel setup ANT/Cable setupComplete the First time setup Adjust the Clock Set clockSelect the Input labels Label inputs About broadcasting systemsQuickGuideStart Viewing FirstWatchingTimeTVSetup Turn power onWatching TV Select a channel numberPress SUB Menu to show the sub menu screen. p Switches the Closed caption mode On or OffDisplays or removes the channel banner Press Format to cycle through the aspect modes. pSet the Favorite Feature Favorite FeatureUse the Favorite Feature To changeDisplay Viera Tools Select the item Using Viera ToolsSet each item Press to exit from a menu screenSelect Viera Link settings Display the menu Select SetupDefault is On Select Viera LinkSelect the data to be viewed Insert the SD cardView Photo viewerViewing Photo settings Watching Videos and DVDs Display the Input select menu Select the input modeInput Select To return to TVDisplay the menu How to Use Menu FunctionsSelect the menu AdvancedTimer LockMenu list Sub menu list Hdmi cable Viera LinkTM Hdavi ControlTMViera LinkTM Connections Setting of this unit after connectionSet Select settingsUnselected device energy save Change SelectFor Recorder Transmittable data Recorder Home theater PlayerSelect Display the Viera Link menuRemote control, pointing it at the TV Select the equipment you want to accessAvailable TV’s remote control buttons Select Speaker output Select Home theater or TVSelect the Lock mode Input your 4-digit passwordLock Display the menu Select LockLock Advanced Select ANT/Cable setup Editing and Setting ChannelsCheck signal strength Select the functionTo cancel the Edit Select a scanning mode pSelect ANT Select Auto programDisplay the menu Select Closed caption Closed CaptionSelect Input labels Input LabelsDisplay labels of Connected devices Select the terminal and label of the external equipmentDisplay the menu Select Timer Using TimerSelect the timer to set Set the timerRecommended AV Connections CamcorderDVD Player Age-based Possible Content Description Group Ratings List for LockSelections Technical Information FAQs, etcClosed Caption CC Aspect Ratio FormatData format for SD Card browsing SD Card warning messagesMm32 24 mm Viera LinkTM Hdavi ControlTM Picture modeHdmi connection Digital Audio OUT terminalsSize Input signals that can be displayedSide bars Scrolling barFirst, unplug the Power cord plug from the wall outlet Care and CleaningDisplay panel CabinetThis is not a malfunction Intermittent soundSome spots remain bright or dark Chaotic image, noisy Viera logo moves on the screenNo image is Displayed on screenSpecifications On-Site or Carry-in Service Limited Warranty CoverageLimited Warranty Limits And Exclusions One Panasonic Way Secaucus, New JerseyAccessory Purchases United States and Puerto Rico Customer Services Directory United States and Puerto RicoPanasonic Product Limited Warranty Limited Warranty for CanadaPage Page Page Page Customer’s Record Anotación del clienteAmbler Drive