JVC HR-J255SA Access Tuner SET, Access Channel List, Select Position, SET Desired Station

Page 31

1

1 2 3

4 5 6

7 8 9

0 4

2

MENU

3

PUSH JOG

OK

EN31

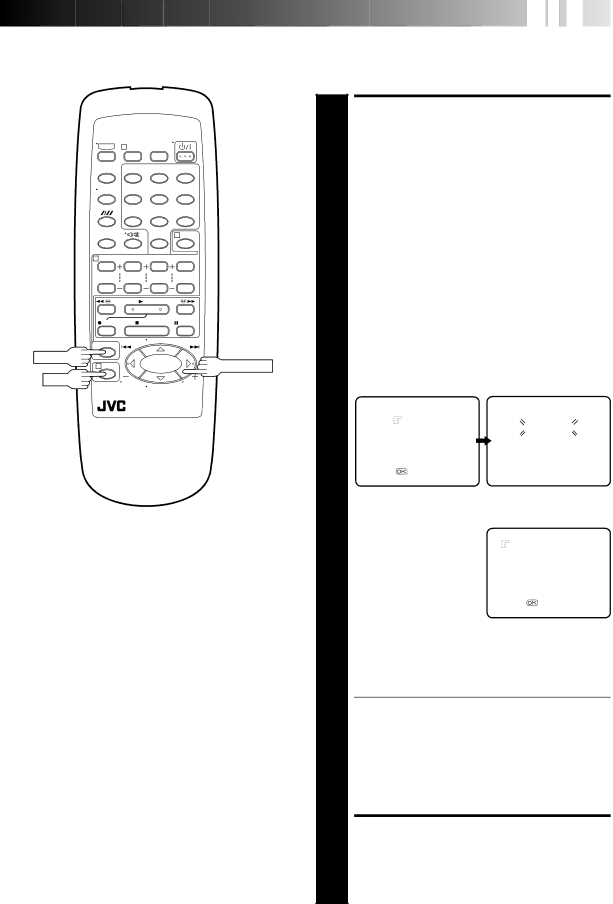
Manual Channel Set

Store channels that were not stored during Auto Set Up (pg. 6) or Auto Channel Set (pg. 30).


ACCESS TUNER SET


SCREEN


1 Perform steps 1 3 of "Auto Channel Set" on page 30.

2

ACCESS CHANNEL LIST

Press PUSH JOG to place the pointer next to "CH

EDIT", then press OK or PUSH JOGÞ.


SELECT POSITION


Press PUSH JOG to place the pointer next to an

3 open channel position, then press OK or PUSH JOGÞ.

4

SELECT BAND


Press PUSH JOG to place the pointer next to the

band of your choice, then press OK to initiate Manual

Channel Set.

MANUAL CH SET


BAND SELECT


VHF L

PLEASE WAIT


VHF H


UHF

VHF L 100MHZ


[5/°] =

[MENU] : EXIT


[MENU] : EXIT


SET DESIRED STATION


The screen to the right


appears when a station is

STORE

5 detected.

CONTINUE


If you do not want to store


the detected station...


Press PUSH JOG to


place the pointer next to

[5/°] =


"CONTINUE", then press

[MENU] : EXIT


OK or PUSH JOGÞ.


Channel search will resume.


If you want to store the detected station...


Press PUSH JOG to place the pointer next to


"STORE", then press OK or PUSH JOGÞ. The Channel


List appears again.


The blueback screen and the TV picture currently being broadcast appear alternately for 8 seconds each.

If you want to store another channel, repeat steps 3 5.

When channel search completes for that band, the Band Select screen appears again. To set channels for other bands, select another band and start Manual Channel Set again (step 4 and 5).

For fine tuning adjustment, see "Fine-Tuning Channels" on page 33.

RETURN TO NORMAL

SCREEN

6 Press MENU.

Image 31
Contents HR-J255SA Auto Head Cleaner Safety PrecautionsDo not place the recorder Connect Recorder to Mains Check ContentsBasic Connections Situate RecorderWith RF Connection Access Video Channel SET ModeVideo Channel Set EN I Nitial Sett IngsWith AV Connection Exit Video Channel SET ModePress to finish the setting SET Video ChannelSET Time Auto Set UpSET Date Major Countries TV System During Auto Set UpSelect TV System Start Auto Channel SETTurn on the Recorder Access Main Menu ScreenENABLE/DISABLE ON-SCREEN Display On-Screen DisplaysInitial SET, then press Select LanguageClock Set Place the pointer next toStart Playback Basic PlaybackLoad a Cassette PointActivate SLOW-MOTION Playback Playback FeaturesSearch PlaybackEN Playback Adjust Tracking ManuallyReturn to Automatic Tracking Activate Repeat PlaybackIndex Search Next Function Memory Tape Position IndicatorActivate Index Search Activate Instant ReviewBasic Recording Select Channel to Watch Recording FeaturesReset Counter Engage ITR ModeReturn to Normal Screen Access Main Menu ScreenS.T. Picture System Load a CassettePlayback RecordingOr press Record on the recorder SET-UP SetupAccess Initial SET Screen EN Timer RecordingOr Push JOG% Enter Receiving Channel Position NumberReturn to Normal Screen Press Push JOG %ÞorNumber Timer ProgrammingAccess Showview Screen Access ShowviewEngage RECORDER’S Timer ModeEnter Channel Position Express Timer ProgrammingEnter Programme Stop Time Enter Programme DateRepeat steps 1 8 for each additional programme Or OK. Program Completed appears onScreen for about 5 seconds, then normal screen AppearsTimer Recording Disengage Timer ModeCancel or Replace a Programme Return to Timer ModeAuto Timer Auto SP→LP TimerSET Recording DECK’S Input ModeEdit To Another Video Recorder Make ConnectionsSET RECORDER’S Input Edit From a Camcorder Or Another Video RecorderSource player Off-Air Recording Setting Of The Colour System Select ButtonsMode Display Mode DescriptionPlayback equipment Tape-To-Tape EditingRecorded tape HR-J255SA Recorded tapePress OK or Push Jogþ Access Tuner SET ScreenSelect Auto CH SET Tuner SETSET Desired Station Access Tuner SETAccess Channel List Select PositionSwap Channel Positions Access Channel ListEN Tuner SET Delete a ChannelFINE-TUNE Fine-Tuning ChannelsEN Troubleshooting Recording Timer againNew one. pg OubleshootingPlayback Recording Questions and Answer S E NFront View IndexDisplay Panel TV VOL +/-, TV Muting Remote ControlRotary two-head helical scan Specification SSupplied fresh battery actual Maximum recording timeEMO Memo HR-J255SA