GoVideo VR5940 manual Connections Connecting Optional Equipment, Connecting a Digital Camcorder

Page 17

Connections (Continued)

Connecting Optional Equipment

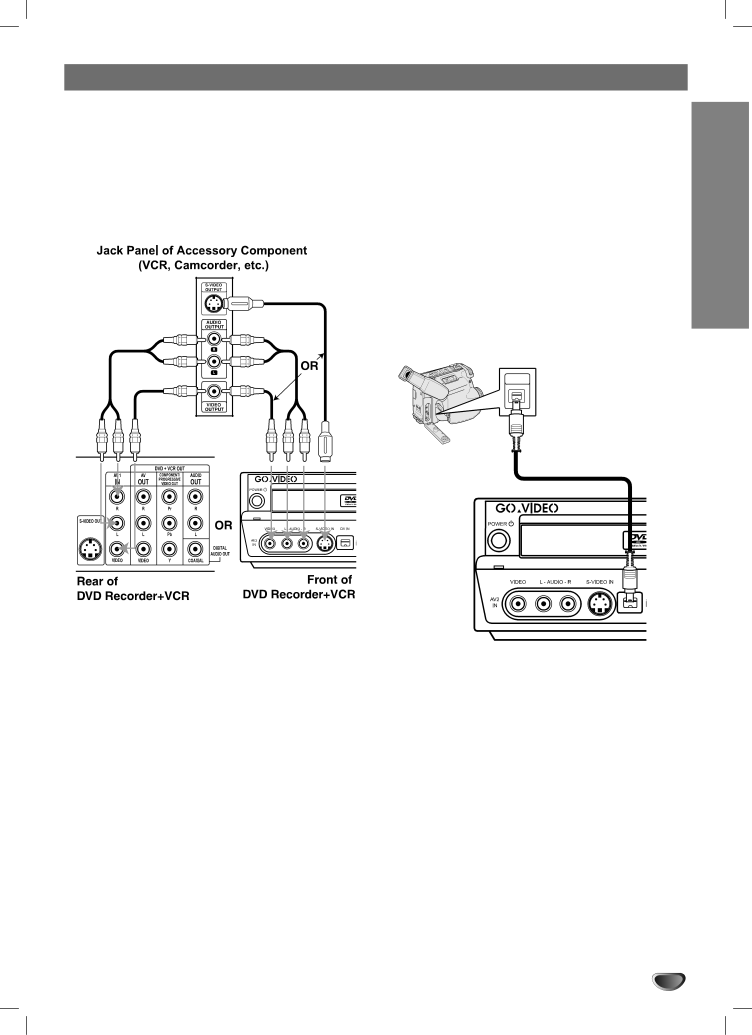
Connect the AV 1 IN or AV 2 IN jacks on the DVD Recorder+VCR to the audio/video out jacks on your external component, using optional audio/video cables.

ote

If you use the S-VIDEO jack on the front panel, there will be no signal output from the front panel VIDEO jack.

Connecting a Digital Camcorder

Using the front panel DV IN jack, it is possible to con- nect a DV digital camcorder, video deck or DVD-R/RW recorder and digitally transfer DV tapes or DVD-R/RW discs to DVD-R/RW.

Use a DV cable (not supplied) to connect the DV in/out jack of your DV camcorder/video deck to the front panel DV IN jack of the DVD Recorder+VCR.

ote

This jack is for connection to DV equipment only. It is not compatible with digital satellite tuners or D-VHS video decks.

DV Digital Camcorder

DV

IN/OUT

Front of DVD Recorder+VCR

CONNECTIONS & SETUP

17

Image 17
Contents DVD Recorder+VCR Regulatory Information FCC Part Safety PrecautionsImportant Safety Instructions Table of Contents Symbols Used in this Manual Recordable Discs OverviewPlayable Discs Disc Related TermsAbout DVD Recording About Recordable DiscsWhat are Recording Modes? Disc Type Disc Format Recording Mode Editing Features What is ‘CPRM’?Recording TV Audio Channels Restrictions on Video RecordingAbout Symbols PrecautionsFront Panel Overview Repeat Indicates current Repeat mode Disc Type indicatorsFront Panel Display Overview Hi-Fi STRemote Control Overview Optical Digital Audio Out Rear Panel OverviewCOMPONENT/PROGRESSIVE Video OUT Y Pb Pr Cable Service Without Cable Box Connecting Antenna/CableCable Service With Cable Box ConnectionsConnections Connecting a TV Audio OUT jacks Optical O or Coaxial X to Connections Connecting an Amplifier/ReceiverDigital Multi-Channel Sound Front of DVD Recorder+VCR Connections Connecting Optional EquipmentConnecting a Digital Camcorder Setup Menu Navigation Initial Setup Setup Menu OverviewGeneral Settings Tuning BandChannel Add/Delete Initial SetupClock Auto Clock ManualLanguage Settings Dolby Digital Initial Setup Audio SettingsSampling Frequency DRC Dynamic Range ControlPassword Initial Setup Lock SettingsMovie Rating Changing the 4-digit codeDisc Record Mode Record SettingsVCR Record Mode Country CodeDV Record Audio Disc SettingsAuto Chapter Disc InitializeDisc Finalize When recording on a DVD-RW in VR mode, set DiscDisc Protect AutoPlayYourDVD You can also use the remote control toDisc Label Character, then press Enter to confirm your selectionInitial Setup On-Screen Display Overview Selection Method Initial Setup OSD Menu Options by Media TypeMenu Options Shows the current Recording dateMode Selection MethodSelecting Titles DVD/VCD Playback Playing a DVD/Video CDSelecting Chapters/Tracks Slow MotionVideo CDs Repeat Track/All/Off Repeat A-BDVD Discs Repeat Chapter/Title/All/Off Disc Menus DVD Marker SearchTitle Menus DVD To Recall a Marked SceneCamera Angle Remember Disc Settings DVDChanging the Audio Language DVD Changing the Audio ChannelMusic menu options Playing an Audio CD or MP3/WMAMusic-Audio CD menu options CD Music-CD menu options MP3 WMASkip Tracks Audio CD and MP3/WMA OperationSearch CD Repeat A-B CDProgram List menu options Program Playback with Audio CD and MP3/WMAMove DeleteErasing a Track from the Program List Repeat Programmed TracksErasing multiple tracks from Program List Changing track order in the Program ListPhoto menu options Jpeg Disc Operation Viewing a Jpeg File JpegPhoto-CD menu options Jpeg Slide ShowStill Picture Jpeg Disc OperationSkip Images Rotate ImagesPlaying a VHS Tape VHS Special Playback Features VHSVCR Playback Before You Begin One Touch Record OTR Basic Recording Recording from TVOne Touch Copy VHS to DVD Basic RecordingOne Touch Copy DVD to VHS Checking Timer Recording Details Timer RecordingCanceling a Timer Recording Stopping a Timer Recording in ProgressRecording from a Digital Camcorder Recording from an External InputDV-Related Messages Recording from an External Input What is DV?Troubleshooting Title List and Chapter List Menu Using the Title List-Original menu VRUsing the Chapter List-Original menu Using the Chapter List-Playlist Menu Using the Title List-Playlist Menu VRIf the disc has already been finalized Using the Title List menu VideoDeleting a Title Video Using the Chapter List menu +RW Using the Title List menu +RWUsing the Chapter List menu +R Using the Title List menu +RTitle and Chapter Editing About Original vs. Playlist ContentAbout Titles, Chapters and Parts VR Changing Title ThumbnailsMaking a New Playlist VR Title appears in the updated Playlist menuAdding Titles/Chapters to a Playlist If you want to display the Chapter List-OriginalDeleting Part of a Title VR Deleting Titles/ChaptersCombining Two Chapters Renaming a Title VR Video +RWCharacter then press Enter to confirm your CombineMoving a Playlist Chapter VR Title Dividing a Title +RWSelect the ‘Hide’ option on the options menu Previewing Title Menus Overwriting a Title +RWAbout Playing Recordings on Other DVD Players Select the input source you want to recordCH 4/3 VOL + Programming the MultiBrand Remote to Control Your TVButtons Used to Operate Your TV Code Language Language Code ListCode Country Country Code ListSymptom Cause Solution TroubleshootingIf you observe any of the following symptoms Reset the DVD Recorder+VCRYou can reset the DVD Recorder+VCR as follows Moisture CondensationTechnical Specifications Outputs AccessoryWho Provides the Limited Warranty Limited Warranty3834RV0002X