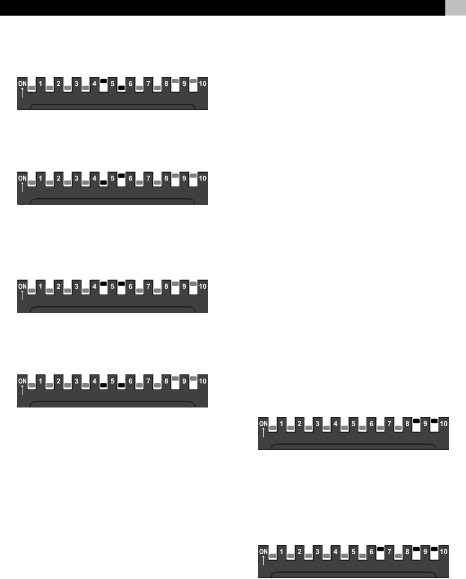
To make ![]() the only additional device but- ton, put SW5 in the ON position:
the only additional device but- ton, put SW5 in the ON position:
To make ![]()
![]()
![]()
![]() the only additional device button, put SW6 in the ON position:
the only additional device button, put SW6 in the ON position:
To make both ![]() and
and ![]()
![]()
![]()
![]() additional de-
additional de-
vice buttons, put both SW5 and SW6 in the ON position:
For no additional device buttons, put both SW5 and SW6 in the OFF position:
Learning commands 


The
New commands are learned by the keypad by using a learning procedure during initial configu- ration of the keypad involving aiming the hand- held remote for the component at the IR sensor on the keypad.
The four device buttons (![]()
![]() ,
, ![]()
![]() ,
, ![]() ,
, ![]()
![]() ) can- not be used to learn commands. In addition, you should not learn new commands replacing the
) can- not be used to learn commands. In addition, you should not learn new commands replacing the ![]()
![]() ,
, ![]()
![]() ,
, ![]() , and
, and ![]() commands. Therefore, there are six buttons available for learning. These but-
commands. Therefore, there are six buttons available for learning. These but-
tons can store commands for each of the devices, ten commands for the ![]()
![]() device, ten for the
device, ten for the ![]()
![]() device, etc. Overwriting commands for a device will not change the existing commands for any of the other devices.
device, etc. Overwriting commands for a device will not change the existing commands for any of the other devices.
13
If you have designated ![]() and/or
and/or ![]()
![]()
![]()
![]() as device buttons (SW5 and/or SW6 in the ON position), these buttons cannot be used to learn commands. However, they can be used as device buttons with commands learned on other buttons, just like the four standard device buttons (
as device buttons (SW5 and/or SW6 in the ON position), these buttons cannot be used to learn commands. However, they can be used as device buttons with commands learned on other buttons, just like the four standard device buttons (![]()
![]() ,
, ![]()
![]() ,
, ![]() ,
, ![]()
![]() ).
).
In addition to learning commands on standard but- tons, each of the four main device buttons (![]()
![]() ,
, ![]()
![]() ,
, ![]() ,
, ![]()
![]() ) can store 14 invisible layer commands. These commands cannot be used during normal system operation from the keypad; however, they can be used as part of Smart Macro sequences. The procedure for learning these invisible layer commands is described in the next section.
) can store 14 invisible layer commands. These commands cannot be used during normal system operation from the keypad; however, they can be used as part of Smart Macro sequences. The procedure for learning these invisible layer commands is described in the next section.
In this example of learning standard commands,
we will change the command for the ![]()
![]()
![]()
![]() button for the
button for the ![]()
![]() device to a PAUSE command instead of the original NEXT DISC command. To learn the new command:
device to a PAUSE command instead of the original NEXT DISC command. To learn the new command:
1.The ![]()
![]() button lighting flashes to confirm suc- cessful or failed learning. So, the backlighting feature must be active before starting the learn- ing procedure (SW10 in the ON position). Also, the IR sensor must be enabled (SW9 in the ON position). Confirm the position of SW9 and SW10:
button lighting flashes to confirm suc- cessful or failed learning. So, the backlighting feature must be active before starting the learn- ing procedure (SW10 in the ON position). Also, the IR sensor must be enabled (SW9 in the ON position). Confirm the position of SW9 and SW10:
2.Press the device key containing the commands (the ![]()
![]() button in this example).
button in this example).
3.Put the keypad into Learning mode by moving SW7 to the ON position:
4.Within 30 seconds, press the keypad command button that you wish to learn (in this example,
the ![]()
![]()
![]()
![]() button). The backlighting on the
button). The backlighting on the ![]()
![]() button turns on and the keypad is ready to receive the IR code. It will flash six times if an improper button is pressed (for example, a device button that cannot be learned).
button turns on and the keypad is ready to receive the IR code. It will flash six times if an improper button is pressed (for example, a device button that cannot be learned).