Pioneer DV-575K-s Before you start, Hints on installation, Putting the batteries in the remote

Page 6

01Before you start

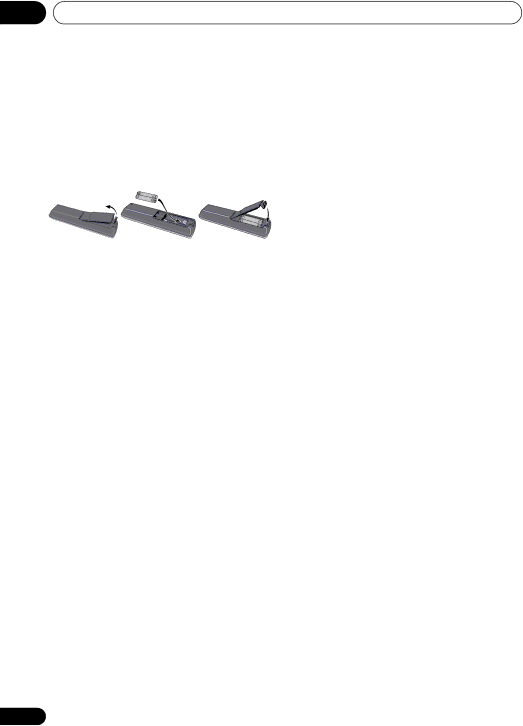
Putting the batteries in the remote

Open the battery compartment cover and insert the batteries as shown.

Use two AA/R6P batteries and follow the

indications ( , ) inside the compartment. Close the cover when you’re finished.

Important

Incorrect use of batteries can result in hazards such as leakage and bursting. Please observe the following:

Don’t mix new and old batteries together.

Don’t use different kinds of battery together—although they may look similar, different batteries may have different voltages.

Make sure that the plus and minus ends of each battery match the indications in the battery compartment.

Remove batteries from equipment that isn’t going to be used for a month or more.

When disposing of used batteries, please comply with governmental regulations or environmental public instruction’s rules that apply in your country or area.

Hints on installation

We want you to enjoy using this product for years to come, so please use the following guidelines when choosing a suitable location:

Do...

Use in a well-ventilated room.

Place on a solid, flat, level surface, such as a table, shelf or stereo rack.

6

Don’t...

Use in a place exposed to high temperatures or humidity, including near radiators and other heat-generating appliances.

Place on a window sill or a place where the player will be exposed to direct sunlight.

Use in an excessively dusty or damp environment.

Place directly on top of an amplifier, or other component in your stereo system that becomes hot in use.

Use near a television or monitor as you may experience interference—especially if the television uses an indoor antenna.

Use in a kitchen or other room where the player may be exposed to smoke or steam.

Use on a thick rug or carpet, or cover with cloth—this may prevent proper cooling of the unit.

Place on an unstable surface, or one that is not large enough to support all four of the unit’s feet.

En

Image 6 Contents
DV-575K-s Operating Environment Risk of Electric Shock Do not Open POWER-CORD Caution Contents Before you start Chapter FeaturesBefore you start What’s in the boxHints on installation Before you startPutting the batteries in the remote DVD-R/RW compatibility Before you start Disc/content format playback compatibilityCD-R/RW compatibility Compressed audio compatibilityAbout WMA Jpeg file compatibilityPC-created disc compatibility Connecting up Connecting up ChapterEasy connections Connecting up Connecting using the S-video outputConnecting using the component video output Interlace Connecting up Connecting to an AV receiver TipControls and displays Chapter Home Menu Remote control sensor DisplayControls and displays Front panelControls and displays Remote control Using the remote controlSwitching on Getting startedGetting started Chapter Getting started Setting up the player for yourSetting the language of this player’s on-screen displays Playing discsBasic playback controls Press OPEN/CLOSE to open the disc tray Load a discPress play to start playback Resume and Last Memory DVD disc menusNumbers Singing Your Favorite Songs Along with Karaoke Discs Video CD/Super VCD PBC menusWhen howling occurs Why won’t the disc I loaded play? Scanning discs Playing discsPlaying discs Chapter Playing in slow motionBrowsing video content with the Disc Navigator Playing discs Viewing a Jpeg slideshowSelect a view option Select the thumbnail image for what you want to play Use the cursor buttons Enter to navigateTo resume normal playback, select ‘Off’ from the menu Using repeat playLooping a section of a disc Select a repeat play optionUsing random play Select a random play optionPlaying discs Creating a program list Other functions available from the program menuSearching a disc Switching subtitlesSwitching audio language/ channels Press Enter to start playbackZooming the screen Switching camera anglesDuring playback or when paused, press Angle to switch angle Displaying disc informationAudio Settings menu Audio Settings and Video Adjust menusAudio Settings and Video Adjust menus Chapter Audio DRCMake settings using Cursor buttons, and Enter Audio Settings and Video Adjust menusVideo Adjust menu DialogUsing the Initial Settings menu Initial Settings menuInitial Settings menu Chapter Digital Audio Out settingsInitial Settings menu Video Output settingsLanguage settings Display settings Changing your password Initial Settings menu Parental LockRegistering a new password Setting/changing the Parental LockAdditional information Additional information ChapterTaking care of your player and discs Additional information Screen sizes and disc formatsPower reset Setting the TV systemResetting the player Disc Player settingSelecting languages using the language code list Additional information DVD-Video regionsAdditional information Language code list Country code listCountry, Country code, Country code letter Additional information Glossary Digital *1Additional information Specifications GeneralPioneer Corporation