Samsung HP-P5071 manual MCC Custom Settings

Page 60

Setting the MCC(My Control Color) Mode

MCC Custom Settings

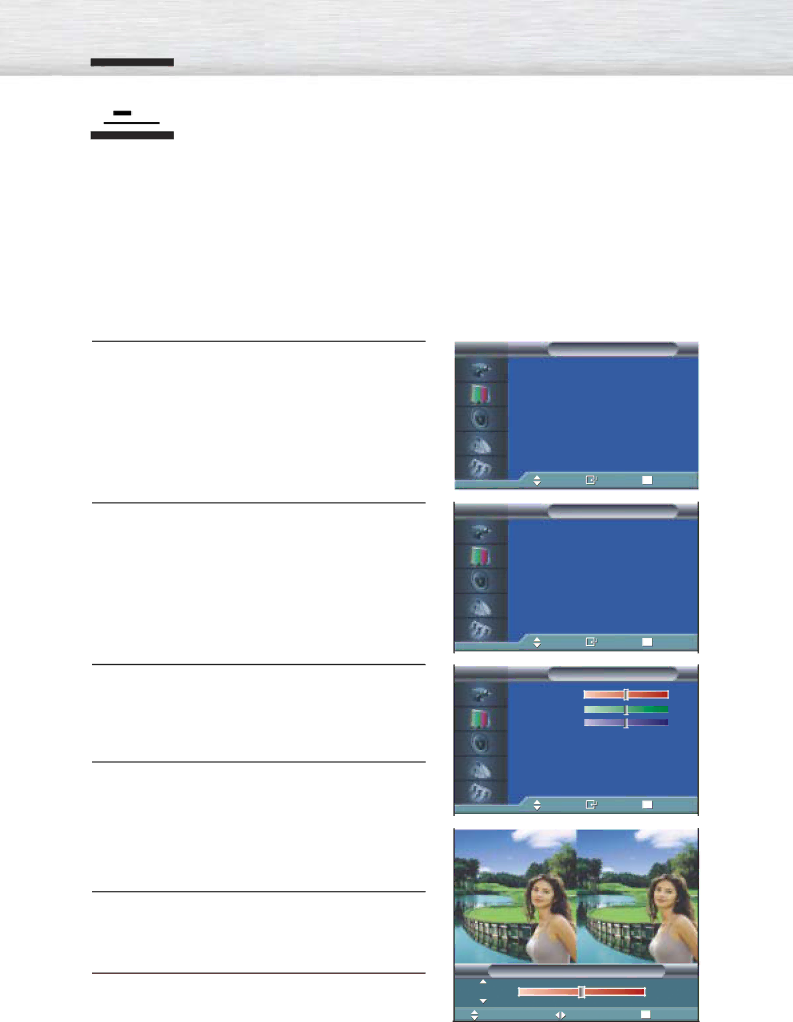
Users can adjust the 3 MCC colors (Skin, Sky, and Grass Tones).

Press the MENU button. Press the ▲ or ▼ button to

1 select “Picture”, then press the ENTER button.

Press the ▲ or ▼ button to select “MCC”, then press

2 the ENTER button.

Press the ▲ or ▼ button to select “Detail Control”,

3 then press the ENTER button.

Press the ▲ or ▼ button to select the desired MCC

4 color and then press the ENTER or button.

The original picture (before adjustment) is shown on the left side, while the picture after adjustment is shown on the right side, and an adjustment bar on the bottom of the screen.

Press the œ or button to adjust the settings.

5 Press the ▲ or ▼ button to choose other MCC colors.

Press the ENTER or MENU button to confirm the

6 changes and return to the previous menu.

TV

Picture


Mode

: Custom


Custom


Color Tone

: Normal


Color Control


Film Mode

: Off


Size

: 16:9


PIP


More


Move

Enter

Return


TV

MCC


Easy Control

: Custom


Detail Control

:


Move

Enter

Return


TV

Detail Control


Skin Tone


50


Green Grass 50

Blue Sky 50

Reset

Move

Enter

Return


Original

Turkish Blue


Original

Turkish Blue


Detail Control


Skin Tone


50

Move

Adjust

Return

60

Image 60
Contents Owner’s Instructions Warranty User InstructionsScreen Image retention Cell DefectTable of Contents Page General Information Power Indicator Remote Control Signal ReceiverSpeakers Source buttonVideo Input Audio Input L, R Ferrite Cores PC Input RGB in / AudioVIDEO1, S-VIDEO2 AV1, AV2, AV3Remote Control Buttons ∑ Reset button Remote Control Operation Range¸ SRS Tsxt button ˛ MTS buttonWall Installation Instructions Installation NotesWall Mount Bracket Support Bars ScrewsHow to assemble the Wall Mount Bracket Wall Installation Instructions How to Adjust Mounting Angle Factory defaultConnecting External Devices to the PDP Change AngleInstalling the Speakers How to Assemble the Speakers StandingParts Speakers Speaker Dust CoverBlack How to Assemble the Speakers Wall Mount Black How to assemble the Stand-Base Connections Connecting VHF and UHF Antennas Antennas with 75-ohm Round LeadsConnecting Cable TV Cable without a Cable BoxPage Connecting a VCR Videotape PlaybackConnecting a Camcorder Viewing camcorder tapesViewing Tapes Connecting a DVD Player 480i, 480p Playing DVDTo Play DVD Watching DTV To Watch DTVOperation Turning the PDP On and Off Viewing the Menus and DisplaysViewing the Menus Displaying Status Information Plug & Play Feature Press the Enter button to confirm your choiceEnjoy your watching Plug and Play can only be accessed in the TV mode Selecting the Video Signal-source Memorizing the ChannelsStoring Channels in Memory Automatic Method Adding and Erasing Channels Manual Method To View Memorized Channels PIP Mode Adjusting the Volume Using MuteChanging Channels Setting Up Your Remote Control Remote Control Codes Viewing an External Signal Source Setting the Signal SourceAssigning Names to External input mode Page Picture Control Customizing the Picture PIPUsing Automatic Picture Settings Selecting the Color Tone DNIe Digital Natural Image engine Changing the Screen Size 169Wide PanoramaZoom 3NormalFreezing the Picture StillViewing the Picture-in-Picture Selecting the PIP ScreenSelecting an External Signal Swapping the Contents of the PIP and Main Image Changing the Size of the PIP Window Changing the Location of the PIP Image Selecting a Signal Source Antenna or Cable for PIP Changing the PIP Channel Setting the MCCMy Control Color Mode MCC Mode Characteristics Emerald Green Indian PinkMCC Custom Settings Resetting the MCC Colors to the Factory Defaults Page Sound Control Customizing the Sound Using Automatic Sound Settings Choosing a Multi-Channel Sound MTS Soundtrack Using the Auto Volume Setting the TruSurround XT TruSurround XT, SRS and SymbolListening to the Sound of the SubPIP Picture Selecting the Internal Mute Channel Control Fine Tuning Channels LNA Low Noise Amplifier Page Connecting a PC and Operation Connecting a PC To watch the PC screenPin Configuration Setting up Your PDP Plug and PlaySub Cable How to Set up Your PC Software Windows only IBM PC / AT Adjusting the PC Screen Adjusting the R.G.BChanging the Position of the Image Picture Quality Adjustment Picture Automatic AdjustmentCoarse Adjustment Fine Tuning Fine Information Page Time Setting Setting the Clock Setting the Sleep Timer Setting the Timers Air Page Function Description Selecting a Menu Language Digital Noise Reduction Selecting the Film Mode Using the Color Weaknees Enhancement Option Setting the Melody Sound Setting the Blue Screen Selecting the Fan Viewing Closed Captions Using the V-Chip Setting Up Your Personal ID Number PINHow to Enable/Disable the V-Chip How to Set up Restrictions using the TV guidelines 105 106 107 Page Appendix Troubleshooting Problem Possible SolutionCare and Maintenance Identifying ProblemsTemperature LiquidsSpecifications Video inputMemo 114 115 BN68-00645A-01