Hitachi 50VS810 important safety instructions Side Panel Jacks and Connectors

Page 9

SIDE PANEL JACKS AND CONNECTORS

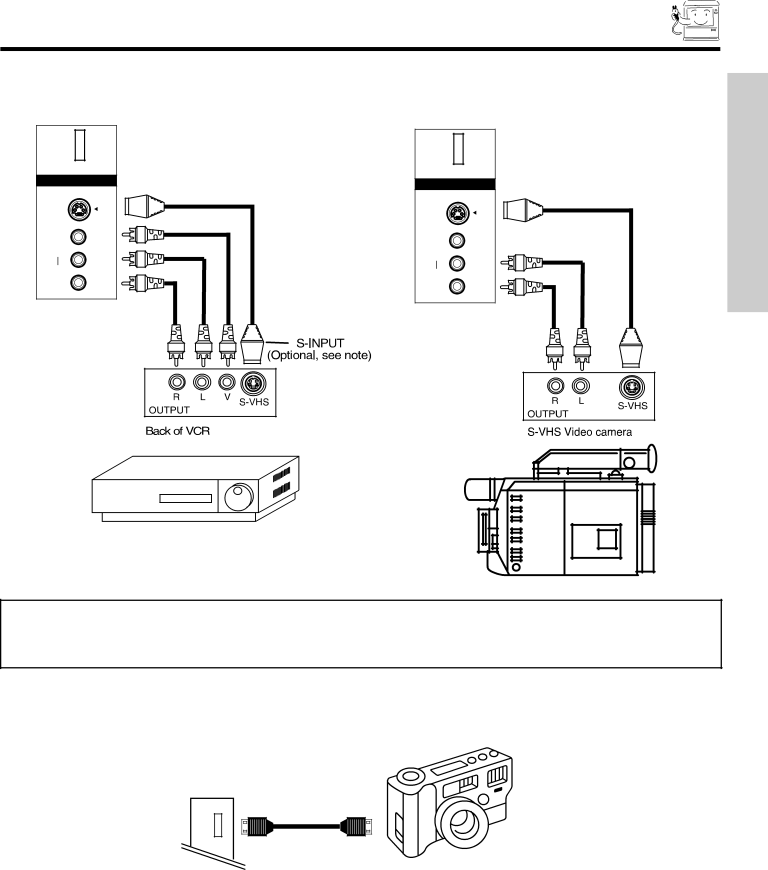
The side panel jacks are provided as a convenience to allow you to easily connect a camcorder or VCR as shown in the following examples:

PHOTO

INPUT

INPUT 5

S-VIDEO

VIDEO

L/MONO

AUDIO

R

PHOTO

INPUT

INPUT 5

S-VIDEO

VIDEO

L/MONO

AUDIO

R

FIRST TIME USE

NOTE: 1. Completely insert connection cord plugs when connecting to front panel jacks. If you do not, the played back picture may be abnormal.

2.If you have a S-VHS VCR, use the S-INPUT cable in place of the standard video cable.

3.If you have a mono VCR, insert the audio cable into the left audio jack of your TV.

PHOTO INPUT

The front panel Photo Input Jack is provided to view digital still pictures from your digital camera using a USB cable and displaying them on the TV screen.

PHOTO

INPUT

USB CABLE

First, connect your digital camera to the Photo Input using a USB cable. Turn on the power of your digital camera. Press the INPUTS button and select Photo Input (see pages 25-27).

9

Image 9
Contents Operating Guide for 50VS810 Refer Servicing to Qualified Service Personnel Important Safety InstructionsPublic Viewing of Copyrighted Material Read before operating equipmentFirst Time USE AccessoriesHOW to SET UP Your NEW Hitachi LCD Rear PTV Antenna Connections to Rear Jack Panel HOOK-UP Cables and ConnectorsPhoto Input Side Panel ControlsTemp indicator Power lightSide Panel Jacks and Connectors Rear Panel Jacks Hdmi 2 Input 2 Extra Hdmi input Upgrade CardOptical Out Digital Audio RS232C InputCableCARD CableCARD SlotRear Panel Connections Typical FULL-FEATURE SetupTips on Rear Panel Connections Rear Panel of Television Connecting External Audio DevicesConnecting External Video Devices Connecting a Monaural Audio Source to INPUT1~INPUT5Before Operating External Video Source CableCARD Connecting a Stereo Source to INPUT1~INPUT5VCR Connecting AN S-VIDEO Source to Input 3, 4HDMI-HDMI Connecting a Component Source to Input 1 or 2 Y-PBPR Remote Control Mode Indicator HOW to USE the Remote to Control Your LCD Rear PTVSource Access F , E buttons Source Access ENT buttonStandard Aspect buttonPICTURE-IN-PICTURE button DAY/NIGHT buttonMenu button Guide buttonPhoto Input Ant B Ant a Inputs buttonPhoto Input JumpRotate SlideshowWhen a S-VIDEO Info buttonVideo Channel CH WHEEL/CHANNEL Selector buttons Volume VOL WHEEL, Mute buttonDash button Last Channel LC buttonPOP Mode PICTURE-IN-PICTURE PICTURE-IN-PICTURE PIPPIP button Split Mode PICTURE-IN-PICTURE PIP Mode PICTURE-IN-PICTURESurf Mode PICTURE-IN-PICTURE NtscMain Freeze Split FreezeStrobe Freeze Operating the precoded function for your cable box Using the Remote to Control Cable BOX FunctionsPrecoded Cable BOX buttons Exclusive TV buttonsPRE-CODED SET-TOP-BOX/SATELLITE Receiver buttons Using the Remote to Control DVD Functions Operating the precoded function for your DVD playerPrecoded DVD Buttons Precoded VCR/PVR Buttons Using Your Remote To Control VCR/PVR FunctionsUsing Your Remote To Control Additional Audio Equipment Operating the precoded function for your Audio componentPrecoded Audio Buttons Control Input AccessDVD Brand Receiver Brand Amplifier Code ControlON-SCREEN Display OSD Video Audio Aspect Channel Video Picture ModeVideo Color Management Reset Video SettingsNoise Reduction Auto Movie Mode Color DecodingAuto Color Audio Treble Bass BalanceTechnology Audio Source Internal Speakers Auto Noise Cancel Perfect Volume LoudnessAudio Language Digital OutputAspect Auto AspectVertical Position Channel Manager Set The AntennaAuto Channel Scan Channel List Signal MeterLocks LocksMovie Ratings TV Ratings Canadian Ratings Eng Canadian Ratings English ChartCanadian Ratings Frn Set The Clock TimersSet Day/Night Timer Set Sleep TimerPlease Set Clock First Set Event TimerSet Auto Power Off Menu Preference SetupScreen Saver Set Menu BackgroundOption Screen WipeSet The Inputs Set Black SidePanel Caption Mode Set Closed CaptionChannel Set Monitor Out CableCARD InfoSet AV Control Quick Start Up UpgradesLamp Type Lamp ReplacementLamp Replacement Handle Remove Screws Lamp Unit 120V Do not Care of Your Hitachi Television Your Remote ControlIgnition Noise Reception ProblemsUseful Info SymptomsDimensions 50VS810 60VS810 InputsOutputs Home Electronics Division Dial Toll FreeDigital Media Division DVI Input IndexEND User License Agreement for Hitachi DTV Software END User License Agreement for Hitachi DTV Software Page Page QR62061