Hitachi 50V720 important safety instructions Srs, Bbe, Drc

Page 33

On-Screen Display

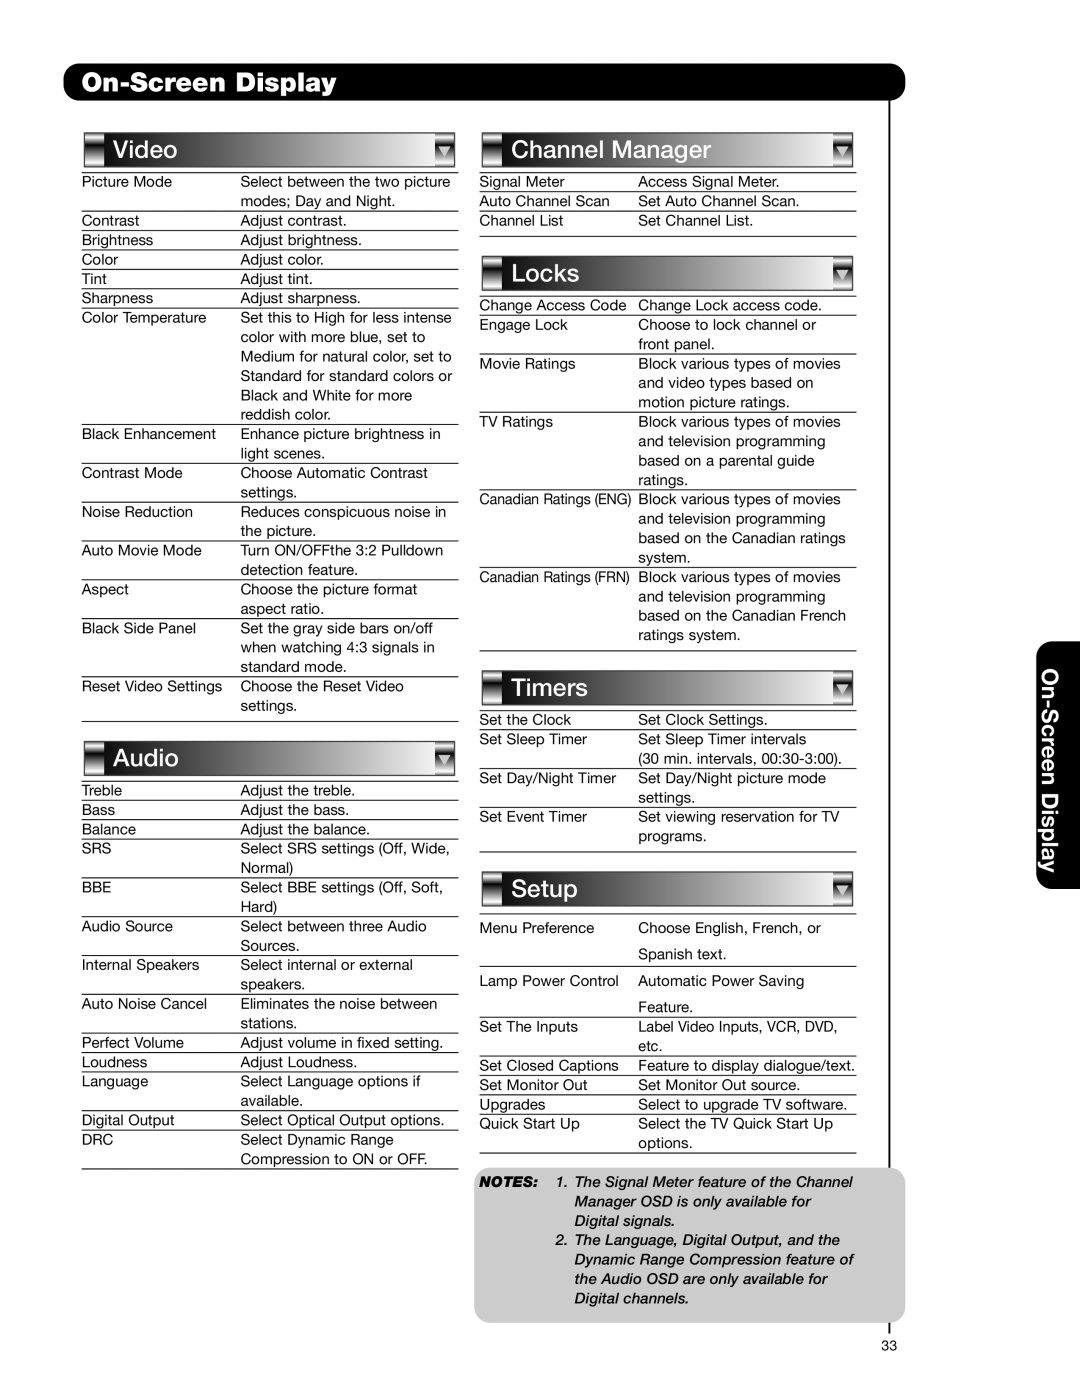
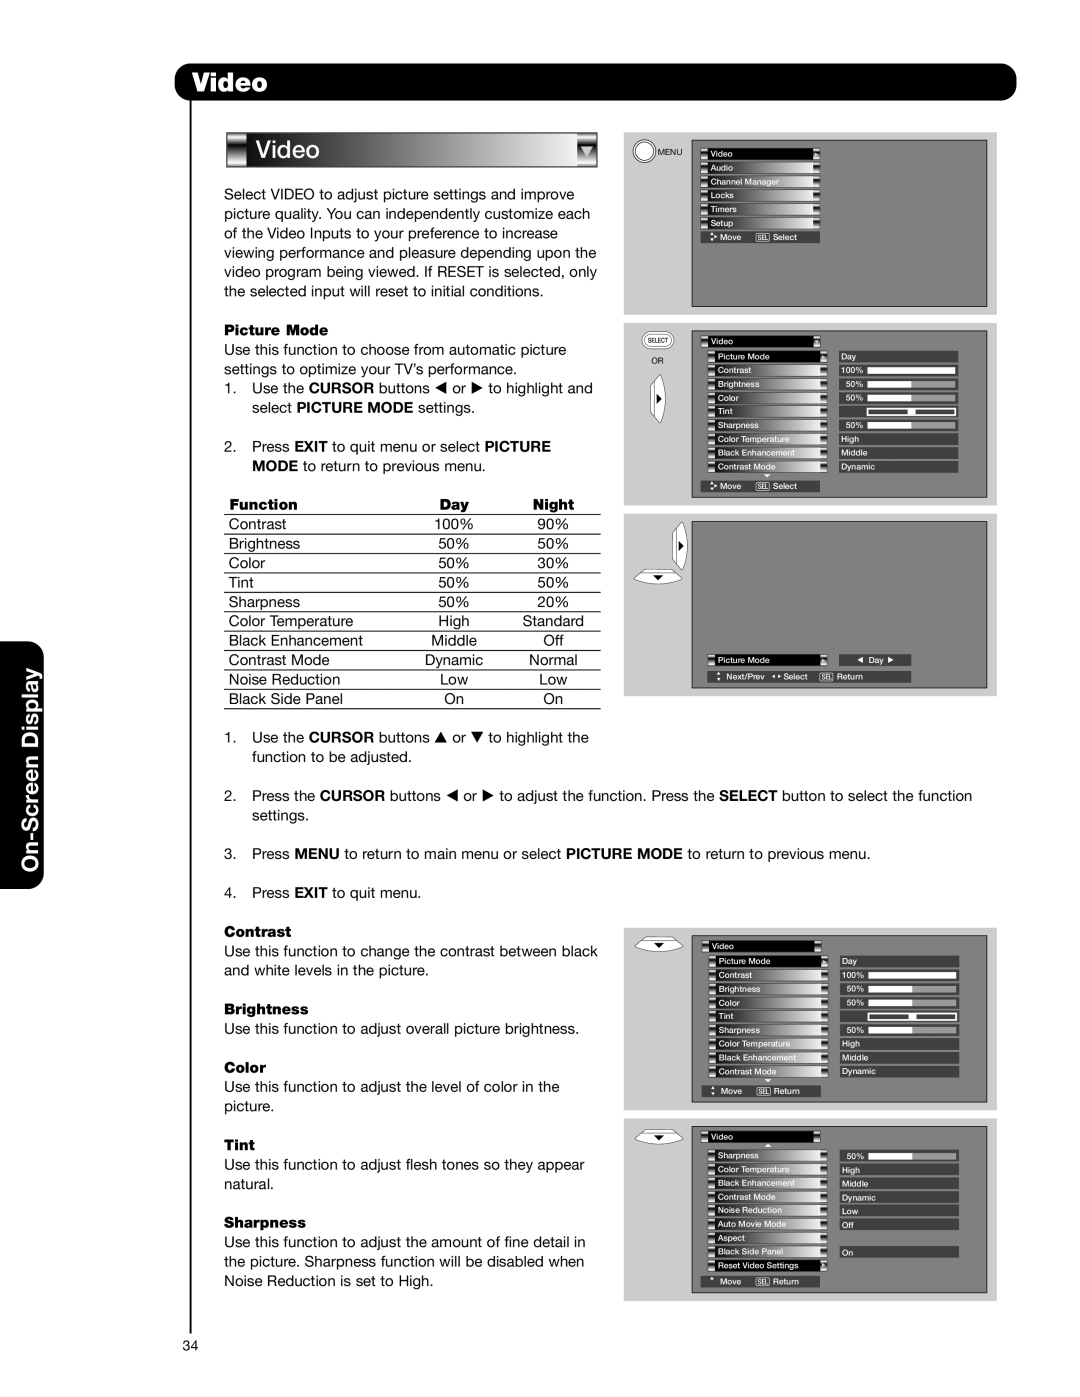
Video

Picture Mode

Select between the two picture


modes; Day and Night.

Contrast

Adjust contrast.

Brightness

Adjust brightness.

Color

Adjust color.

Tint

Adjust tint.

Sharpness

Adjust sharpness.

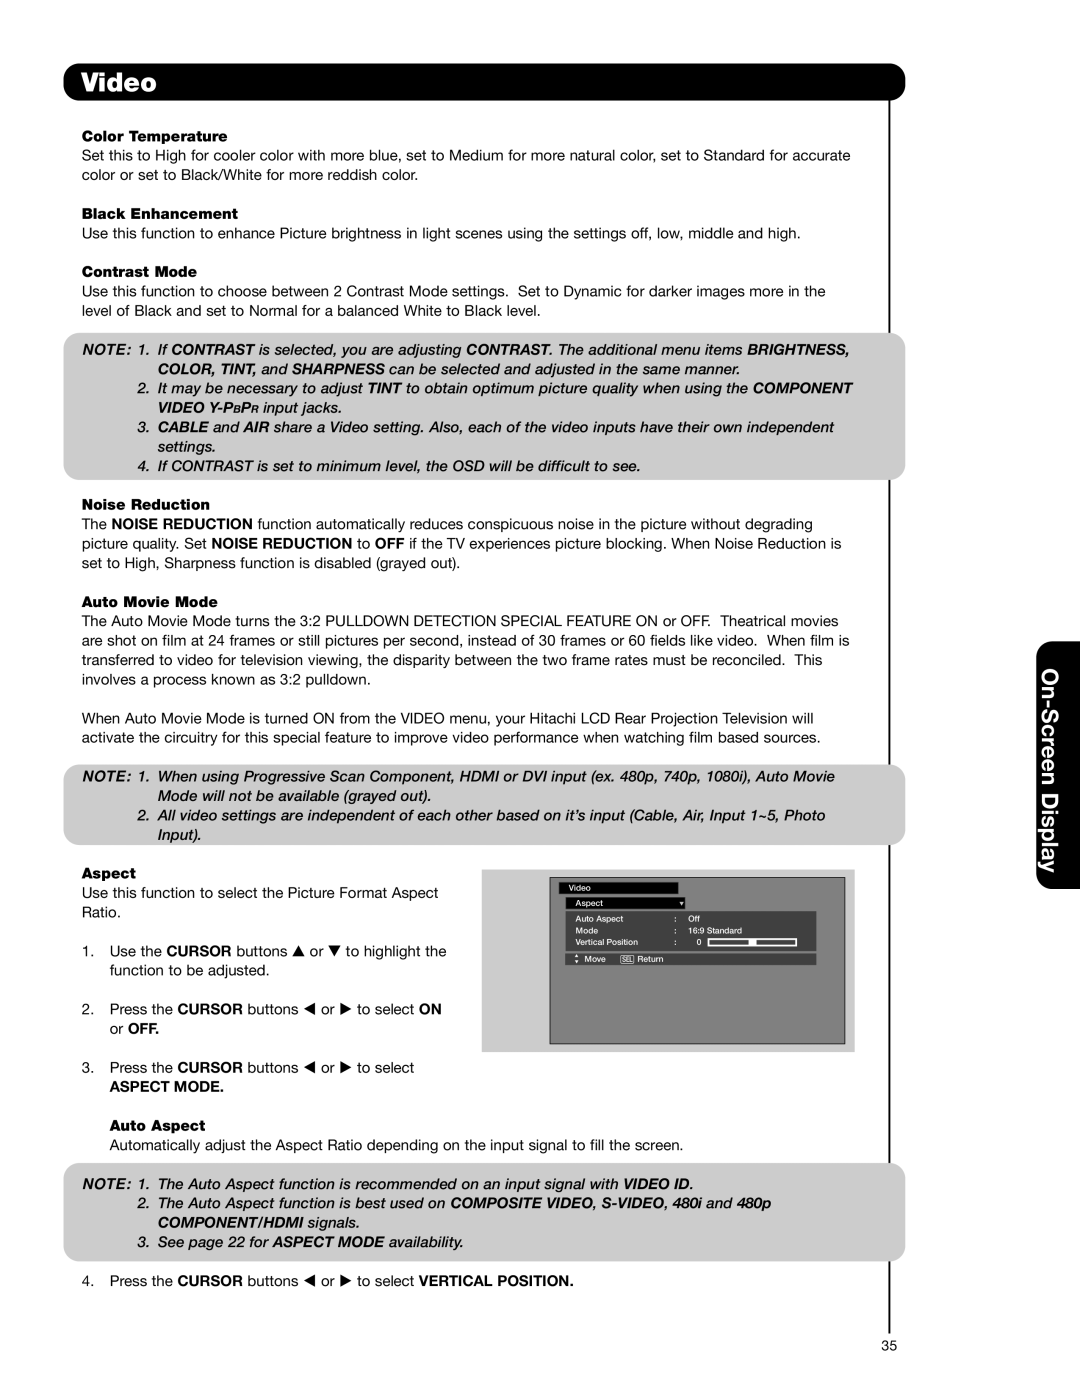
Color Temperature

Set this to High for less intense


color with more blue, set to


Medium for natural color, set to


Standard for standard colors or


Black and White for more


reddish color.

Black Enhancement

Enhance picture brightness in


light scenes.

Contrast Mode

Choose Automatic Contrast


settings.

Noise Reduction

Reduces conspicuous noise in


the picture.

Auto Movie Mode

Turn ON/OFFthe 3:2 Pulldown


detection feature.

Aspect

Choose the picture format


aspect ratio.

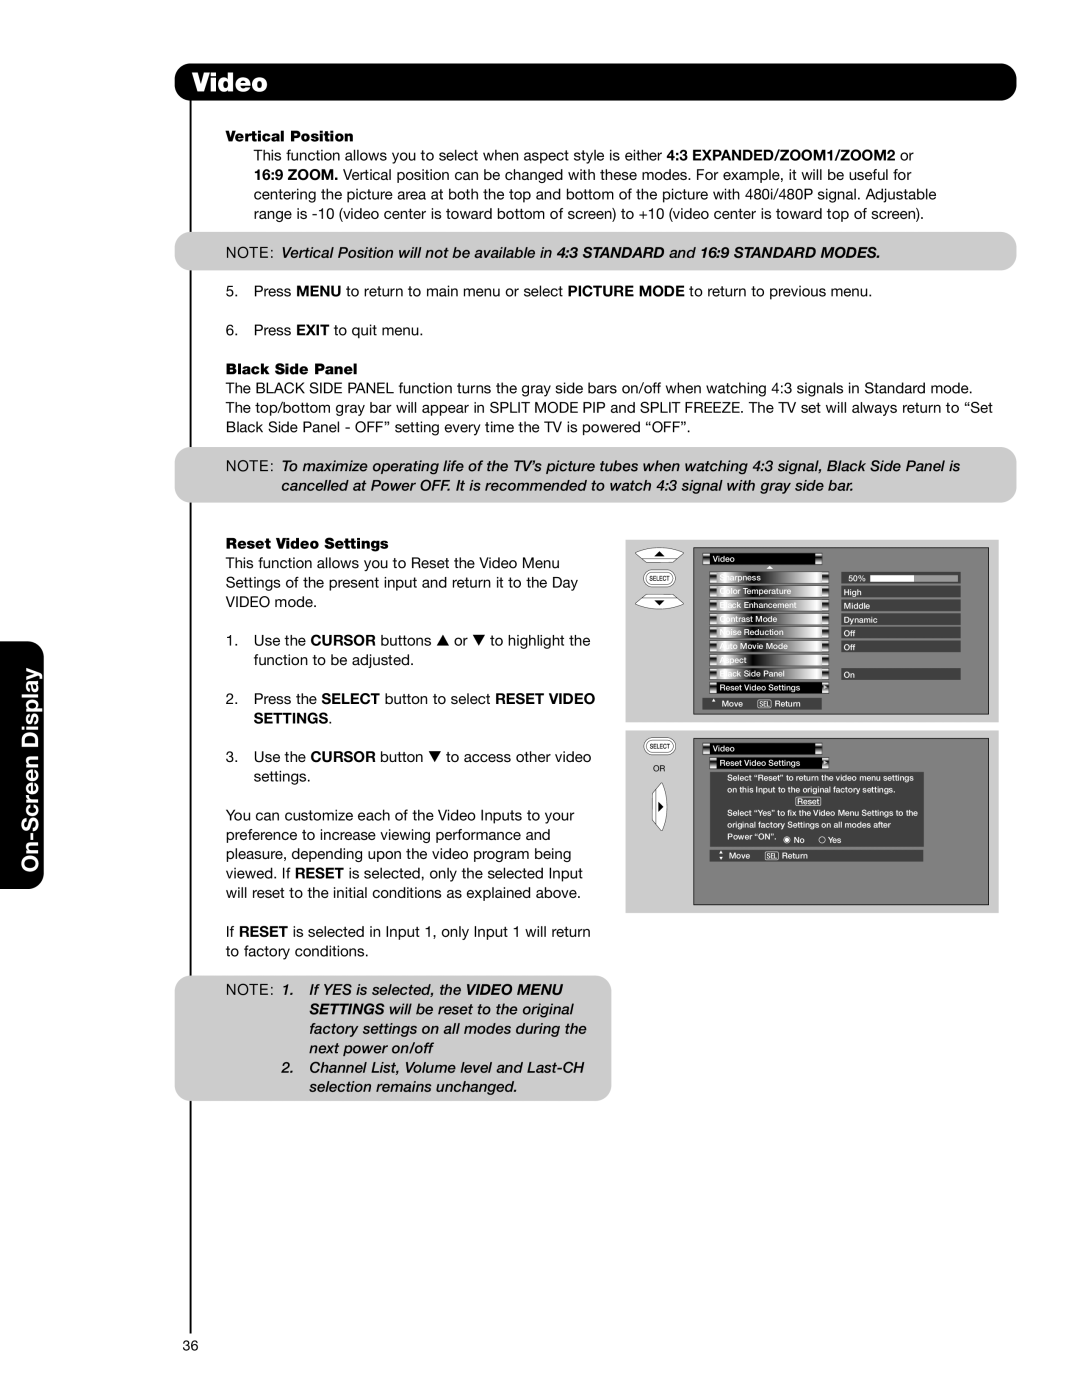
Black Side Panel

Set the gray side bars on/off


when watching 4:3 signals in


standard mode.

Reset Video Settings

Choose the Reset Video


settings.


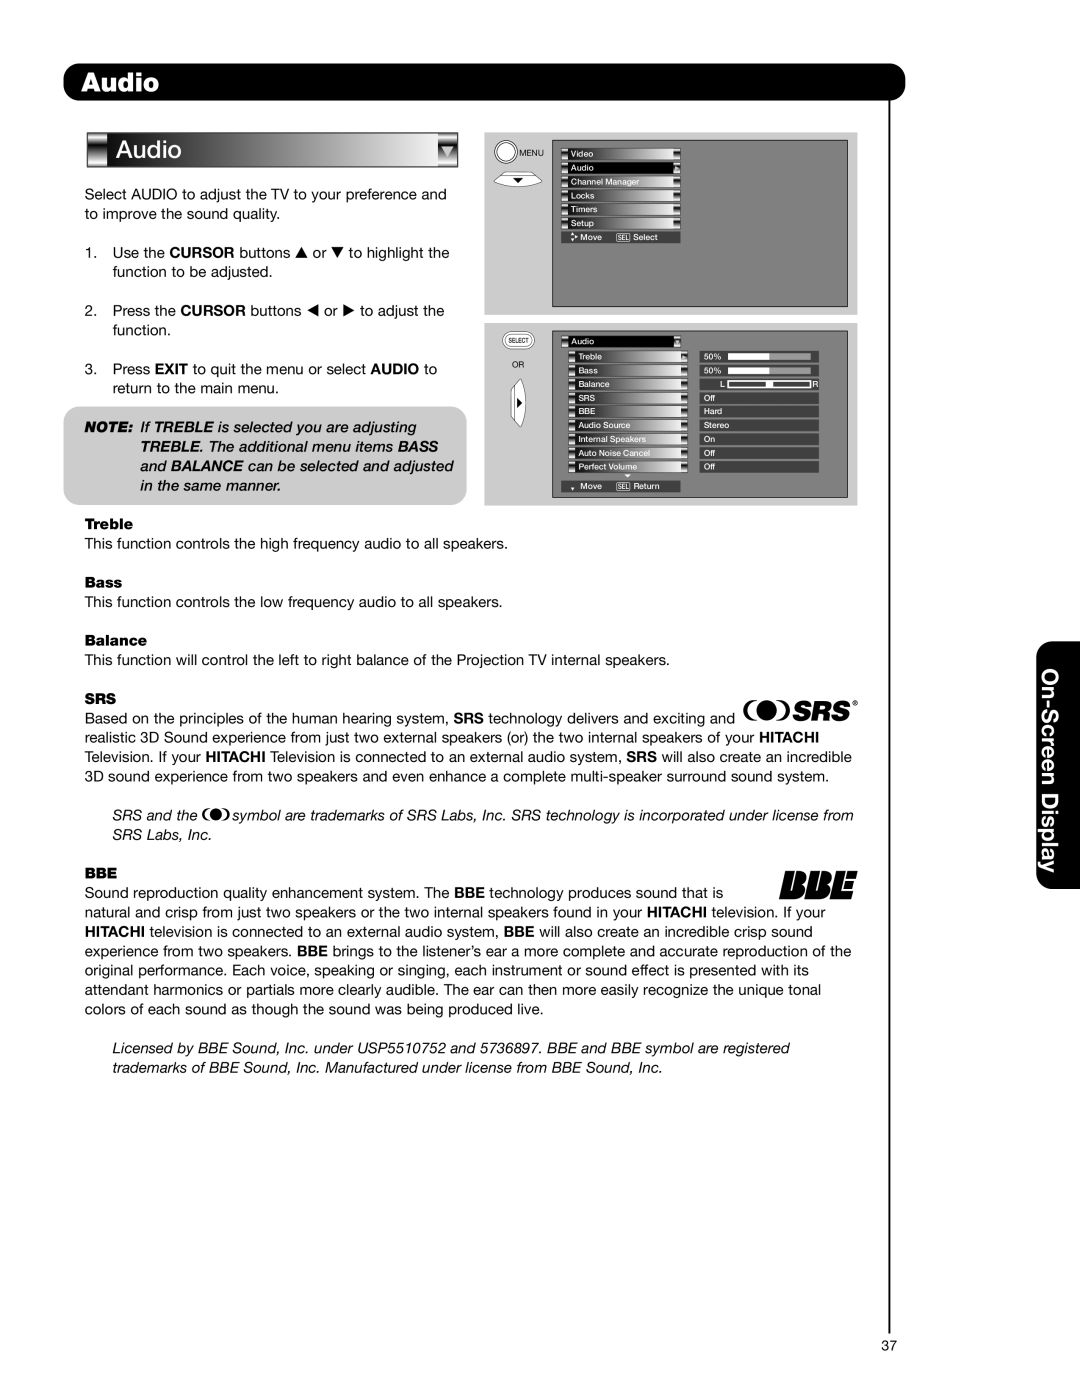
Audio

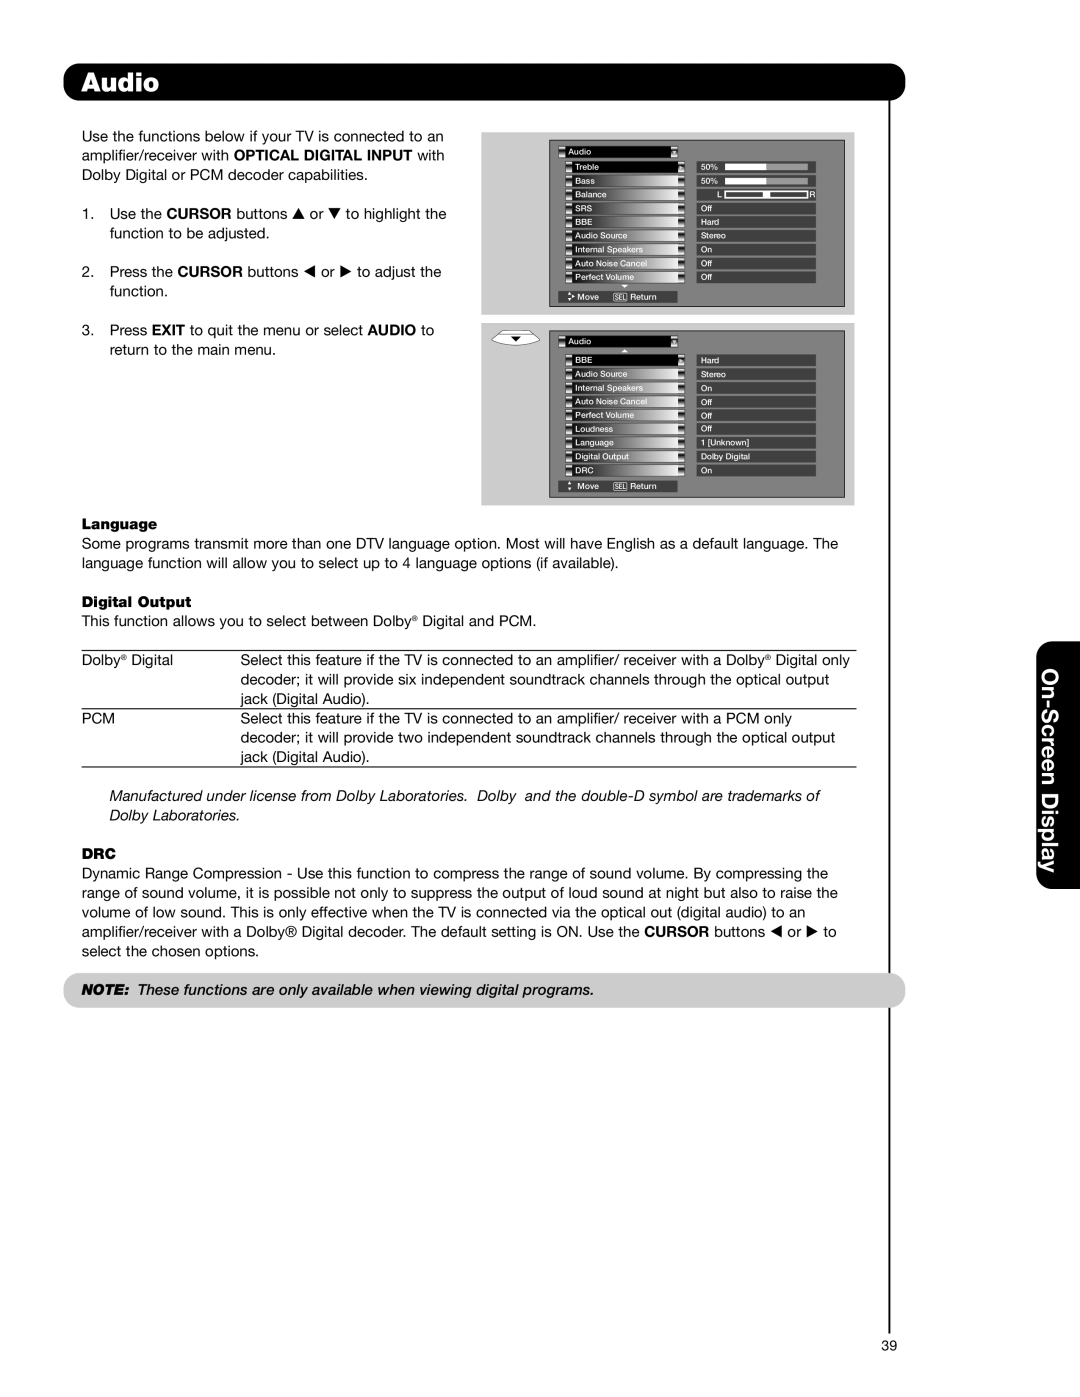
Treble

Adjust the treble.

Bass

Adjust the bass.

Balance

Adjust the balance.

SRS

Select SRS settings (Off, Wide,


Normal)

BBE

Select BBE settings (Off, Soft,


Hard)

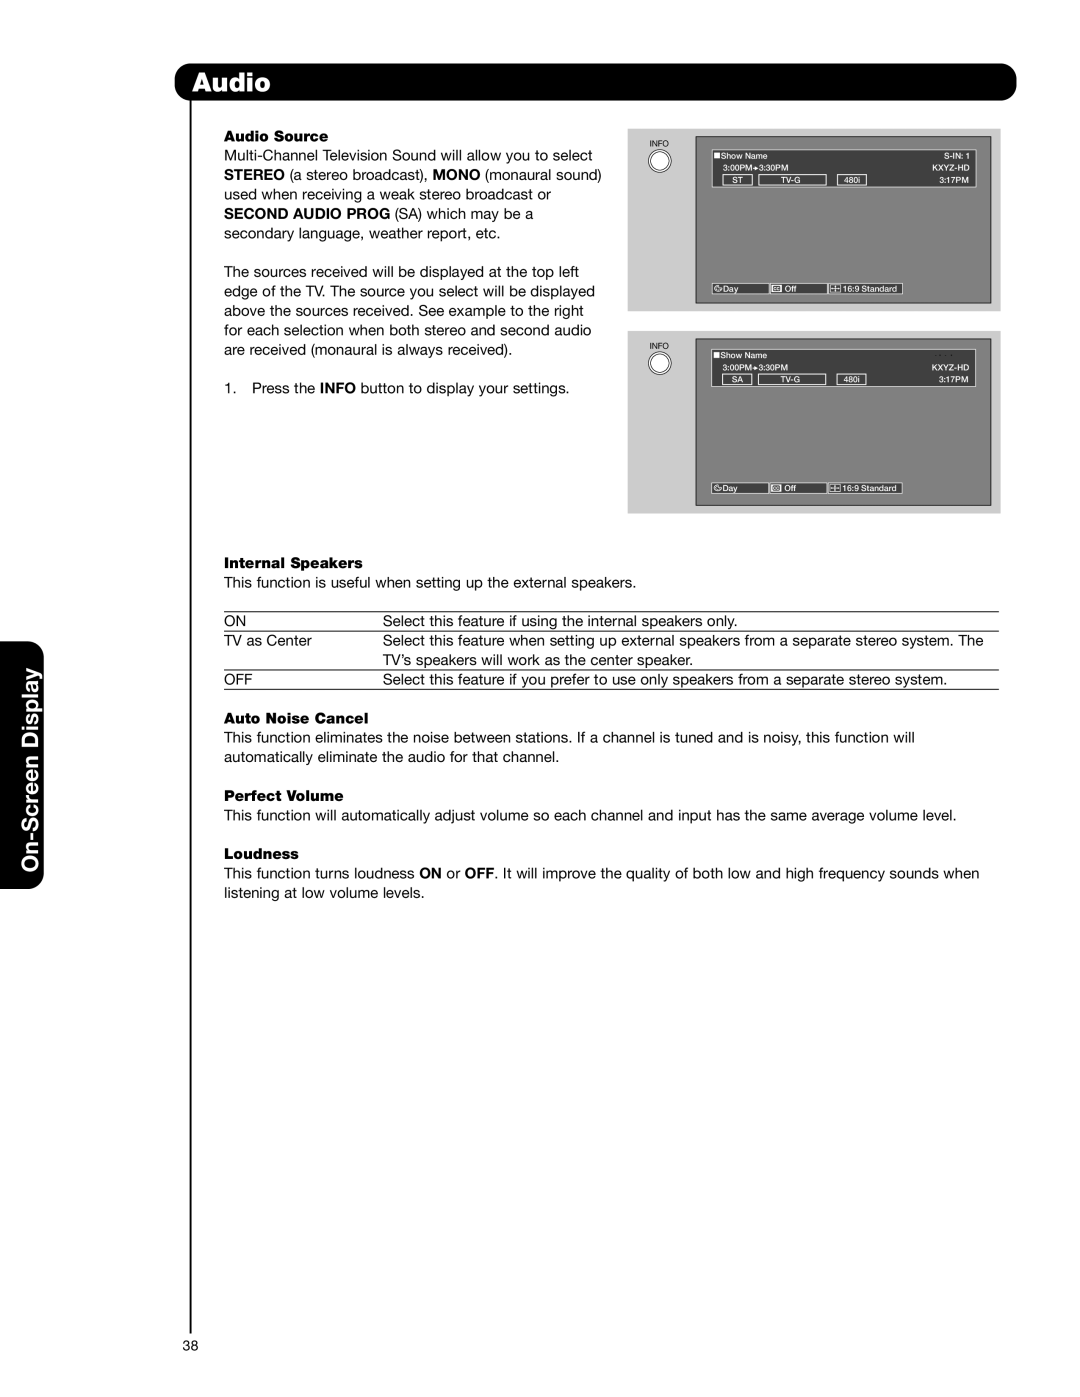
Audio Source

Select between three Audio


Sources.

Internal Speakers

Select internal or external


speakers.

Auto Noise Cancel

Eliminates the noise between


stations.

Perfect Volume

Adjust volume in fixed setting.

Loudness

Adjust Loudness.

Language

Select Language options if


available.

Digital Output

Select Optical Output options.

DRC

Select Dynamic Range


Compression to ON or OFF.

Channel Manager

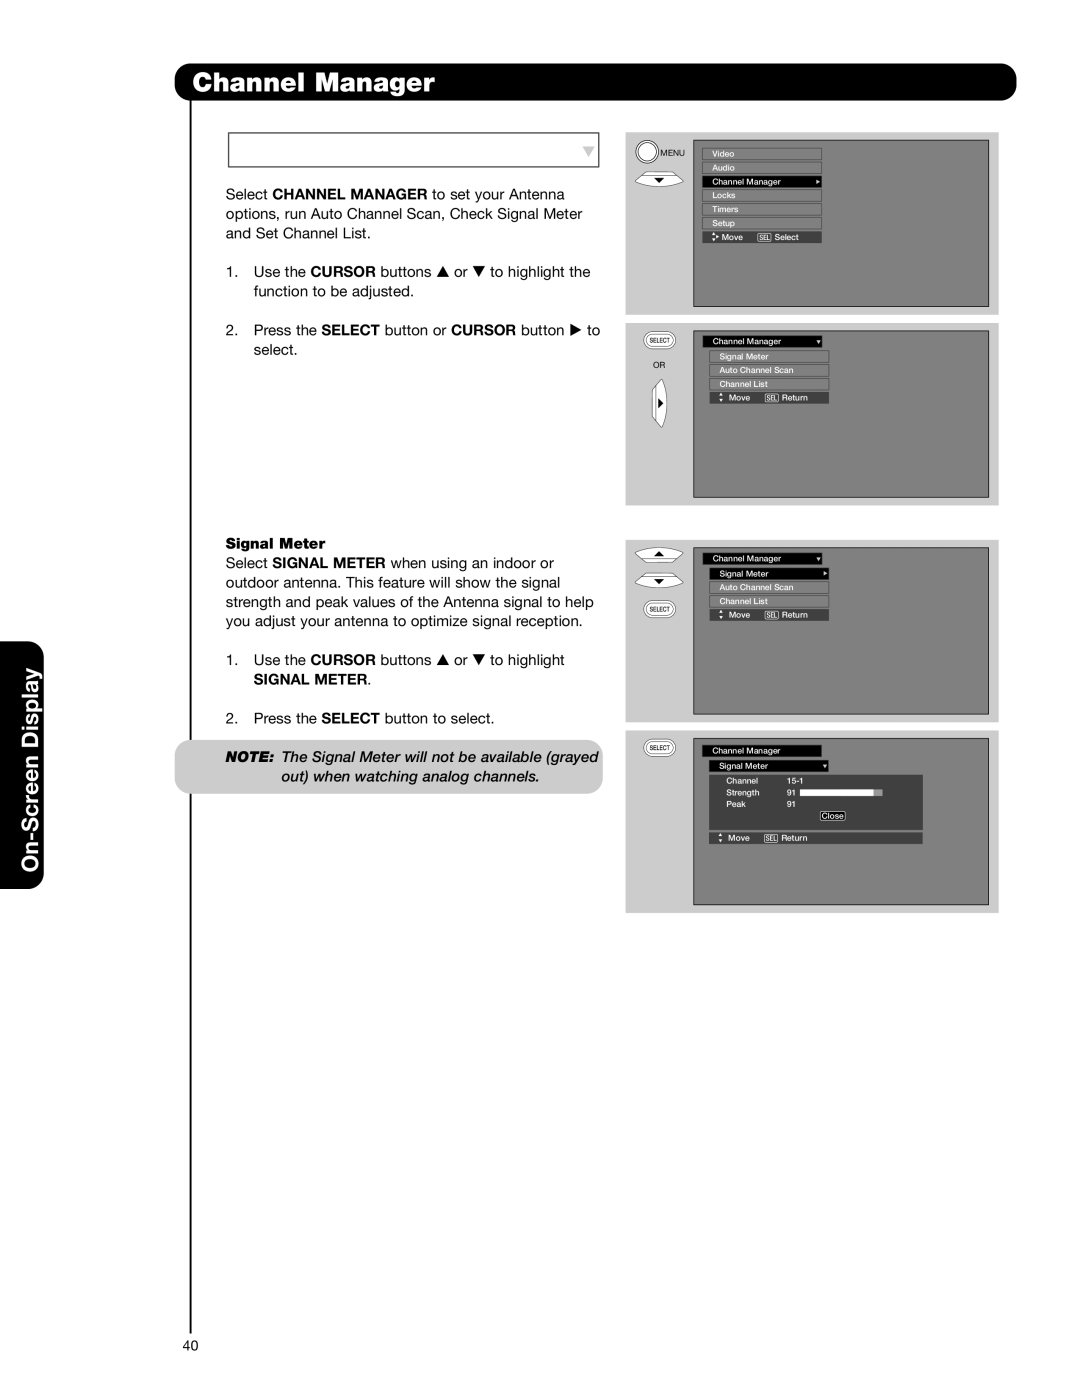
Signal Meter

Access Signal Meter.

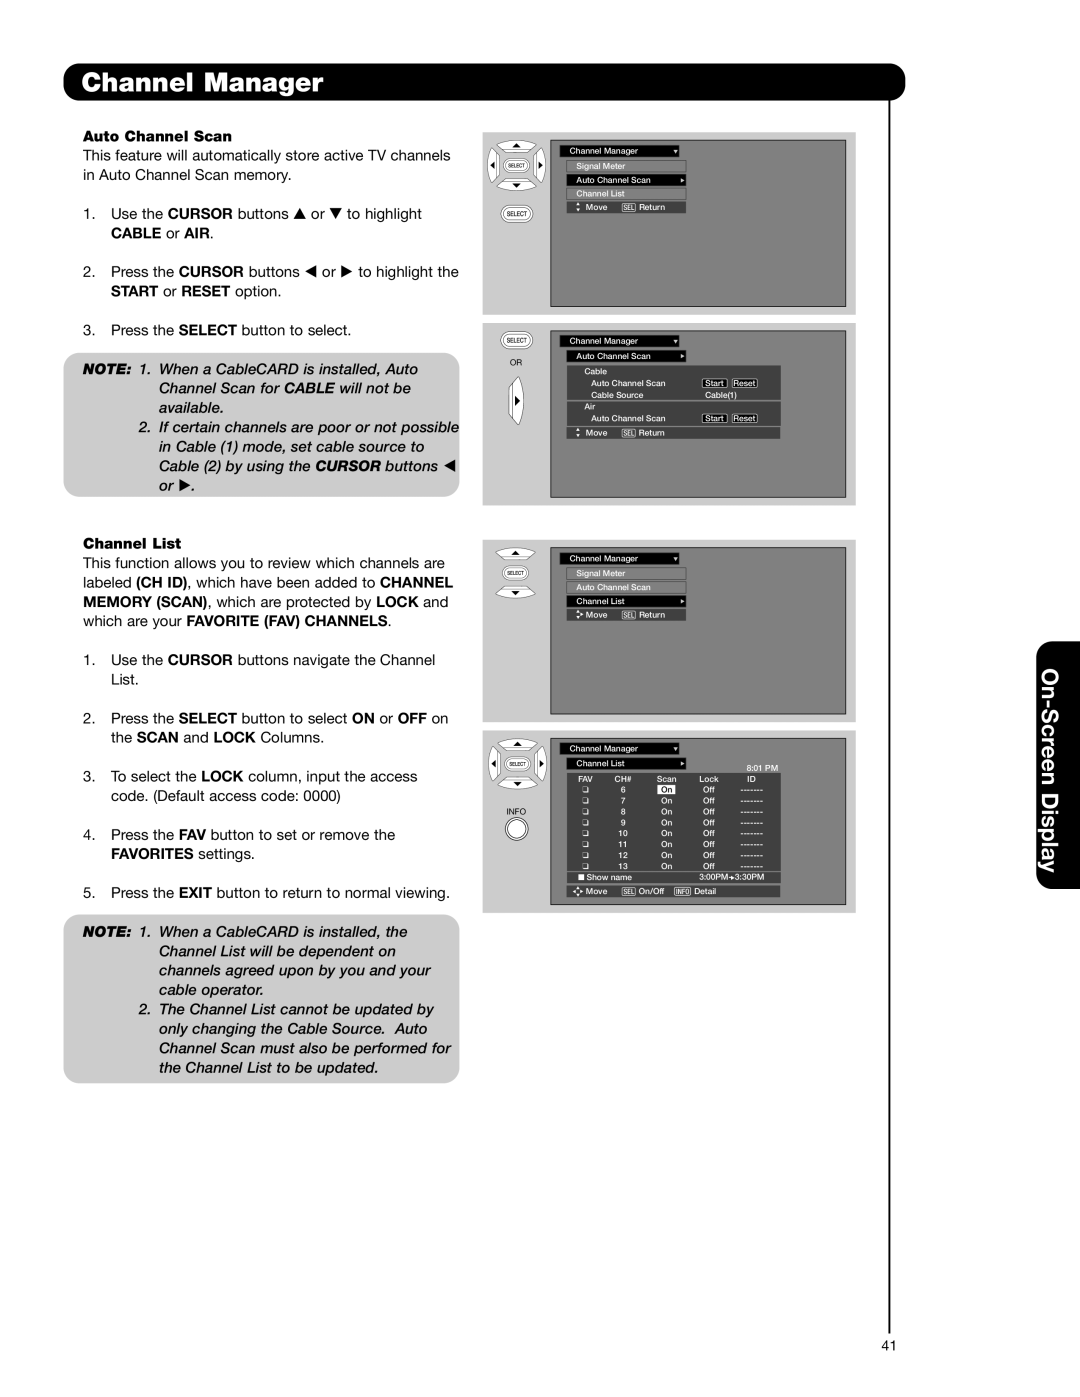
Auto Channel Scan

Set Auto Channel Scan.

Channel List

Set Channel List.


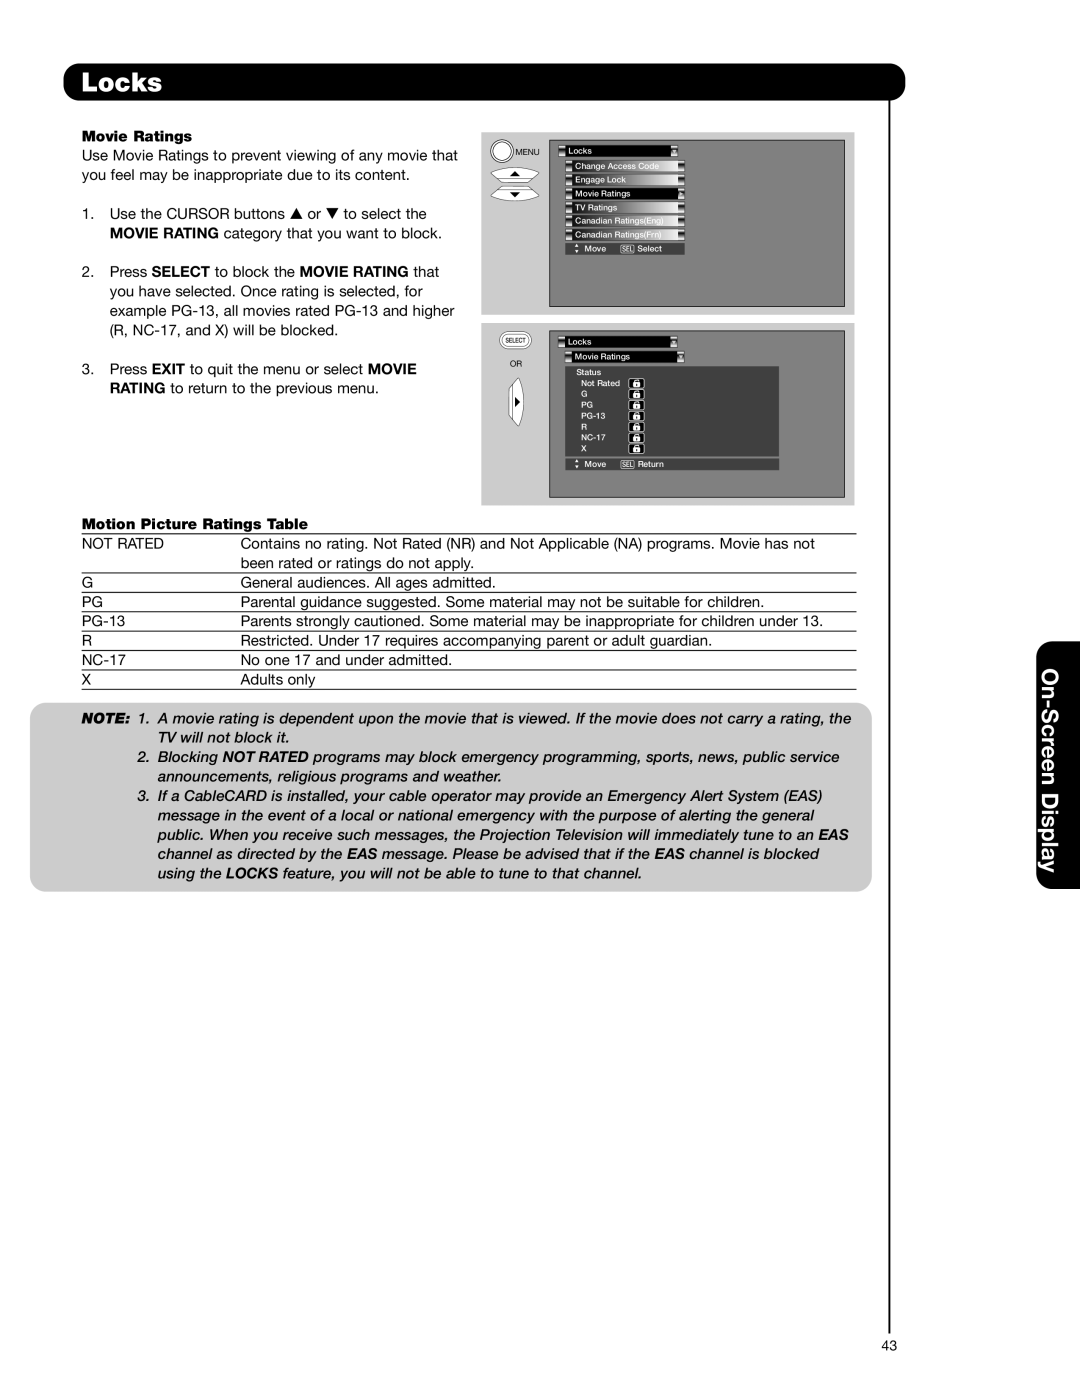
Locks

Change Access Code

Change Lock access code.

Engage Lock

Choose to lock channel or


front panel.

Movie Ratings

Block various types of movies


and video types based on


motion picture ratings.

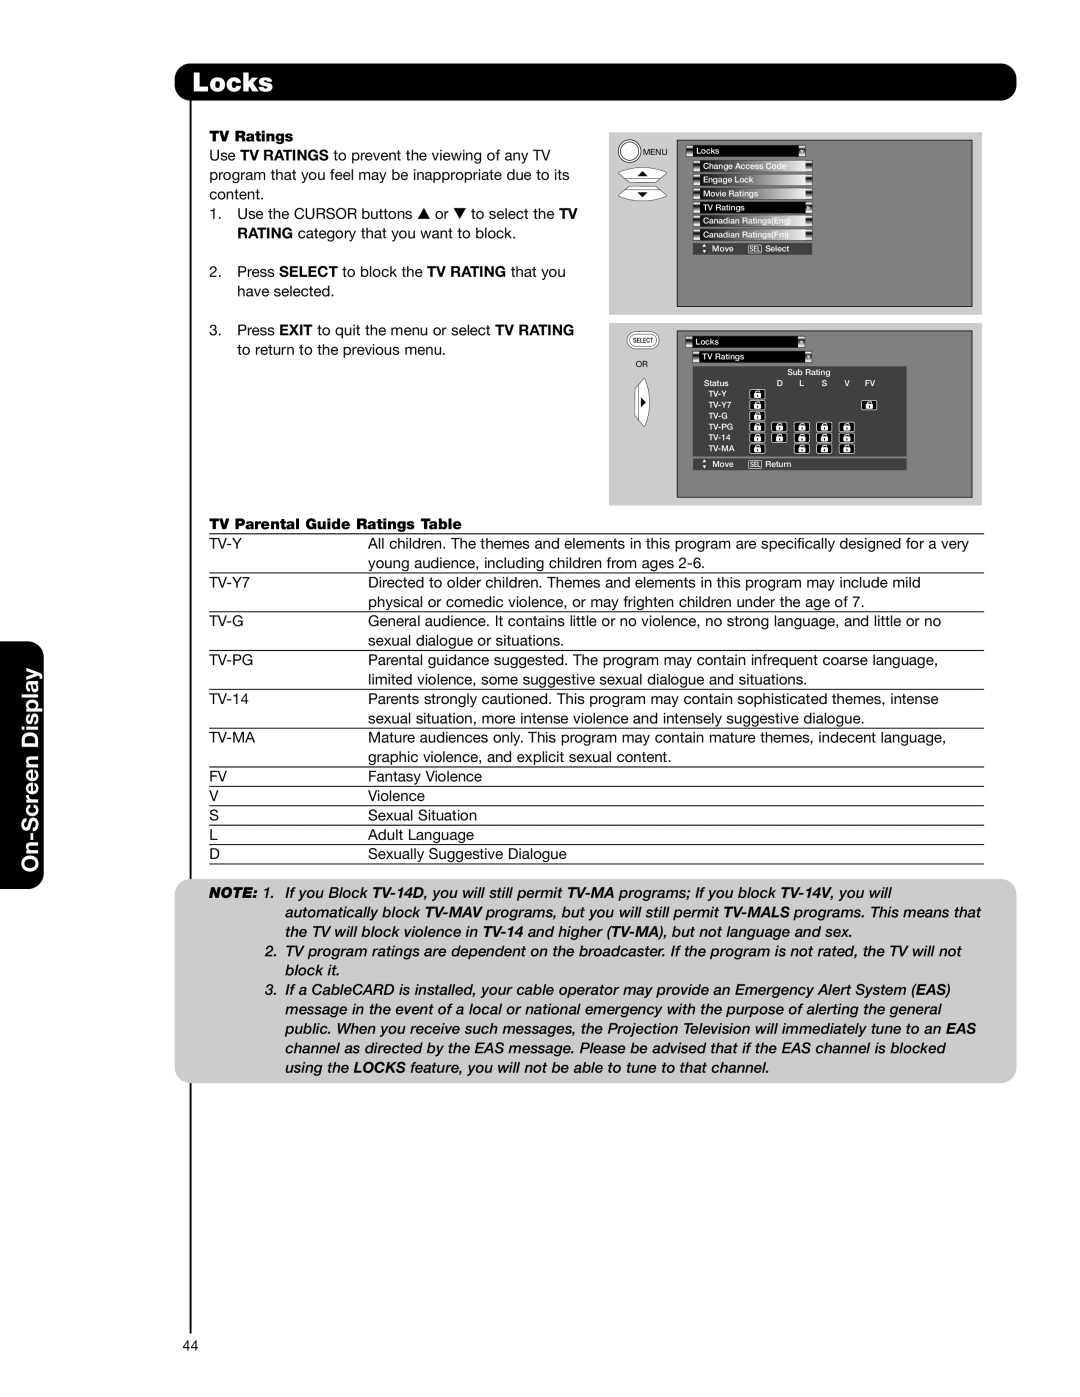
TV Ratings

Block various types of movies


and television programming


based on a parental guide


ratings.

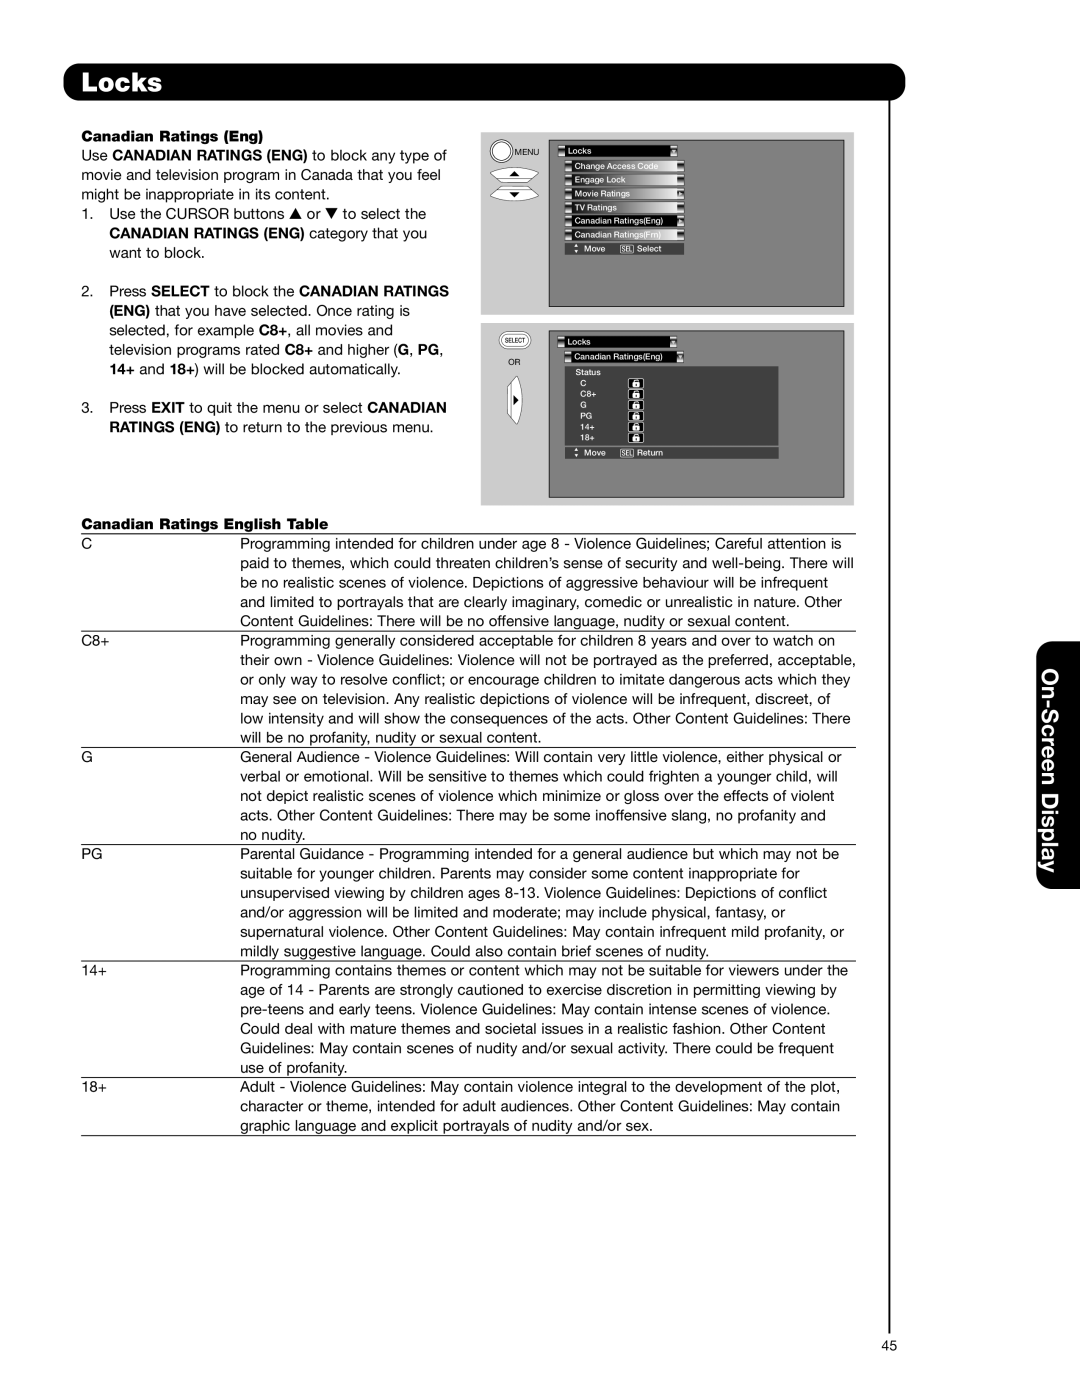
Canadian Ratings (ENG) Block various types of movies and television programming based on the Canadian ratings system.

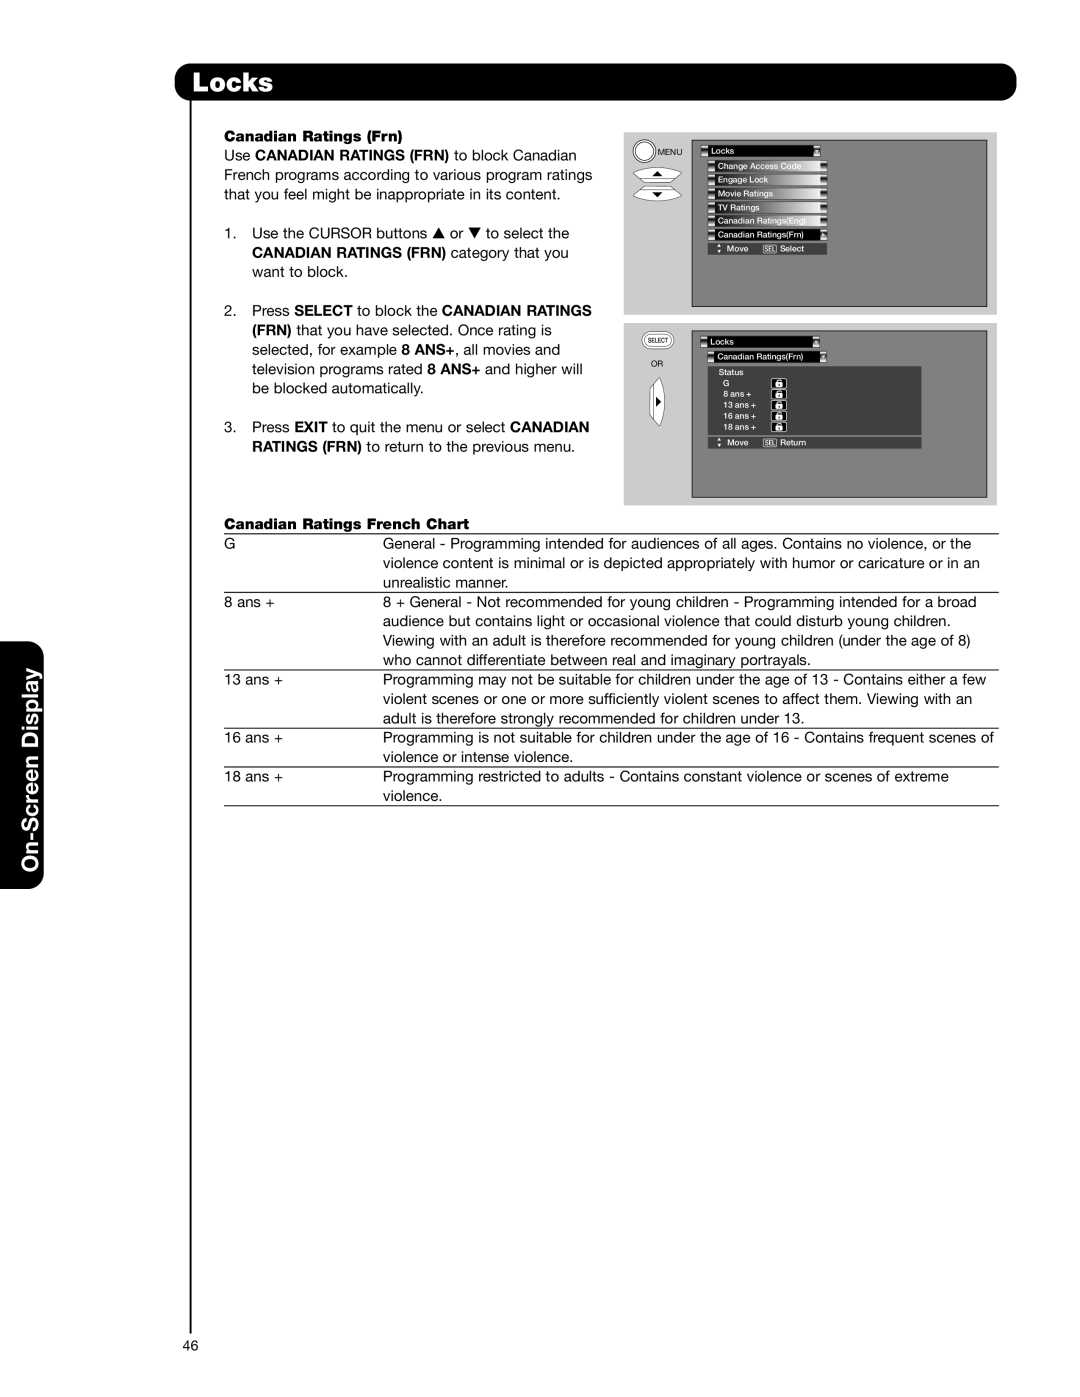
Canadian Ratings (FRN) Block various types of movies and television programming based on the Canadian French ratings system.

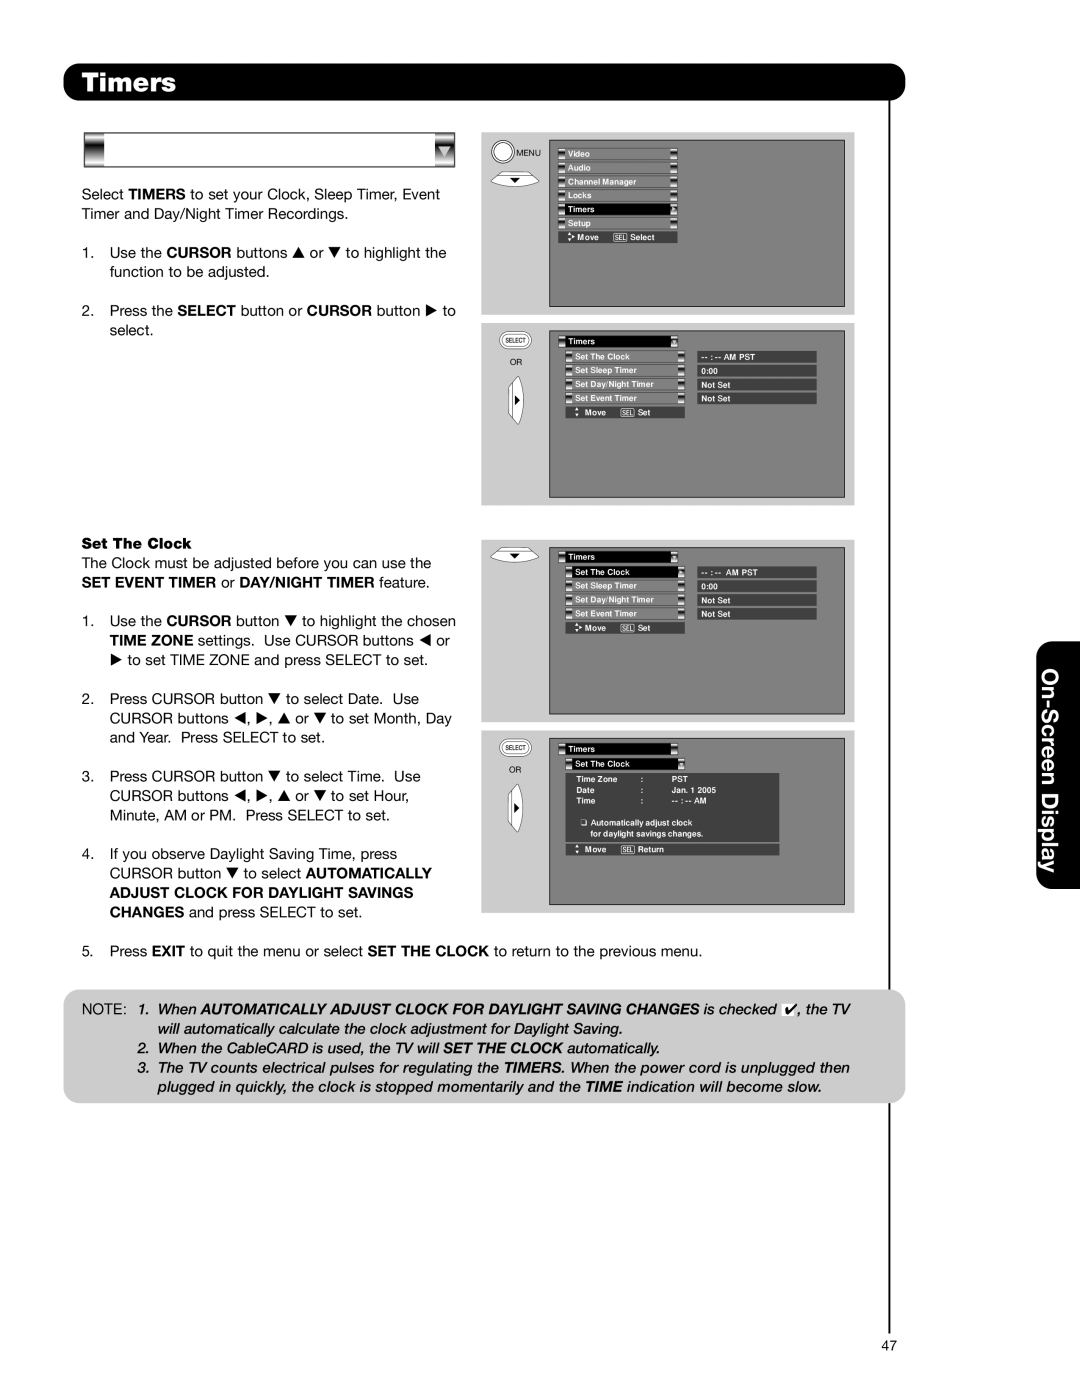
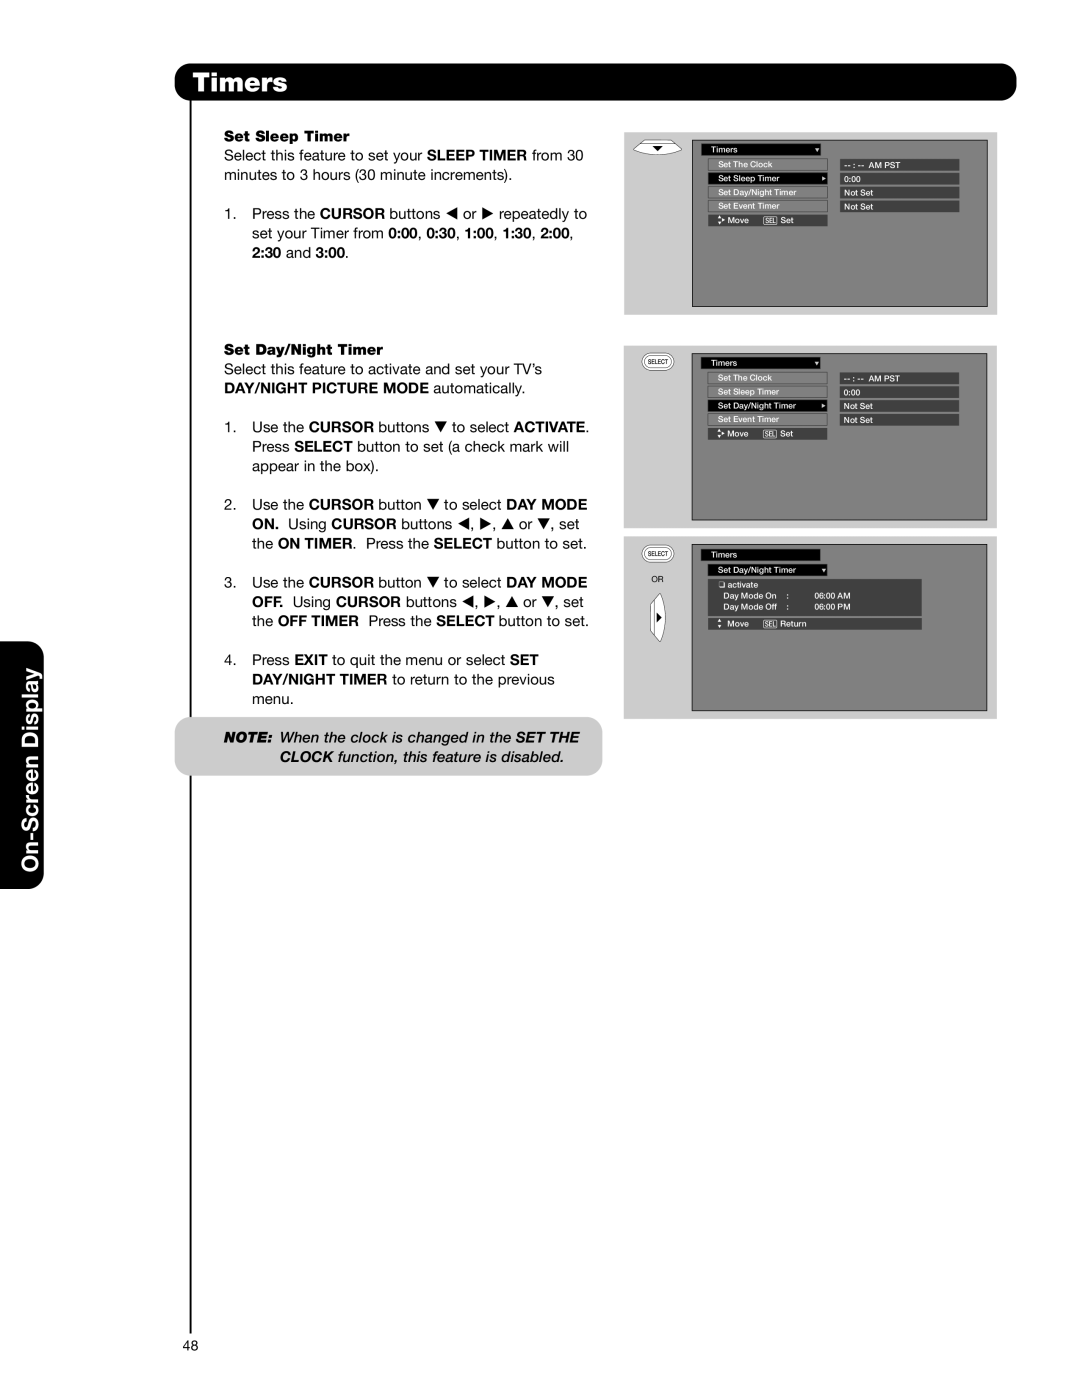
Timers

Set the Clock

Set Clock Settings.

Set Sleep Timer

Set Sleep Timer intervals


(30 min. intervals, 00:30-3:00).

Set Day/Night Timer

Set Day/Night picture mode


settings.

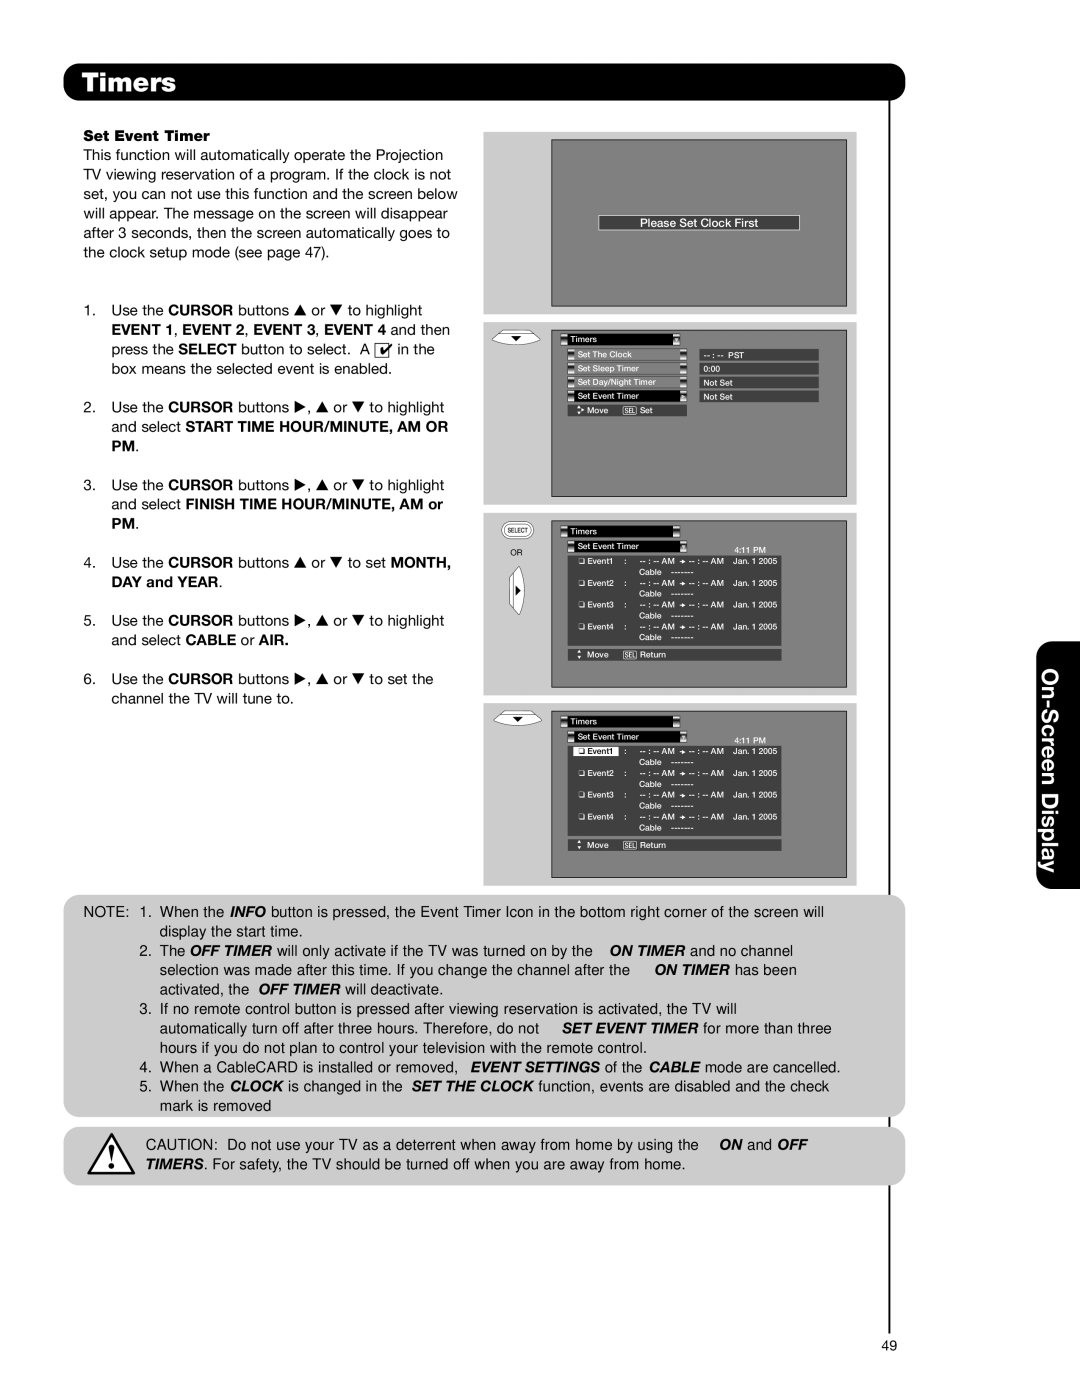
Set Event Timer

Set viewing reservation for TV


programs.


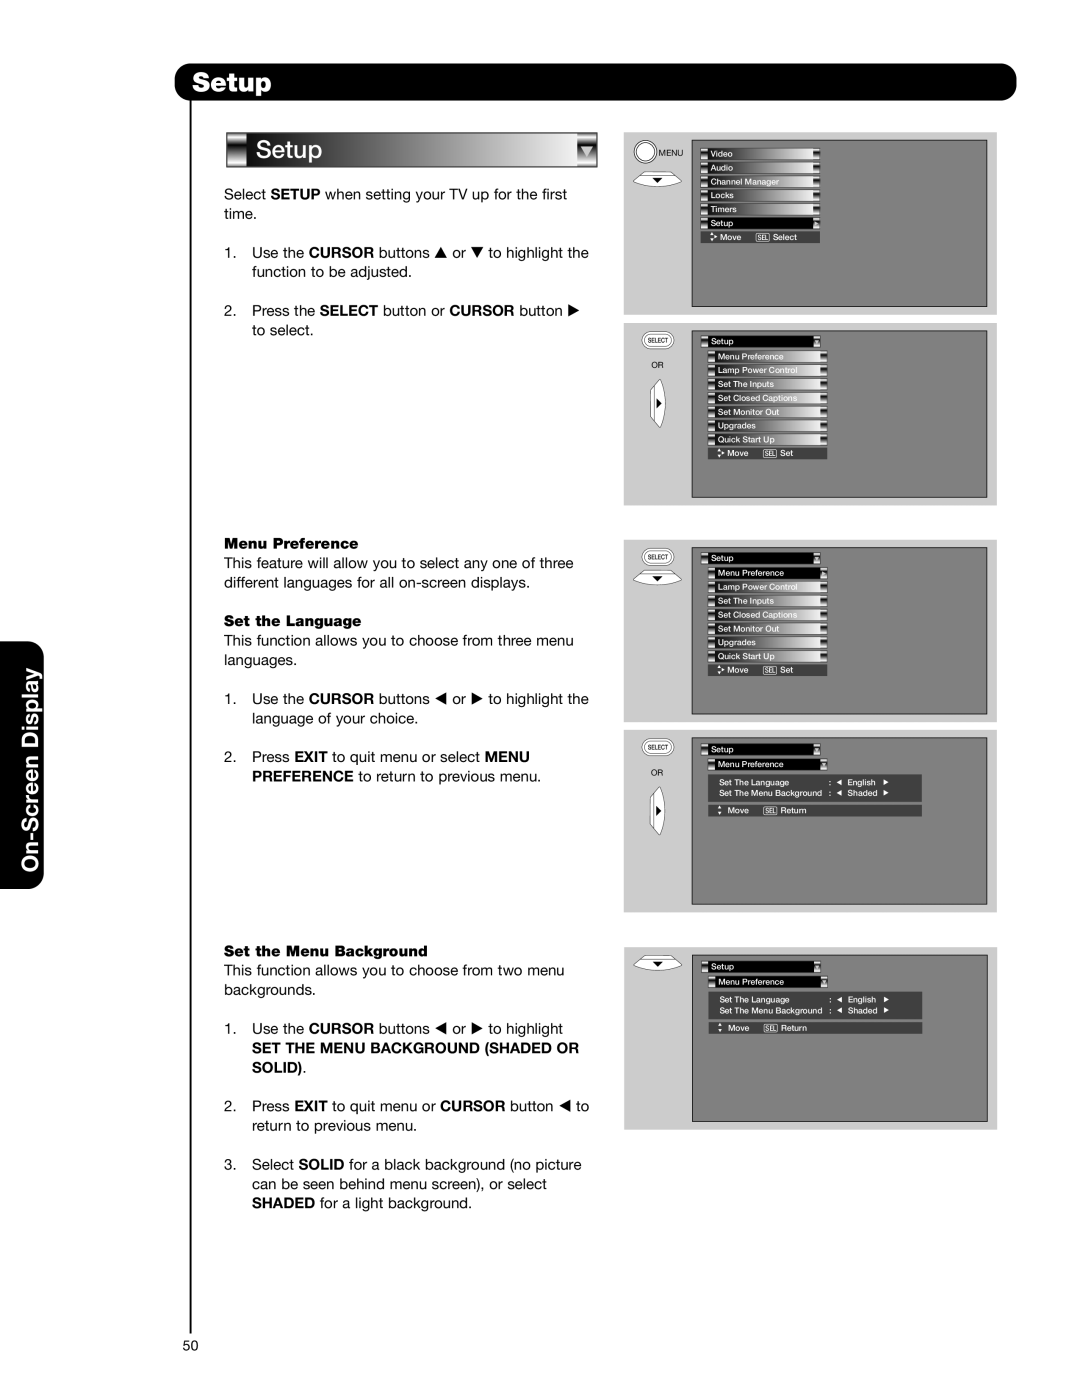
Setup

Menu Preference

Choose English, French, or


Spanish text.


Lamp Power Control

Automatic Power Saving


Feature.

Set The Inputs

Label Video Inputs, VCR, DVD,


etc.

Set Closed Captions

Feature to display dialogue/text.

Set Monitor Out

Set Monitor Out source.

Upgrades

Select to upgrade TV software.

Quick Start Up

Select the TV Quick Start Up


options.

NOTES: 1. The Signal Meter feature of the Channel Manager OSD is only available for Digital signals.

2.The Language, Digital Output, and the Dynamic Range Compression feature of the Audio OSD are only available for Digital channels.

On-Screen Display

33

Image 33
Contents Lamp Replacement Important Safety Instructions First Time USE Remote ControlON-SCREEN Display Useful InformationRead Before Operating Equipment Important Safety InstructionsModifications Power sourcePublic viewing of copyrighted material Lead NoticeRemote Control Battery Installation and Replacement AccessoriesAntenna How to set up your new Hitachi Projection TelevisionLocation ViewingAntenna Connections to Rear Jack Panel Hook-up Cables and ConnectorsQuick Reference Remote Control Buttons and Functions Side Input Jacks Input Front Panel ControlsPower Light Temp IndicatorLamp Indicator Side Panel Jacks and Connections Rear Panel Connections CableCARD Slot TV AS Center InputsAdditional CableCARD Information Use the Cursor buttonCableCARD Information and press the Select button VIDEO,Y-PBPRand Hdmi Tips on Rear Panel ConnectionsSpeaker placement Connecting External Video SourcesBefore Operating External Video Source FirstConnecting a Composite Video Approximately four seconds InputConnecting a Component Remote Control Mode buttons How to Use the Remote to Control Your TVPause button DAY/NIGHT buttonStandard Aspect buttonExpanded ZOOM1/ZOOM2PICTURE-IN-PICTURE button Inputs buttonMenu button Exit buttonWhite Channel CH DownPicture-in-Picture PIP POP Mode Picture-in-PicturePIP button SUB PictureSplit Mode Picture-in-Picture PIP Mode Picture-in-PictureSurf Mode Picture-in-Picture Picture-In-Picture PIP ModesMain Freeze Split FreezeStrobe Freeze Remote Control for Cable Box Functions Operating the Precoded Function for Your Cable BOXCable Brand Codes Satellite Brand Codes Remote Control for Set-Top Box/Satelite Receiver FunctionsSET TOP BOX Brand Codes MY Satellite ReceiverRemote Control for DVD Functions Operating the Precoded Function for Your DVD PlayerDVD Brand Codes Remote Control for VCR Functions Operating the Precoded Function for Your VCRVCR Brand Codes On-Screen Display SRS BBEDRC Video Aspect Mode Reset Video Settings Vertical PositionBlack Side Panel Audio SRSBBE Perfect Volume Auto Noise CancelAudio Source Internal SpeakersDigital Output LanguagePCM DRCSignal Meter Signal MeterChannel Manager Auto Channel Scan Start or Reset optionCable or AIR Channel ListLocks Change Access CodeMovie Ratings Motion Picture Ratings TableNot Rated TV Parental Guide Ratings Table TV RatingsCanadian Ratings English Table Canadian Ratings EngCanadian Ratings French Chart Timers Adjust Clock for Daylight SavingsSet The Clock Set Day/Night Timer Set Sleep TimerEvent 1 , Event 2 , Event 3 , Event 4 and then Set Event TimerSelect Start Time HOUR/MINUTE, AM or Select Finish Time HOUR/MINUTE, AM orSetup SET the Menu Background Shaded orSolid Set The Inputs Lamp Power ControlInput 4 Auto Link Caption ModeSet Closed Caption Caption DisplaySet Monitor Out Digital CaptionsMonitor TV Tuner OutYES ANTHDMI1 YES HDMI1Upgrade NOW UpgradesInsert MMC Card Quick Start UpLamp Replacement Lamp ReplacementLamp Life Lamp Compartment Front Cover 120VLamp Cover ScrewPhillip Head Screw Driver Handle Lamp Unit Remove ScrewsScrew Troubleshooting Equipment Care and TroubleshootingSwitch ON/OFF Do notReception Problems Features Features and SpecificationsDimensions InputsDigital Media Division Home Electronics DivisionCanada 1-800-HITACHI Meadowpine Blvd Mississauga, Ontario L5N 6C3END User License Agreement for Hitachi DTV Software End User Licence Agreement for Hitachi DTV SoftwareImage Input Type Format Aspect Video ID Auto Aspect AppendixesLocks IndexPage Page Page Page Page QR64621