Pentax S4 Recording Sound Voice Recorder Mode, Press the power switch for more than 2 seconds

Page 78

5 Recordingand

Playback

Recording and Playback

Recording Sound (Voice Recorder Mode)

You can record sound. The recordable time is displayed on the LCD monitor according to how much space is available on the SD Memory Card / MultiMediaCard.

2, 3

1, 4

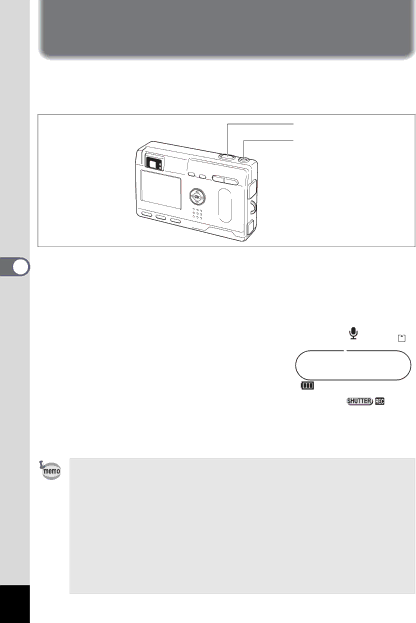
1 Press the power switch for more than 2 seconds.


The power switch is illuminated by a red light.


The recordable time is displayed on the LCD monitor.


1 Remaining recordable time

2

1


2 Recording time


2


Press the shutter release button.


00:00:30


Recording starts. The self-timer lamp and


00:00:00


flash status lamp light during recording.


3


Press the shutter release button.


Recording stops. The remaining recordable


Start


time is displayed.


4 To exit Voice Recorder mode, turn the camera off.

When you press the power switch, the lens extends, then retracts immediately and the camera enters the Voice Recorder mode.

Sound is saved in WAVE monaural files.

The microphone is located on the front of the camera. Aim the camera to obtain the best sound.

An index can be added by pressing the MENU button during recording.

When the shutter release button is pressed for more than 1 second after recording has started, recording continues for as long as the button is held down and stops when the button is released.

76

Image 78
Contents Operating Manual Thank you for buying the Pentax Optio S4 Digital Camera For Safe USE of Your Camera Care to be Taken During Handling To users of this camera Contents Recording and Playback Playback/Erasing/EditingSettings AppendixContents of the Operating Manual Checking the Contents of the Package Names of Parts FrontBack Names of Operating Parts Guide indicationsAttaching the Strap Powering the Camera Charging the BatteryInstalling the Battery GettingStarted Battery Level Indicator Using the AC Adapter optional Installing the SD Memory Card / MultiMediaCard Data Backup Precautions When Using a SD Memory Card / MultiMediaCardInitial Settings Setting the Display LanguagePress the four-way controller Setting the Home Town Setting the D.S.T. ModeSetting the Date and Time GettingStarted Press the power switch Taking Still PicturesPress the shutter release button Rotating a Displayed Image Playing Back ImagesPlaying Back Previous or Next Images Press the Playback button after taking a pictureDeleting a Displayed Image Viewing Images on the Camera Viewing Images on a TVPrinting images by a printing service Viewing Images on a PCPlayback Only Mode Voice Recorder ModeTurning the Camera On and Off Using the Button Functions Capture ModePlayback Mode Zoom/f/y buttonShutter release button Press the Menu button Setting the MenusHow to Set the Menus Use the four-way controller 23 to select an itemExample of menu operation Menu buttonRec. Mode Menu Menu ListPlayback Menu Set-up MenuPress the four-way controller 3 Capture mode Setting the Shooting FunctionsChanging the Mode Switching between Capture Mode and Playback ModeSelecting the Focus Mode Press the q s or z button in Capture modeFocus Mode To move the autofocus area Focusing area mode, press the four-way controllerChanging the Focusing Point Manual FocusSelecting the Flash Mode Press the b button in Capture modeHistogram Display Displaying Shooting Information in Capture ModeDisplay On Display OffSelect Recorded Pixels on the a Rec. Mode menu Selecting the Recorded PixelsTo change the size Selecting the Quality Levels Press the OK buttonPress the OK button twice Select White Balance on the a Rec. Mode menuUse the four-way controller To select the setting White balance screen will beBalance screen Manual SettingSelect K manual on the White Press the Display buttonChanging the AF Area Focusing Area Saving the Focusing Area Setting 1 p.74Select AE Metering on the a Rec. Mode menu Setting the Sensitivity SensitivitySetting the Instant Review time Instant Review Select Instant Review on the a Rec. Mode menuTo change the setting from Setting the Image Sharpness SharpnessSelect Sharpness on the a Rec. Mode menu Normal to Hard + or SoftSetting the Color Saturation Saturation Select Saturation on the a Rec. Mode menuSetting the Image Contrast Contrast PicturesSelect EV Compensation on the a Rec. Mode menu EV CompensationSetting the Functions Program Mode Press the four-way controller 3 in Capture ModeTaking Pictures Mode at the top of the dial Press the OK button Picture ModeSelect the icon for the desired picture Taking Pictures of Dark Scenes Night-Scene Mode Taking Movie Pictures Movie Picture Mode Picture mode C at the top of the dial Press the OK buttonUse the four-way controller 45 to display the Movie Keeping the shutter release button pressed Taking Panorama Pictures Panorama Assist Mode 3, 4Take the first picture Move the camera to the rightTake the second picture Taking Pictures with Digital Filters Digital Filter Mode Color FiltersSlim Filter Setting the slim filter Use the four-way controller 45 to set the slimnessUsing Preset Function Settings User Mode 5, 6 4, 7 Taking Stereo Pictures 3D Image ModeSelect the viewing mode Pictures Take the picturesTake the first image How to Assemble the 3D Image Viewer How to view 3D pictures using the 3D image viewer Example of a 3D Picture Continuous Shooting Continuous Shooting Mode Button to display j on the LCD MonitorBDE Using the Self-Timer C F GDEYou can take pictures using the remote control F optional Using the Remote Control Unit optionalOn the remote control unit Life of the Battery for the Remote Control UnitUsing the Zoom Press the Zoom button in CaptureMode Press the Menu button in Capture mode Enabling the Digital Zoom FunctionPress the Menu button in Movie Picture mode Taking Time-lapse Movie Pictures Fast Fwd MovieChoose Off ×1, ×2, ×5, ×10 Saving the Settings Memory Saving the Menu Items MemoryTo select Memory Register Functions in User ModeFunctions registered in User mode To select the itemTo exit Voice Recorder mode, turn the camera off Recording Sound Voice Recorder ModePress the power switch for more than 2 seconds Playback4 1 Playing Back SoundPress the Playback button Following operations can be performed during playbackSetting the Record Voice Memo to Off Enter the playback modeAdding a Voice Memo Playing Back Images Playing Back Still PicturesZoom Display Playing Back Movie Pictures Following operations can be Performed during playbackDisplaying shooting information in Playback mode Nine Image Display Press w/f on the Zoom button f/yTo change the playback interval SlideshowSelect Slideshow with the four 4 5Erasing Images Erasing a Single Image or Voice MemoErasing a Voice Memo only Enter the Playback mode and press the i button twice Erasing All ImagesEnter the Playback mode Press the Z button twice Protecting Images / sound from Deletion ProtectProtecting All Images Viewing Images on a TV Press the four-way controller 2 button Setting the Printing Service DpofPrinting Single Image CopiesTo select whether to insert the date or not Printing All Images Press the four-way controller 45 to select O On or OffPress the Menu button Press the four-way controller Editing ImagesChanging the Image Size Press the four-way controller 23 to select ResizePress the four-way controller 45 to select Recorded pixels Trimming Images Press the four-way controller 23 to select TrimmingTrim the image Copying Files Select the copying methodTo select the file you want to copy Press the OK button Camera Settings How to recall the B Set-up menuChanging the Sound Settings Changing the volume of playback and operation soundsChanging the Start-up Screen Setting the Date Style Setting the World Time Changing the Date/TimeSelect World Time on the B Set-up menu Switch O and P with the four-way controller Changing the Display Language 102Changing the Video Output Format Sleep Timeout Setting Auto Power OffSetting the Quick Delete Function Setting the Quick Zoom FunctionRegistering Functions Registering a functionRetrieving a function Resetting to Default Settings Reset Setting the Alarm Setting the AlarmChecking the Alarm Press the four-way controller 23 to select AlarmTurning the Alarm Off To select alarmList of City Names City names CodeOptional Accessories Messages 112113 Troubleshooting Problem Cause Remedy115 Main Specifications MMC117 Warranty Policy 119 For customers in USA For customers in CanadaPour les utilisateurs au Canada Declaration of Conformity Pentax Europe GmbH European Headquarters
Related manuals
Manual 2 pages 11.24 Kb