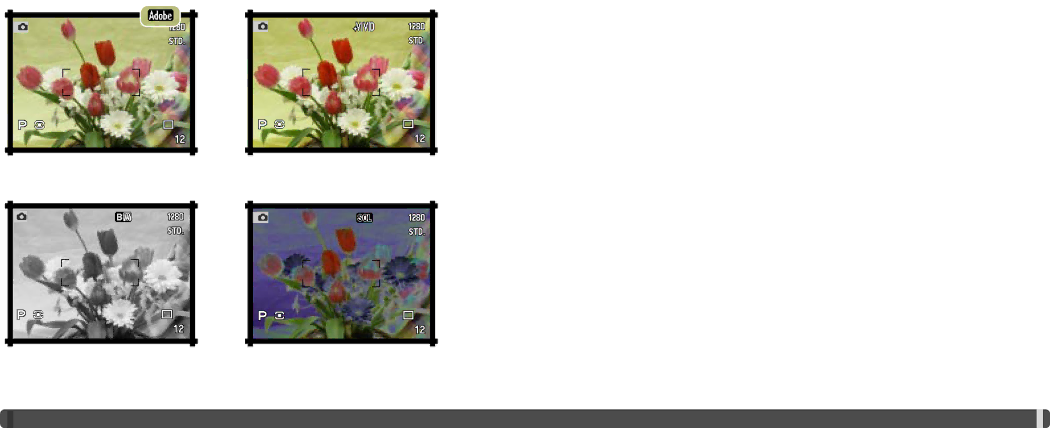
COLOR MODE
The color mode controls whether a still image is color or black and white as well as the color space. The color mode is set in the advanced 2 section of the
BEFORE YOU BEGIN
Thank you for purchasing this Minolta digital camera. Please take the time to read through this instruction manual so you can enjoy all the features of your new camera.
This manual contains information regarding products introduced before September, 2002. To obtain compatibility information for products released after this date, contact a Minolta Service Facility listed on the back cover of this manual.
Check the packing list before using this product. If any items are missing, immediately contact your camera dealer.
Natural Color and Adobe RGB - | Vivid Color - increases the |
reproduces the colors in the | saturation of the colors in the scene. |
Minolta DiMAGE digital camera
Lens shade
16MB CompactFlash card AV cable
USB cable
scene faithfully. |
Black & White - produces | Solarization - produces a partial |
monochrome images. | reversal of tones in the image. |
![]() 2
2![]()
![]()
![]() EXAMPLES
EXAMPLES
This product is designed to work with accessories manufactured and distributed by Minolta. Using accessories or equipment not endorsed by Minolta may result in unsatisfactory performance or damage to the product and its accessories.
Apple, the Apple logo, Macintosh, Power Macintosh, Mac OS, and the Mac OS logo are registered trademarks of Apple Computer Inc. Microsoft and Windows are registered trademarks of the Microsoft Corporation. The official name of Windows is Microsoft Windows Operating System. Pentium is a registered trademark of the Intel Corporation. Microdrive is a trademark of the International Business Machines Corporation. QuickTime is a trademark used under license. Adobe is a registered trademark of Adobe Systems Incorporated. All other trademarks are the property of their respective owners.
![]()
![]()
![]()
![]()
![]()
![]()
![]()
![]()
![]()
![]()
![]()
![]()
![]()
![]()
![]()
![]()
![]()
![]()
![]()
![]()
![]()
![]()
![]()
![]()
![]()
![]()
![]()
![]()
![]()
![]()
![]()
![]()
![]()
![]()
![]()
![]()
![]()
![]()
![]()
![]()
![]()
![]()
![]()
![]()
![]()
![]()
![]()
![]()
![]()
![]()
![]()
![]()
![]()
![]()
![]()
![]()
![]()
![]()
![]()
![]()
![]()
![]()
![]()
![]()
![]()
![]()
![]()
![]()
![]()
![]()
![]()
![]()
![]()
![]()
![]()
![]()
![]()
![]()
![]()
![]()
![]()
![]()
![]()
![]()
![]()
![]()
![]()
![]()
![]()
![]()
![]()
![]()
![]()
![]()
![]()
![]()
![]()
![]()
![]()
![]()
![]()
![]()
![]() 3
3 ![]()