Eizo CE240W, CE210W user manual Making USE of USB Universal Serial Bus, Required system environment

Page 30

5. MAKING USE OF USB (Universal Serial Bus)

5. MAKING USE OF USB (Universal Serial Bus)

This monitor provides a hub which supports the USB standard. When connecting to a USB compliant PC or another hub, the monitor functions as a hub to which the USB compliant peripherals can be easily connected.

Required system environment

PC equipped with USB ports or another USB hub connected to the USB compliant PC

Windows 98/2000/Me/XP // Mac OS 8.5.1 or later

USB Cable (MD-C93, enclosed)

NOTE

The USB hub function may not work properly depending on the PC or peripherals. Please consult the manufacturer of each device about the USB support.

Using the USB Rev. 2.0 compatible PC or peripherals is recommended.

If the monitor is in the power saving mode, or if the monitor is connected to the power outlet with the monitor turned off, all the devices connected to the USB ports (upstream and downstream) work. Therefore, power consumption of the monitor varies with connected devices even in the power saving mode.

The followings are procedures for the Windows 98/Me/2000/XP and Mac OS.

Connecting to the USB HUB

1

2

Connect the monitor to the PC with the signal cable first, then turn on the PC.

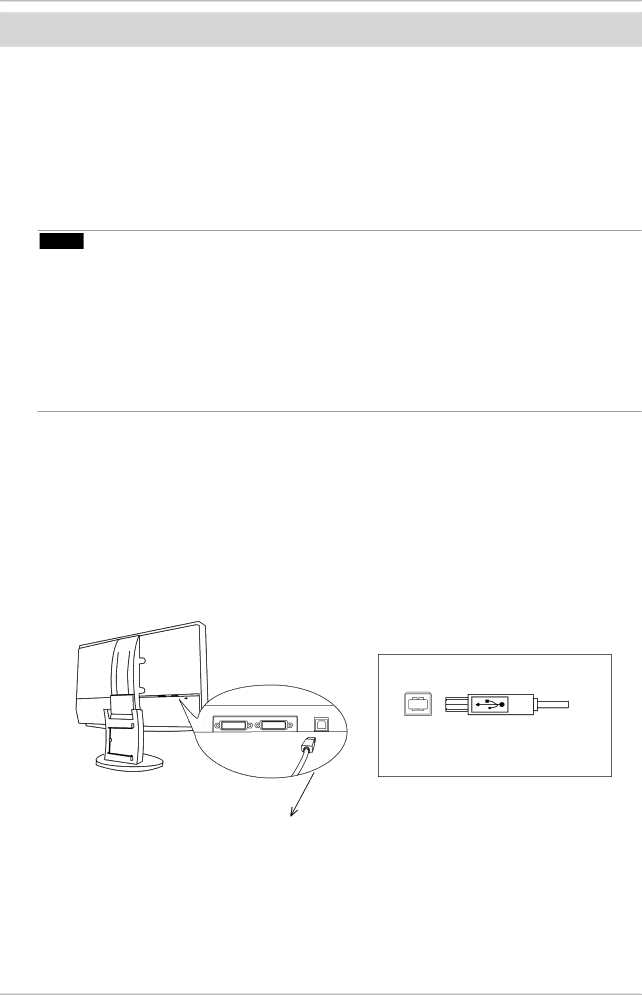
Connect the upstream port of the monitor to the downstream port of the USBcompliant PC or another hub by using the USB cable.

After connecting the USB cable, the USB function can be set up automatically.

Upstream Port

To downstream port of the PC or another hub

Upstream Port:

Connect the USB complaint PC or another hub using the USB cable

30

Image 30
Contents Safety Symbols Precautions Introduction Safety Symbols Location of the Caution Statements PrecautionsRefer all servicing to qualified service personnel Do not open the cabinet or modify the unitNever touch the plug and power cord if it begins to thunder To disconnect the power cord, grasp the plug firmly and pullHandle the power cord with care Place the unit at the strong and stable placeUnplug the unit before cleaning it Use an easily accessible power outletPeriodically clean the area around the plug Do not touch a damaged LCD panel directly with bare handsLCD Panel CE210W FeaturesIntroduction CE240WPackage Contents Controls & Connectors FrontRear / Side / Bottom CE210W is given as an example Cable Connection Before ConnectingResolution Frequency Dot Clock Remarks Analog Input CE210WConnecting the Signal Cable Digital InputSignal Cable Connector of the PC Analog InputCable Connection USB Cable Connecting Two PCs to the Monitor Connecting ExamplesSelecting the Active Input Priority setting Performance Entering the ScreenManager How to use the ScreenManagerMaking Adjustments and Settings Exiting the ScreenManagerFineContrast ScreenManager Adjustments and SettingsTo select the Mode Main menu Sub menu ReferenceDetailed Adjustments Color Adjustment of the Mode SettingsFineContrast Mode Mode DescriptionAdjustment Lock Off TimerUseful Functions To undisplay Power Indicator SettingEizo Logo Appearing Function To displayRun the Screen Adjustment Program AdjustmentScreen Adjustment Analog InputAdjust by using Screen menu in the ScreenManager Adjust the output signal range Dynamic Range of the signal ProcedureMode Function Displaying Lower ResolutionsEnlarge the screen size when displaying a low resolution Smooth the blurred texts of the enlarged screenColor Adjustment Adjustment ItemsIcons Functions FineContrast Mode SRGB Custom Menu Function Descriptions Adjustable range Monitor Power Indicator Power-save SetupPower Saving System Digital InputMaking USE of USB Universal Serial Bus Required system environmentConnecting Examples Attaching AN ARM Attach an arm stand to the LCD monitor securely100 Troubleshooting Problems Points to check with PossibleSolutionsSame image for extended periods of time Try executing the following method Cleaning CabinetLCD Panel Specifications DVI-I×2CE240W Default settings Beeper settingsDimensions CE240W Pin Assignment Pin No SignalSignal Remarks USB PortGlossary Temperature TMDSTransition Minimized Differential SignalingSRGBStandard RGB APPENDIX/ANHANG/ANNEXE CE240W For more information, please visit FCC Declaration of Conformity Hinweis zur Ergonomie Recycling Information for customers in USA