JVC CA-DXJ35 Timer Operations, Setting the Timer Remote Info, Make the timer setting as you want

Page 38

Timer Operations

Remote control

AUDIO

CLOCK/TIMER SLEEP

CANCEL

, ,

ENTER/SET

SHIFT

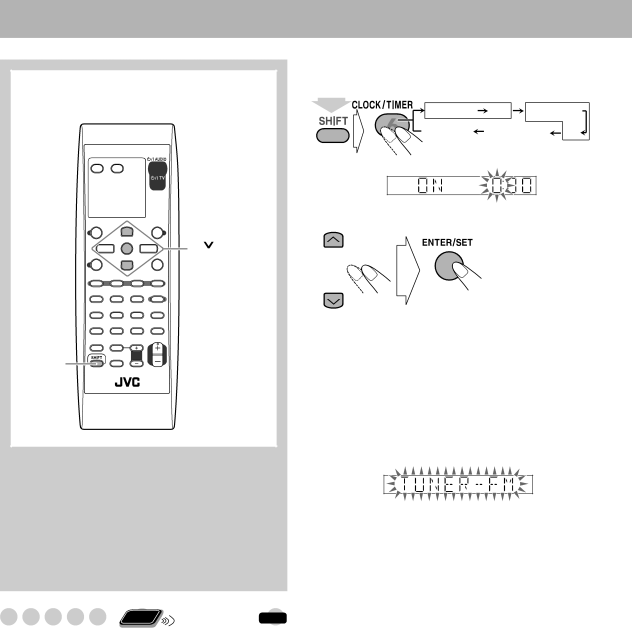
1Select one of the timer setting modes—ON for Recording Timer or Daily Timer.

Recording Timer


Daily Timer

REC TIMER

ON

DAILYTIMER

Canceled

Clock setting ON

(while holding...)

2Make the timer setting as you want.

Repeat the procedure for the following settings until finished.

1Set the hour then minute for on-time.

2 Set the hour then minute for off-time.

3 For Recording Timer: Select the playback source—“TUNER-FM,” “TUNER-AM” or “AUX.”

For Daily Timer: Select the playback source— “TUNER-FM,” “TUNER-AM,” “DISC,” “USB,” “TAPE-A,” “TAPE-B” or “AUX.”

Setting the Timer Remote INFO

ONLY

Using Daily Timer, you can wake up with your favorite song. On the other hand, with Recording Timer, you can make a tape of a radio broadcast automatically.

You cannot activate Daily Timer and Recording Timer at the same time. (Activating one timer deactivates the other timer.)

To correct a misentry during the process, press CANCEL while holding SHIFT. You can return to the previous step.

EX.: When “TUNER-FM” is selected.

When you select “AUX” as the source, you also need to set the timer of the external component.

4Select an item you want to play or record as follows.

“TUNER-FM” and “TUNER-AM”: Preset station.

“DISC”: Disc, group/title and track/file/chapter.

“USB”: Group and file.

5Select the volume level.

You can select the volume level (“VOLUME 0” – “VOLUME 30” and “VOLUME --”). If you select “VOLUME --,” the volume is set to the last level when the System has been turned off.

After making the timer setting, “SET OK” appears and your setting items appear on the display one after another.

35

Image 38
Contents CA-DXJ35 Important for Laser Products CA-DXJ35 Audio formats How to Read This ManualIntroduction About color systemPrecautions Contents¤ Voltage selector Supplied accessoriesConnections # To a wall outletAM/FM antenna Powered subwoofer~ TV/monitor To assemble the AM loop antenna To connect AM/FM antenna¤ Voltage selector Not applicable for Australian model ⁄ Speakers@ Auxiliary equipment To connect the speaker cordsPreparing the Remote Control # Power cordConnecting a USB Mass Storage Class Device Cancelling the DemonstrationDisplay Indication Daily Operations-Playback How to select a numberConnecting or putting on the headphones To turn off standby the SystemTo select the AM tuner interval spacing Adjusting the VolumeTo tune in to a station To select the band FM/AMTo insert discs To tune in to a preset stationPlaying Back a Disc/USB Mass Storage To play back disc/USB mass storage class deviceTo locate a particular portion To select a discTo select a chapter/track To return to normal playback, press DVD/CD 3 orTo reverse the tape automatically deck B only Playing Back a TapeTo change the tape running direction deck B only To insert a tapeRepeat steps 1 and 2 to adjust other speakers Adjusting the Speaker Output LevelSelect the speaker you want to adjust Selecting the Sound Modes Remote Modes-User ModeApplying an Optimal Bass Sound Effect Creating Your Own SoundChanging the Picture Tone Remote Presetting Automatic DVD VideoTo select a preset picture tone To adjust the picture tone Unique Video Disc/File Operations While playing DVD VideoWhile playing a DVD-VR Selecting Browsable Still Pictures RemoteWhile playing While playing an SvcdFrame-by-frame playback Still picture playbackSlow-motion playback Advanced Playback Operations Programming the Playing Order Program PlayTo exit from Program Play To check the programmed contentsTo modify the program To exit from Random PlayRepeat Play RepeatOn-screen bars On-Screen OperationsOn-screen Bar Information Operations Using To change the time information Enter the time Time SearchChapter/Track Search ExamplesControl screen for AV files/JPEG files Operations Using the ControlControl screen for DVD-VR To repeat play for Video files To start playbackTo repeat slide-show for Jpeg file To zoom in the JPEG/ASF fileInsert a recordable cassette into deck B Change the Reverse Mode if necessaryRecording Operations To change the directionDubbing Tapes Enjoying Karaoke Sing into the microphone Adjust the MIC Level and VolumeTo cancel the Mic Mixing Singing Along KaraokeTo return to normal playback, select OFF Adjusting the Sound Track for KaraokeTo return to normal playback temporarily Activate Karaoke Scoring. Kscore on appears on the displayChanging the Karaoke Setting To apply an echo to your voiceReserving Karaoke Songs Select the volume levelTo erase the entire program, repeat the procedure Activate Karaoke Program PlayMake the timer setting as you want Timer OperationsSetting the Timer Remote Info Select an item you want to play or record as followsTurning Off the Power Automatically Remote Timer PriorityPicture menu Setup Menu OperationsLanguage menu Others menu SPK. Setting menuAudio menu Operating the TV VideoDaily Operations-Playback see pages 8 to Additional InformationLearning More about This System Setting the Clock Adjusting the Speaker Output LevelCreating Your Own Sound Modes-User Mode Reinforcing the Bass SoundRecording Operations see pages 29 to Advanced Playback Operations see pagesOn-Screen Operations see pages 23 to Setup Menu Operations see pages 37 to Maintenance TroubleshootingTape Operations Timer OperationsDisc/file Operations Recording OperationsLanguage Code List Cassette deck section SpecificationsAmplifier section Main unit Remote controlParts Index Exclude Australian Model CA-DXJ30 CA-DXJ20 CA-DXJ10 Important for Laser Products CA-DXJ30 Playable Disc/File Types Adjusting the Speaker Output Balance Illustration above is CA-DXJ30 ~ From the video input of TV/monitor SeeFrom the digital input of digital audio component Digital audio component For CA-DXJ20 ¤ Voltage selector Not applicable for Australian modelsFor CA-DXJ30 For CA-DXJ10Connecting a USB Mass storage class device With surround effect is activated Next Shift Listening to the Radio Select Tuner AM, then turn off standby the SystemTo connect a USB mass storage class device To select a title/group Playing Back a Tape Applying an Optimal Bass Sound Effect Vario Bass Adjusting the Speaker Output Balance RemoteReinforcing the Bass Sound Classic Creating 3-Dimensional Sound Field-3D PhonicChanging the display information AUDIO/MPX Zoom SUB Title CA-DXJ30 only Playing Back Bonus Group Remote Pause playbackRepeat above until you complete your program Start playback Programming the Playing OrderSelect chapters/tracks/files you want for Program Play To check the programmed contents Prohibiting Disc Ejection For DVD Audio CA-DXJ30 only While playing or before playbackDVD Audio CA-DXJ30 only DTS/ Lpcm To change the time information Time Search Control screen for AV files/JPEG file Track Group Disc Repeat Track Repeat Group Repeat Disc Forward 2 reverse To stop dubbing Karaoke Scoring Volume -,+ REC START/STOP MIC Level -,+ Your score To change the calculation level Calculation level is strictTo change the mic volume Timer Operations Turning Off the Power Automatically Remote Basic Procedure Digital Audio Output To turn on or Daily Operations-Playback see pages 8 to Creating 3-dimensional Sound Field-3D Phonic On-Screen Operations see pages 23 to Maintenance Troubleshooting With Dolby Digital Optical Digital Output SignalsWith MP2, MP3 Language Code List CA-DXJ30 only NTSC/PAL CA-DXJ30/CA-DXJ20/CA-DXJ10 Compact Component System