JVC GVT0115-008B manual Front Panel Display Window

Page 7

Continued

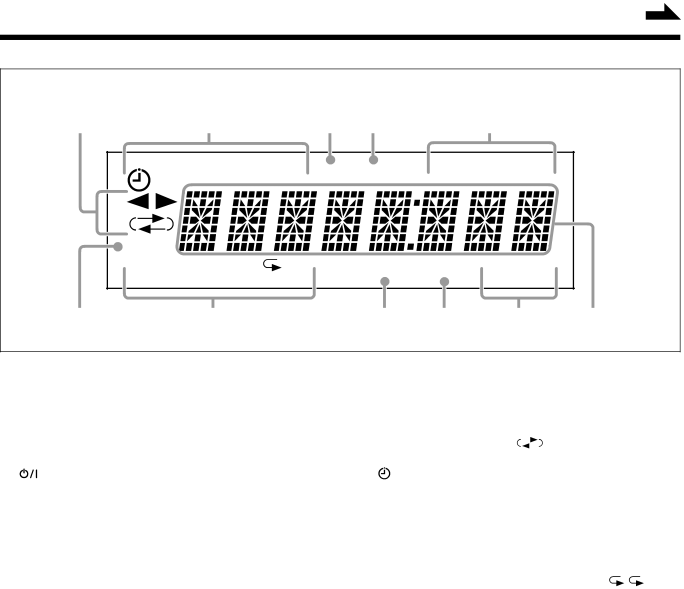
Display Window

1

2

3

4


5


[DAILY REC SLEEP] REC RDS

TA NEWS INFO


CLOCK


PRGM RANDOM

ALL

BASS SOUND MONOST


6

7


8

9

p

q

See pages in the parentheses for details.

Front Panel

Display Window


1

Disc tray

1

Tape operation indicators


2

Display window


2 3 (tape direction) and


(reverse mode)


3

STANDBY lamp (9)

2

Timer indicators


4

(standby/on) button (9, 17, 22)


• (timer), DAILY (Daily Timer), REC (Recording

5

Remote sensor


Timer), and SLEEP (Sleep Timer)

6

CLOCK button (9)

3

REC indicator


7

TIMER button (21, 22)

4

RDS indicator


8

Cassette holder

5

TA, NEWS, and INFO indicators


9

PHONES jack (10)

6

CLOCK indicator


p 0 (disc tray open/close) button (15)

7

Disc play mode indicators


q SOUND button (10)


• PRGM (program), RANDOM, and repeat ( / ALL)

w AHB (Active Hyper Bass) PRO button (10)

8

BASS (Active Hyper Bass Pro) indicator

e Source buttons

9

SOUND (sound mode) indicator


CD 3/8 (play/pause), TAPE 2 3 (play), FM/AM,

p Tuner operation indicators


and AUX


• MONO and ST (stereo)


Pressing one of these buttons also turns on the unit.

q Main display


r VOLUME + / – control (10)


• Shows the source name, frequency, etc.

tMulti operation buttons

4 (reverse search), 7 (stop), and ¢ (forward search)

y) (cassette holder open) portion (18 – 20) u REV.MODE (reverse mode) button (18 – 20) i REC (recording) button (19, 20)

4

Image 7
Contents Instructions Important for Laser Products Above ALL Introduction Precautions About This Manual Contents Front Panel Location of the Buttons and ControlsFront Panel Front Panel Display Window Display WindowRemote Control To connect an outdoor FM antenna Supplied Accessories Connecting AntennasGetting Started FM antennaTo connect an outdoor AM MW antenna Connecting SpeakersRelease the finger from the clamp AM MW antennaTo connect audio equipment Connecting Other EquipmentSelecting the Sources and Starting Play Turning On the PowerSetting the Clock Common OperationsTo select the sound modes, press Adjusting the VolumeSelecting the Sound Modes Reinforcing the Bass SoundPresetting Stations Tuning in a StationListening to FM and AM MW Broadcasts Tuning in a Preset Station Changing the RDS Information Receiving FM Stations with RDSSearching for Programs by PTY Codes PTY Search News News Switching Temporarily to a Program Type of Your ChoicePress PTY/EON until E.O.NET PTY Select alternately appear on the displayPress CD 3/8 Playing Back Discs CD/CD-R/CD-RWPlaying Back the Entire Disc-Normal Play Press CD 0 or 0 on the unitPress Prog program Basic Disc OperationsProgram Play Load a discRepeating Tracks-Repeat Play Playing at Random-Random PlayProhibiting Disc Ejection-Tray Lock Playing Back a Tape Playing Back TapesPress REC RecordingRecording on a Tape Check the recording direction for the tapeRepeat steps 2 and 3 to record other tracks Disc Direct RecordingOne Track Recording Play the track on the disc you wish to Record Press RECUsing Daily Timer and Recording Timer Using the TimersPress Sleep Using Sleep TimerPress Timer to complete the timer Setting Press Standby/on to turnAction TroubleshootingSymptom CauseHandling cassette tapes MaintenanceCleaning the unit Handling discsDescription of the PTY codes Additional InformationSpecifications Memo Memo Micro Component System