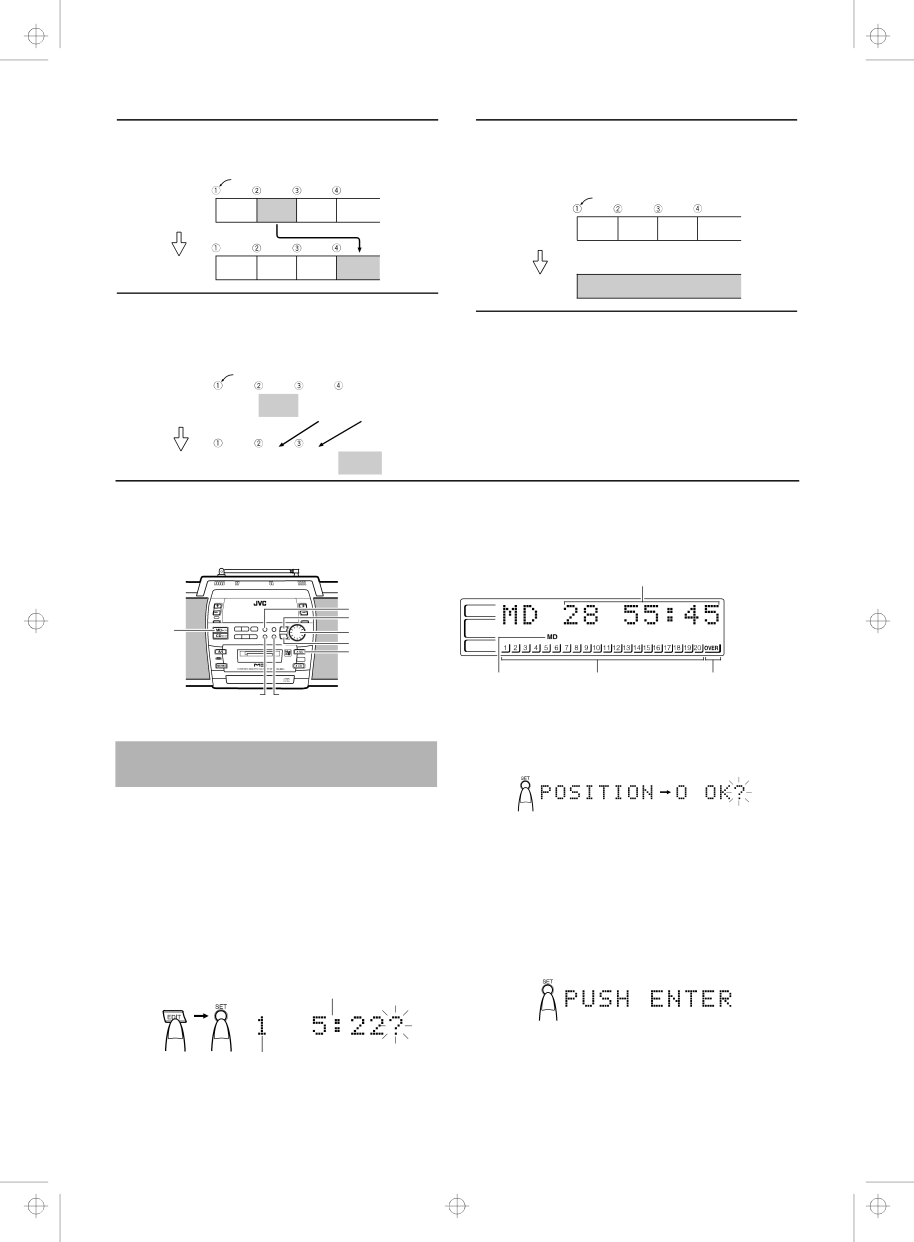
Moving tracks (MOVE function)
Tracks can be moved around so that they are in the desired se- quence.
Track No.
Track A Track B Track C Track D
MOVE
Track A Track C Track D Track B
Erasing all the tracks (ALL ERASE function)
All the tracks can be erased at once without recording fresh material over them.
Track No.
ALL | Track A Track B Track C Track D |
ERASE |
|
New tracks can be recorded.
Erasing tracks (ERASE function)
This enables unnecessary tracks. Narration, etc. to be erased speed- ily. The erased parts do not remain as silences but are closed up by the subsequent tracks.
| Track No. |
| ||
Erasing |
|
|
| |
Track A | Track B. | Track C | Track D | |
Track B |
|
|
|
|
|
|
|
| |
|
|
|
|
|
| Track A | Track C | Track D | New tracks can |
|
|
|
| be recorded. |
|
|
|
|
|
Giving titles to discs and tracks (TITLE function)
A title consisting of up to 32 characters can be given to a disc and a track. The title given appears in the display window.
MD6
SET | ENTER |
Note: Track marks
These marks are provided to locate the start of each track. Whatever lies between one track mark and the next is considered to a track. and the numbers of the tracks (called “track numbers”) are dis- played in the sequence in which they are to be played.
Track number, Playing time
CANCEL TITLE
JOG dial
EDIT
0 MD
MD indicator | Music calender OVER indicator which lights up if the |
| number of tracks of the MD exceeds 20. |
When the System is in use, the display shows other items as well. For simplicity, we show here only the items described in this section.
Dividing Tracks
(DIVIDE Function)
■Use the Unit to carry out this function.
■1. Insert an MD to be edited with its label side up.
■2. Press the MD6 button and then 7 button to set the function to MD.
The track numbers and total playback time are displayed.
■3. Press the EDIT button until "DIVIDE ?" is displayed.
Each time you press the button, the display changes as follows. Current display=DIVIDE=JOIN=MOVE=ERASE=ALL ERASE=(back to the beginning)
■4. Press the SET button.
Playback time of the track
Track to be divided
■5. Select the track number to be divided.
Press the 4 or ¢ button or turn the JOG dial to select the track.
The selected track is automatically played.
■6. Press the SET button at the point where the track is to be divided.
•The selected track is divided into two tracks and the track number in the music calender will increase by 1.
•The recording lasting for 4 seconds starting where the track was divided is repeatedly played for your reference. Movement is possible within the
■7. Press the SET button.
■8. Press the ENTER button.
The selected track is divided into two tracks and the number of tracks increases by 1. The new total track number and the total playback time appear on the display.
■9. Press the 0MD button to complete editing.
The MD is ejected after "UTOCwriting" is displayed.
16