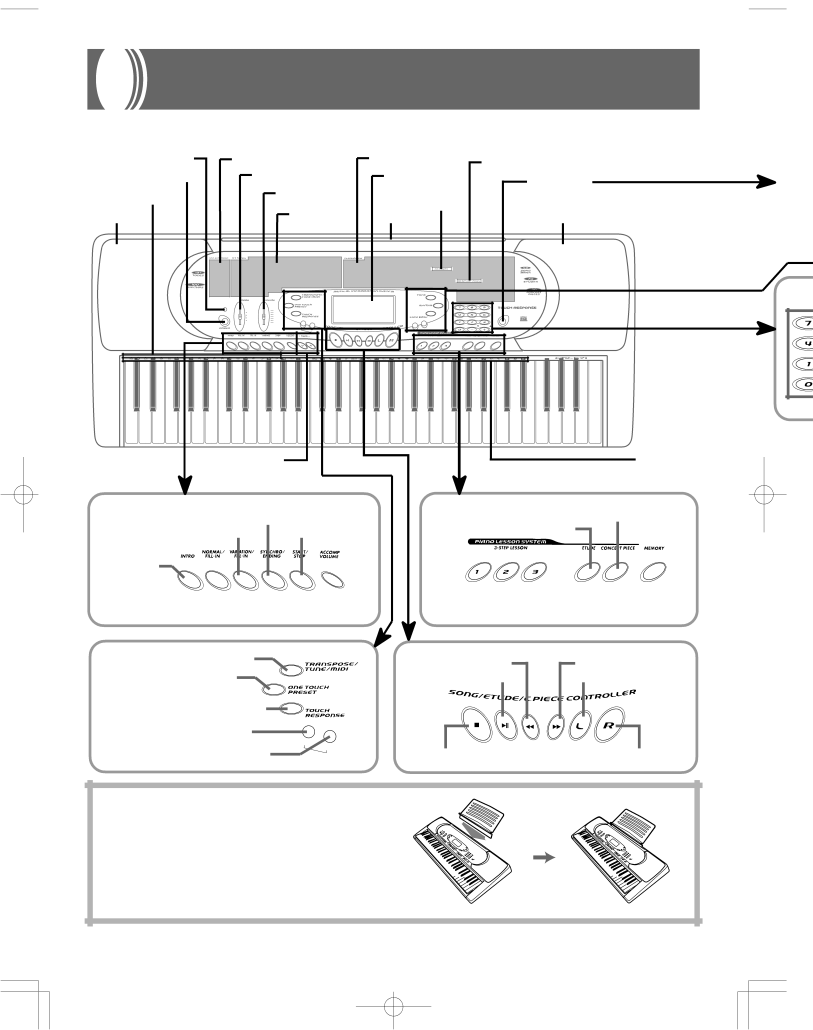
Casio CTK-571 manual General Guide, Attaching the Score Stand

Page 10

General Guide

Key, button, and other names are indicated in the text of this manual using bold type.

Power indicator

POWER button

CHORD ROOT NAMES Speaker

RHYTHM list


SONG BANK list

CONCERT PIECE list


MODE switch


Display

DEMO button


VOLUME slider


TONE list


ETUDE list


*

Speaker


LAYER


SPLIT


MAX


ETUDE


GM


FULL RANGE


CONCERT


CHORD


PIECE


TOUCH


FINGERED


RESPONCE


CASIO CHORD


MEMORY


NORMAL

METRO


MIN

NOME


LAYER


BEAT

STOP


SPLIT


PLAY/PAUSE

REW

FF

LEFT/TRACK1

RIGHT/TRACK2


TEMPO button

SYNCHRO/ENDING button

VARIATION/FILL-IN button

START/STOP button

INTRO button

NORMAL/FILL-IN button ACCOMP VOLUME button

TRANSPOSE/TUNE/MIDI button

ONE TOUCH PRESET button

TOUCH RESPONSE button

METRONOME button

ME

TRO

NOME


BEAT button


BEAT


*Attaching the Score Stand

Insert the score stand into the slot at the top of the keyboard as shown in the illustration.

Percussion instrument list

CONCERT PIECE button

ETUDE button


Step 1 button


Step 3 button

MEMORY button


Step

2 button


REW button


FF button

PLAY/PAUSE button


LEFT/TRACK 1 button

STOP

PLAY/PAUSE


LEFT/TRACK1

RIGHT/TRACK2


REW

FF


STOP button


RIGHT/TRACK 2 button

E-8

702A-E-010A

Image 10
Contents USER’S Guide Guía DEL Usuario FCC Warning Welcome Main Features Safety Precautions SymbolsDo not disassemble or modify the instrument Care of your keyboard CareContents Midi General Guide Attaching the Score StandPlaying a Demo Tune Rear PanelQuick Reference Press the Power button to turn on powerSet the Mode switch to Normal To play the keyboardConnections Connecting to a Computer or Other EquipmentAccessories and Options Phones/Output TerminalUsing the AC Adaptor Power SupplyUsing batteries Important Battery InformationAuto Power Off Settings and Memory ContentsTo play the keyboard Basic OperationsSelecting a Tone To start the metronome Using the MetronomeUse the Tempo buttons to set the tempo Selecting a Rhythm Adjusting the TempoAuto Accompaniment Playing a RhythmCasio Chord Accompaniment Keyboard and Melody Keyboard Using Auto AccompanimentTo use Auto Accompaniment Chord TypesFingered Accompaniment Keyboard and Melody Key- board Csus4 Cm7 Cmaj7C7sus4 Cadd9 Cmadd9 CmM7 Cdim7 Full Range Chord Accompaniment Keyboard and Melody KeyboardUsing a Rhythm Variation Using an Intro PatternUsing a Fill-in Pattern Using a Fill-in Pattern with a Variation RhythmUsing One-touch Preset Adjusting the Accompaniment VolumeFinishing with an Ending Pattern Use the number buttons to input the tune’s two-digit number Playing a Built-in TuneTo play back a Song Bank tune Press the PLAY/PAUSE button to start play of the tuneTo play a Concert Piece tune To play an Etude tuneMusical Information System To fast forward To pause playbackTo fast reverse To change the melody toneStep Lesson Display Contents During 3-step Lesson PlayStep Lesson Tempo Setting Tune Types and Their PartsMaster the melody Master the timingPress any keyboard keys to play the melody right hand part Play a normal speed Accompaniment left hand part starts to play at normal speedMemory Button Operation Memory FunctionTracks Selecting a TrackReal-time Recording to Track To record to Track 1 using real-time recordingTrack 1 Contents After Real-time Recording Memory CapacityTrack 1 Real-time Recording Variations Playing Back from MemoryMemory Data Storage To play back from memoryTo record to Track 2 while playing back Track Track 2 Contents After Real-time RecordingTo record to Track 2 without playing back Track Deleting the Contents of a Specific Track Using Split Keyboard SettingsUsing Layer To layer tonesNow try playing something on the keyboard Using Layer and Split TogetherTo split the keyboard and then layer tones Input the number of the layered split toneTo turn touch response on and off Using Touch ResponseTransposing the Keyboard To transpose the keyboardTuning the Keyboard To tune the keyboardMidi Connections What is MIDI?Midi Channels Navigate Channel Default Changing Midi SettingsGM Mode Default Off General MidiAccomp Midi OUT Default Off Midi in Chord Judge Default OffLocal Control Default On Local Control On Local Control OffUse the + and -or 0 and 1 buttons to change the setting Touch Curve DefaultSound Range Shift Default On MessagesGM System on F07E7F0901F7 Effect Control NumberGM System OFF F07E7F0902F7 Troubleshooting Problem Possible Cause Action SeeSpecifications Appendix/Apéndice Tabla de notasRange Type Sonidos de DeLista Fingered Chord Chart Cuadros de acordes Fingered Aug Sus4 7sus4 Add9 MM7 Tone List Lista de sonidos Rhythm List Lista de ritmos Truevoice Remarks Recognized TransmittedMode3 NumberAux True#System RealTime RemarksHon-machi 1-chome