Pioneer VSX-LX51 manual Connecting your equipment Installing your speaker system

Page 20

03Connecting your equipment

Installing your speaker system

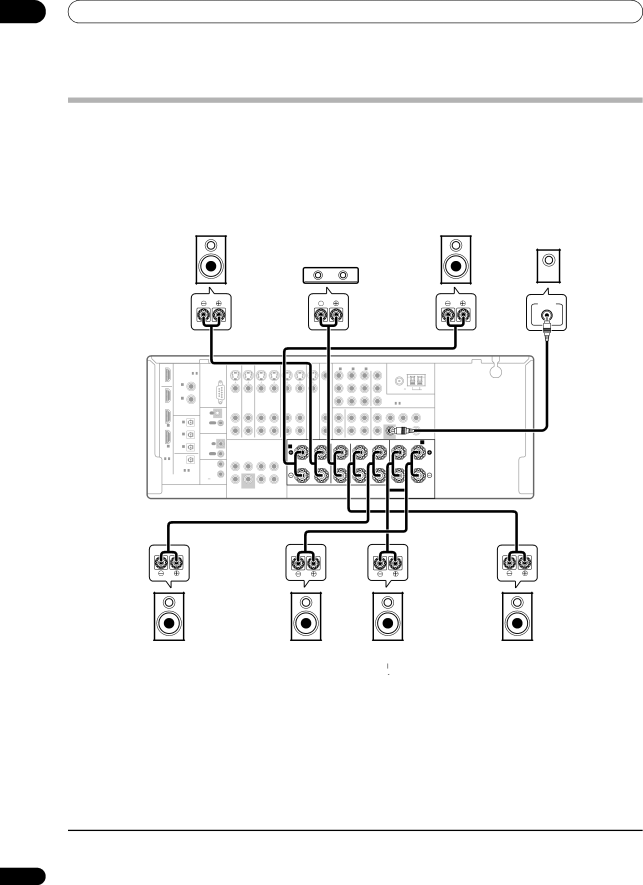
To take full advantage of the receiver’s surround sound capabilities connect front, center, surround and surround back

speakers, as well as a subwoofer.1 Although this is ideal, other configurations with fewer speakers—no subwoofer or no center speaker, or even no surround speakers—will work. At the very least, front left and right speakers only are necessary. Note that your main surround speakers should always be connected as a pair, but you can connect just one surround back speaker if you like (it must be connected to the left surround back terminal). You can use speakers with a nominal impedance between 6 Ω and 16 Ω (please see Switching the speaker impedance on page 72 if you plan to use speakers with an impedance of less than 8 Ω).

Front


Front

left

Center

right


HDMI


S-


MONITOR


COMPONENT VIDEO

MONITOR

ANTENNA


COAXIAL


VIDEO IN

IN

OUT

IN

OUT

IN

OUT

OUT

IN 1

IN 2

IN 3

OUT


ASSIGNABLE 1 - 2


Y


OUT

IN 1


VIDEO


(DVD)

RS-232C


PB FM UNBAL 75

AM LOOP


IN 2


PR

ASSIGNABLE


(CD)


DVD

TV SAT

DVR1


DVR2


ZONE 2


BD IN


1 - 3


AUDIO


(Single) PRE OUT


CON-

IN

IN

OUT

IN

OUT

IN


OUT

IN

OUT

IN

FRONT CENTER


IN


OPTICAL

TROL

L


IN 1

IN 1


OUT


(TV SAT)


IN 2


R


IR


CD


CD-R


(DVR1)


SUBWOOFER SURROUND

SURROUND BACK


ZONE2

IN

MULTI CH IN

SPEAKERS

FRONT


CENTER

SURROUND


SURROUND BACK / B

IN 2

IN 3


A

R


L

R

L

R

L


(Single)


(DVR2)


ASSIGN-


OUT


ABLE


1 - 2

OUT


FRONT CENTER SURROUND SURROUND BACK


1

L


ASSIGNABLE

12V TRIGGER


1 - 3


2


DIGITAL

(OUTPUT


12 V TOTAL

R


50 mA MAX)


SUBWOOFER

SELECTABLE

SEE INSTRUCTION MANUAL

SELECTABLE VOIR LE MODE D'EMPLOI

VSX-LX51

Subwoofer

LINE LEVEL

INPUT

Surround left

Surround back left

Surround right

Surround back right

Connecting the speakers

Each speaker connection on the receiver comprises a positive (+) and negative (–) terminal. Make sure to match these up with the terminals on the speakers themselves.

Caution

These speaker terminals carry HAZARDOUS LIVE voltage. To prevent the risk of electric shock when connecting or disconnecting the speaker cables, disconnect the power cord before touching any uninsulated parts.

Make sure that all the bare speaker wire is twisted together and inserted fully into the speaker terminal. If any of the bare speaker wire touches the back panel it may cause the power to cut off as a safety measure.

Note

1• When using only one surround back speaker, connect it to the SURROUND BACK L (Single) terminals.

• To use a 5.1-channel speaker set, use the surround speakers for the surround channel, not the surround back channel.

20

En

Image 20
Contents Operating Instructions Important the Moulded Plug Risk of Electric Shock Do not OpenOperating Environment Contents Other Settings Using other functionsOther connections Hdmi ControlBefore you start Chapter FeaturesBefore you start Installing the receiver Before you startChecking what’s in the box Loading the batteriesMinute guide 02 5 minute guide ChapterIntroduction to home theater Listening to Surround SoundFollow the instructions on-screen Problems when using the Auto Mcacc Setup 02 5 minute guidePlaying a source Select the input source you want to playBetter sound using Phase Control Phase Control onPhase Control OFF Minute guideConnecting your equipment Connecting your equipment ChapterConnecting your equipment Connecting your equipment When making cable connections About the video converterConnecting your equipment Connecting using Hdmi About HdmiConnecting your equipment Connecting your TV and DVD player Connecting your Blu-ray disc playerFor a second recorder, use the DVR2 in inputs Using the component video jacks Connecting digital audio sourcesAbout the WMA9 Pro decoder Connecting analog audio sourcesConnecting a component to the front panel inputs Connecting your equipment Installing your speaker system Connecting the speakersBare wire connections Placing the speakersConnecting antennas THX speaker system setupPlugging in the receiver Connecting external antennasPlug the power cord into a power outlet Controls and displays Controls and displays ChapterFront panel 13 14Speakers Operating range of remote control unitControls and displays Controls and displays Display Controls and displays Remote control RECEIVERTV Ctrl SOURCEMute ReceiverListening to your system Listening to your system ChapterAuto playback Listening in surround soundUsing the Home THX modes Using the Advanced surround effectsListening to your system PRO LOGIC+THX CinemaTip Using Front Stage Surround AdvanceListening in stereo Listening to your system Using Stream Direct Selecting Mcacc presetsChoosing the input signal Hdmi Digital AnalogAuto Using surround back channel processingUsing the Virtual Surround Back mode Sources Using the tuner Using the tuner ChapterSaving station presets Listening to the radioUsing the tuner Naming station presetsListening to station presets An introduction to RDSUsing EON Displaying RDS informationSystem Setup menu System Setup menu ChapterMaking receiver settings from the System Setup menu Automatic Mcacc ExpertSystem Setup menu Custom Menu The default is ALL recommendedSetting , Channel Level , Speaker Distance and EQ Options are ALL , Keep SP System , 6 SpeakerIf necessary, confirm the speaker configuration in the OSD.1 Surround back speaker setting Manual Mcacc setupAdjust the level of the left channel Select ‘Fine SP Distance’ from the Manual Mcacc setup menuFine Channel Level Fine Speaker DistanceAcoustic Calibration EQ Adjust Select ‘Standing Wave’ from the Manual Mcacc setup menuAdjust the parameters for the Standing Wave Control Select ‘EQ Adjust’ from the Manual Mcacc setup menuHow to interpret the graphical output How to use Acoustic Calibration EQ ProfessionalSelect the channels you want and adjust to your liking Acoustic Calibration EQ ProfessionalSelect an option and press Enter Using Acoustic Calibration EQ ProfessionalSelect ‘EQ Professional’, then press Enter Checking Mcacc preset data Select ‘Data Management’ from the System Setup menuSelect the setting you want to check Data ManagementManual speaker setup Renaming Mcacc presetsClearing Mcacc presets Copying Mcacc preset dataChannel Level Speaker SettingSelect ‘Speaker Setting’ from the Manual SP Setup menu Speaker Distance THX Audio Setting CurveConnecting an iPod Connecting your iPod to the receiverOther connections Other connections ChapterSwitching the iPod controls2 Other connectionsBasic playback controls ReturnOther connections Connecting a USB device Connecting your USB device to the receiverBasic playback controls Connect your USB device.3Compressed audio compatibility Other compatibility informationAbout MPEG-4 AAC About WMAOther connections Connecting the multichannel analog inputs Speaker B setupSwitching the speaker system Selecting the multichannel analog inputsConnect your speakers as shown below Bi-wiring your speakersBi-amping your front speakers Large MULTI-ZONE listeningMaking MULTI-ZONE connections Using the MULTI-ZONE controls Basic MULTI-ZONE setup ZoneSurround Back System MULTI-ZONE setup Zone MULTI-ZONE listening optionsConnecting an IR receiver MULTI-ZONE remote controlsUsing this receiver with a Pioneer flat screen TV Pioneer flat screen TVUsing the SR+ mode with a Pioneer flat screen TV Select ‘Output PC’ and press Enter Other connections Connecting a PC for Advanced Mcacc outputAdvanced Mcacc output using your PC Setting the Hdmi options Setting the Hdmi Control modeHdmi Control Hdmi Control ChapterBefore using synchronization Synchronized amp modeHdmi Control About Hdmi ControlOther Settings Other Settings ChapterInput Setup menu SetupOther Settings Other Setup menuInput function default and possible settings Select ‘Other Setup’ then press EnterMulti Channel Input Setup Zone Audio SetupSR+ Setup for Pioneer flat screen TVs OSD AdjustmentSelect ‘SR+ Setup’ from the Other Setup menu Select the ‘PDP Volume Control’ setting you wantUsing other functions Using other functions ChapterSetting the Audio options Press Return to confirm and exit the menuUsing other functions Setting the Video optionsUse / to select the setting you want to adjust Press RECEIVER, then press Video ParameterMaking an audio or a video recording Select the source you want to recordPrepare the source you want to record Prepare the recorderUsing the sleep timer Switching the speaker impedanceChecking your system settings Dimming the displayUsing other functions Resetting the system Default system settingsPress the front panel Auto SURR/STREAM Direct button Press Home THX to confirmSetting the remote to control other components Preset code listSelecting preset codes directly Controlling the rest of your systemControlling the rest of your system VCRCatv TapeControls for TVs Controls for other componentsDecide which component you want to use the remote sensor DisplayHDD Continue the chain in the same way for as manyTroubleshooting PowerAdditional information Additional information ChapterAdditional information Other audio problems Settings VideoDisplay Signal SEL buttonProfessional Calibration EQ graphical output Remote control USB interfaceOr other setting for your component Other setting for your componentReceiver to a component or TV with the DeepColor feature Hdcp Error showsImportant information regarding the Hdmi connection Configuration aConfiguration B Additional information Surround sound formats DolbyWindows Media Audio 9 Professional DTS Digital SurroundDTS Neo6 DTS 96/24Additional information About THX About Neural THX Surround Stereo 2 channel signal formats ON/AUTOPRO Logic +THX PRO LogicMultichannel signal formats DTS +Neo6 DTS +Neo6 +THX Cinema Pro Logic llx Music +THX a EX +THX Games bConnected Not connectedAdditional information Specifications Cleaning the unitPioneer Corporation