Weber 500 LX owner manual Install igniter, Check that all burner valves are off

Page 14

Step 11

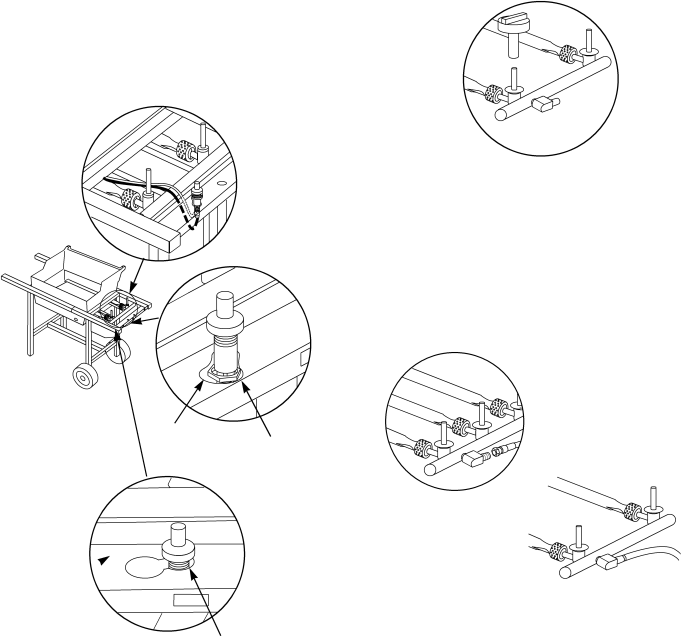
Install igniter

Note - The igniter wires are already attached to the Gas Catcher Ignition Chamber and the igniter. This was done to factory test the ignition system.

The igniter lock nut is on the igniter.

Insert the top of the igniter up through the large part of the keyhole in the frame brace. Figure 12 (b). Loosen the igniter lock nut and slide the igniter into the small part of the keyhole. Figure 12 (c). Tighten the igniter lock nut. Figure 12.

Note - If the igniter works loose, carefully tighten the igniter lock nut with an adjustable wrench or pliers.

(a)

(b)

Figure 12

Keyhole in

frame brace Igniter lock nut

(c)

Frame brace

Small part of keyhole in frame brace

Step 12

Check that all burner valves are off

You will need: one burner control knob.

Valves are shipped in the OFF position, but you should check to be sure. Put the knob on each valve. Check by pushing down and turning clockwise. If they do not turn they are off, proceed to the next step. Figure 13.

Figure 13

Step 13

Connect flexible hose to manifold

You will need: the 12 foot natural gas supply hose and a 3/4 inch wrench.

Thread fitting end of hose onto manifold. Figure 14 (a). Tighten with wrench.

(a)

Figure 14

14

Image 14
Contents Spirit 500 LX Series MDANGER MWARNINGS LP GAS Units onlyWarranty Patents and Trademarks Contents General Instructions For Installation in CanadaGas supply testing StorageStep AssemblyCheck package contents Check contents of hardware packs Assemble wheel frame Assemble top frameAdd front panel Continue frame assemblyInstall tubing plugs Add cooking box Install gas supply Install manifold bracketInstall frame connector General Specifications for PipingTest connections Typical natural gas supply installation. FigureGas line piping Connect flexible hose to manifold Install igniterCheck that all burner valves are off Check for gas leaks MWARNING Do not ignite burners while leak checkingMCAUTION Do not line bottom tray with aluminum foil Install Flavorizer Bars and Cooking GratesInstall the bottom tray Install Lid Add tool holders, control panel and burner control knobsComplete accessory installation Lighting To ExtinguishManual Lighting Storage and/or Nonuse Periodic CleaningCooking PreheatingAnnual Maintenance Inspection and Cleaning of the Weber Spider Stopper GuardsMCAUTION Do not enlarge the burner ports when cleaning General MaintenanceMain Burner Cleaning Procedure Weber Spider Stopper GuardsTo reinstall the burners, reverse steps c through g Crossover Ignition System Operations Burner does not light, or flame is low in High position MCAUTION Do not line the bottom tray with aluminum foilPage 11-12 Parts List Page Page Final Word Thanks