and format to be read by the Jukebox Multimedia 10, 20, 120 and the AV140. When you run it for the first time, the Mpeg4 Translator will need to locate the Virtual Dub program. If you did not install the virtual dub in the default location, you will have to show the program where Virtual Dub is.
7.2Using Mpeg4 Translator
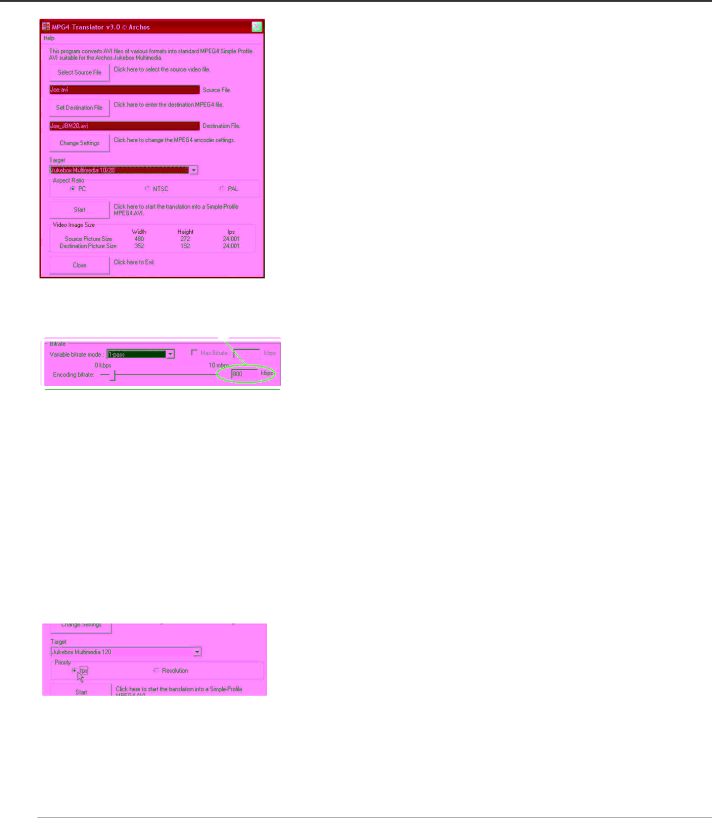
To the left you see the image of the main Mpeg4 Translator program. When you first run the program, if the DivX™ codec has not been installed yet, you will be notified. You should go and download the codec and install it on your computer. If the Virtual dub program has not been installed, you will also be notified, and you should also install it (either from the CD or the Virtual Dub website). If you have placed the Virtual Dub program in a folder other than the default, it will ask you to locate the file.
Select Source & Destination Files
In the example to the left, a source file Joe.avi has been selected as the source video. You can see on the bottom of the window its original characteristics (width 480, height 272, frame rate 24). Next, you must then tell the program where to place (Set Destination file) the newly recoded version of the file (it will not erase the original).
Change Settings
Following, you can change the parameters (Change Settings) of the DivX™ encoder to give adjust the level of quality of the final image. Like MP3 music, the higher the bit rate setting is made, the higher the quality of the music, or video in this case, that you will get. However, this will also take up more space on your disc drive. At a horizontal size of 640 for example, a setting of 800
kbits/sec will give you a nice looking image for viewing on a television. For near DVD quality, you can set it to about 1200 kbits/second.
Target & Aspect Ratio (Jukebox 10 or 20)
Use the Target control to specify which type of Archos product you have. The program determines the best way to make it playable on the target device (Jukebox Multimedia 10 or 20 in the case above). The highest resolution that is playable on a Jukebox 10 or 20 is 352x288. The aspect ratio will change according to the type of output you plan on using. Choose the PAL button if you plan to connect your Jukebox Multimedia to a European television or the NTSC button for an American television. Choose NTSC if you plan to display it on the Jukebox only. You will notice that the width and height dimensions will change. This is normal and is required so that your image does not look squashed or stretched.
Target & Priority (Jukebox 120 or AV140)
When you select a target of Jukebox Multimedia 120 or Archos Video AV140, you will see a Priority box appear. This control is to allow the user to select which feature of the video to be guarded. If for example you are re- encoding a video file that is 800x600 in resolution and 30 frames per second, this is beyond the maximum resolution that the Jukebox Multimedia can play. Thus, the Mpeg4 Translator program will have to decrease the resolution, the frame rate, or both. If you prefer that the resolution of the image is kept to the largest maximum, then click
on the Priority control Resolution. The best possible resolution will be kept and the frame rate will be decreased in order to accommodate that resolution. On the other hand, if you want to make sure you keep the highest possible frame rate, then click on the Priority control fps. The highest possible frame rate will be kept and the image resolution will be decreased to accommodate keeping the higher frame rate. In all cases, even if the original frame rate is 29 or 30 frames per second, the destination file will have a strict maximum of 25 frames per second.
19