SM 1619X02139
*DRILL BIT STORAGE COMPARTMENT AND QUICK REFERENCE GAUGE
Your tool may be equipped with a bit storage compartment and quick reference gauge located on top of your tool (Fig. 3).
To remove, simply slide off the housing towards the back of the tool.
The quick reference gauge will allow you to identify the size of drill bits, and standard or metric screws.
Hex bits can be slid in from the front for storage.
FIG. 3
BIT STORAGE | QUICK REFERENCE |
COMPARTMENT | GAUGE |
DRILL LEVEL
Your tool is equipped with drill level located on top of the housing that will allow you to accurately enter the workpiece in a horizontal position (Fig. 1).
USING THE LEVEL: Place drill bit where hole is to be drilled, position drill so the bubble in the level is centered between the lines, then start drilling the hole, once the bit has entered the workpiece check from time to time to be sure the bit is maintaining the horizontal position.
Operating Tips
You will extend the life of your bits and do neater work if you always put the bit in contact with the work before pulling the trigger. During the operation, hold the tool firmly and exert light, steady pressure. Too much pressure at low speed will stall the tool.
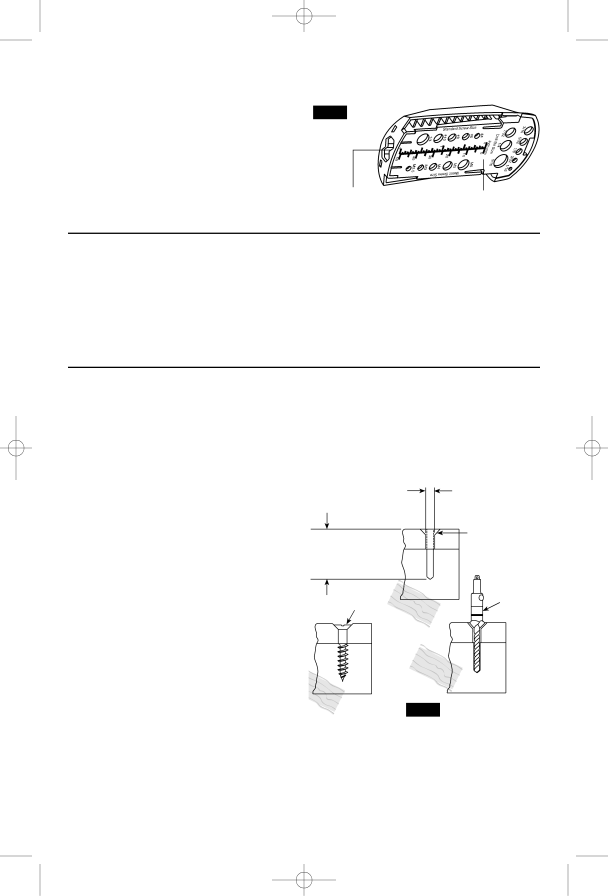
FASTENING WITH SCREWS
This procedure shown in (Fig. 4) will enable you to fasten materials together with your Drill/Screwdriver without stripping, splitting or separating the material.
Too little pressure will keep the bit from cutting and cause excess friction by sliding over the surface. This can be damaging to both tool and bit.
DRILLING WITH VARIABLE SPEED
The trigger controlled variable speed feature will eliminate the need for center punches in hard materials. The variable speed trigger allows you to slowly increase RPM. By using a slow starting speed, you are able to keep the bit from “wandering”. You can increase the speed as the bit “bites” into the work by squeezing the trigger.
DRIVING WITH VARIABLE SPEED
FASTENING
WITH SCREWS
1.Drill 2/3 diameter and 2/3 of screw length for soft materials, full length for hard materials.
Screw
Apply a slight even pressure when driving screws.
2.Drill same diameter as screw shank.
3.Countersink same diameter as screw head.
Adjustable
Screw
Drill
Variable speed drills will double as a power screwdriver by using a screwdriver bit in the drill mode. The technique is to start slowly, increasing the speed as the screw runs down. Set the screw snugly by slowing to a stop. Prior to driving screws, pilot and clearance holes should be drilled.
FIG. 4
First, clamp the pieces together and drill the first hole 2/3 the diameter of the screw. If the material is soft, drill only 2/3 the proper length. If it is hard, drill the entire length.