Grizzly G0634XP Lubrication Setting Fence Stops, Tools Needed Qty, To set the 90˚ fence stop

Page 10

Lubrication


Setting Fence Stops


Follow all lubrication instructions outlined on Pages 35–36of the manual. Lubricate the G634XP fence with multi-purpose grease, as shown in Figures 7–8.

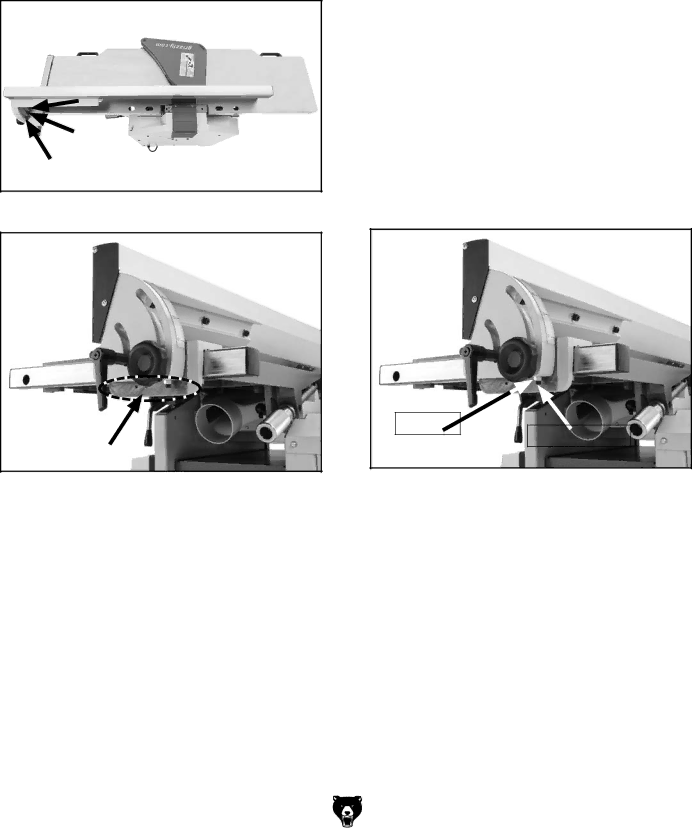
Figure 7. Inside fence lubrication locations.

The fence stops simplify the task of adjusting the fence to 45˚ and 90˚.

Tools Needed

Qty

45° Square

1

90° Square

1

Sliding Bevel

1

Wrench 10mm

1

Wrench 12mm

1

Hex Wrench 3mm

1

Hex Wrench 4mm

1

To set the 90˚ fence stop:


1.Loosen the lock nut on the 90° fence stop screw shown in Figure 9, and loosen the fence tilt knob.

Figure 8. Outside fence lubrication location.

-10-

Lock Nut

90˚Stop Screw

Figure 9. Adjusting fence to 90°.

2.Place a 90° square against the table and fence, and adjust the stop screw so the fence is set exactly at 90°.

3.Tighten the lock nut.

Model G0634XP (Mfg. 4/11+)

Image 10
Contents Machine Inventory Spiral Cutterhead Hardware FigureStand Assembly Parts Breakdown Table Assembly Parts BreakdownCutterhead & Motor Parts Breakdown DescriptionFence/Guard Parts Breakdown PCAP03Machine Data Sheet Cutting Capacities Planer Full-Load Current Rating AvailabilityCircuit Requirements for Minimum Gauge Size 10 AWG Grounding InstructionsExtension Cords 50 ftBasic Jointer Controls To set up the machine for planer operationsJointer-Planer Conversion Tools Needed Qty Lubrication Setting Fence StopsTo set the 90˚ fence stop To set the 45 fence stop Replacing Carbide InsertsTo rotate or change a carbide insert Accessories H9893 Carbide Inserts Model G0634XP Mfg /11+