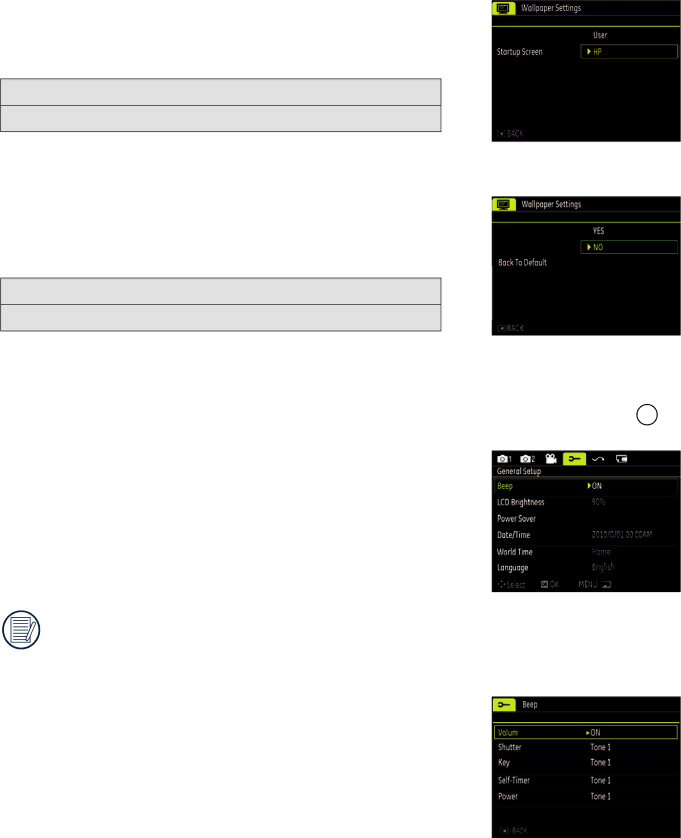
HP CC-330 manual Setup Menu, Startup Screen, Set back to defaults, Beep

Page 34

Startup Screen:

Use Up/Down button to select the Startup Screen option, press to

confirm or press Left button to return to last page, and press to exit the menu.

User

GE logo

Set back to defaults:

Use Up/Down button to select Set back to defaults, press to

confirm or press Left button to return to last page, and press to exit the menu.

Yes

No

Setup Menu

The Setup menu for the camera is available in all modes. Each menu page can be selected by pressing the button and switching between menus with the Left/Right button.

To adjust the settings:

1.Select the menu page with the function you want to adjust and press the Down button.

2.Switch between different functions with the Up/Down button.

3.Press the Right button to enter the submenu.

After selecting a function option, you can press the Up button to return to the menu for other Camera Setup pages. Or you can press the Down button to switch to the next menu page.

Refer to the following pages for more details about each setting.

Beep

Use this setting to adjust the volume of beep when buttons are pressed and change the tones for Shutter button, self-timer, and power-on/power-off.

To change this setting:

1.Select the Beep setting from the Setup menu as described previously.

2.Use the Up/Down navigation buttons to switch between volume, shutter, key, self-timer, and power fields.

3.Press the Right button, press the Up/Down button to adjust volume and change tone, and press the button to confirm setting.

32

Image 34
Contents CC330 Page FCC Statement For customers in EuropeCamera notes Safety PrecautionsBattery notes Memory card notesPreface Safety informationBefore YOU Start CopyrightAbout this manual Symbols used in this manual LCD Screen notesContents Using the Modes Using the Menus Transmission Connecting to a PictBridge Compatible Printer Unpacking Getting ReadyCamera Views Left / Right View Insert the Battery and SD/SDHC Card Not included Using the Mode Button Turning On and OffSetting the Language Setting Date/Time and LanguageSetting the Date and Time Basic Operation Shooting in Auto ModeUsing the Zoom Function Basic Functions MenuFlash Self-timerMacro Mode Exposure CompensationSize Advanced Functions MenuQuality WB White Balance ColorStill Picture Mode Display Using the ModesLCD Screen Display Video Shooting Mode Display Playback mode displayScene mode Mode Icon Description NamePanorama mode Blink Detection Stabilization modeFace Detection Smile DetectionViewing Photos and Videos PlaybackThumbnail View Using Zoom Playback for still pictures only Using the Delete ButtonStill Menu Using the MenusAF Mode Auto-Focus mode Continuous AFQuick Review Continuous ShotDate Imprint Digital ZoomPlayback Menu Movie MenuProtect Delete Dpof Digital Print Order FormatRotate TrimResize Red-eye ReductionSlideshow Display SetupWallpaper Settings Menu WallpaperStartup Screen Setup MenuSet back to defaults BeepZone Power SaverLCD Brightness Date/TimeFormat Memory Reset SettingsFile and Software File NumberingVideo System Connecting to a PCSetting the USB mode Transferring photos and videos to your PCConnecting to a PictBridge Compatible Printer Connecting the camera and printerPrint with date Using the PictBridge MenuPrint without date Print Dpof Digital Print Order Format Print indexExit Specifications AppendicesError messages Messages ExplanationTroubleshooting Problem Possible causes SolutionGetting Help Contact/phone Support LanguageNorth America Page 7525C00257A