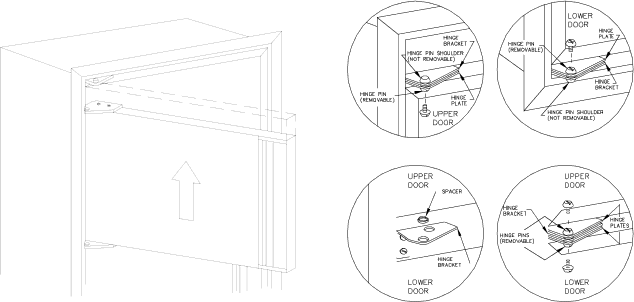
Norcold 462, 483, 463, 453, 482, 443, 452, 442 specifications Alignment of the Doors

Page 13

Figure 18

ALIGNMENT OF THE DOORS

12.Align the upper door with the lower so that there is a parallel gap between the doors and around the frame. Adjust the doors to the cabi- net so the gaskets seal but do not bind. Tighten the screws holding the hinge brackets in place.

13.Door Seal: The door seal can be checked by closing the door on a 1" x 6" strip of paper. A slight drag should be noticed when the paper is pulled out from between the gasket and the cabinet. Repeat the process around all four sides of the door. If the door does not seal properly, readjust the hinge brackets.

14.Position the travel latches so that they secure the doors when closed but does not prevent the doors from closing properly. Tighten the two screws in each travel latch.

15.Replace the juice rack and storage bins into the door. Make sure that the milk bins (wider storage bins) are installed in the lowest door position.

A: Top Hinge


B: Bottom Hinge


C: Middle Hinge

D: Middle Hinge

Figure 19

13

Image 13
Contents For Your Safety Installation and Operating InstructionsLP Gas System GeneralExhaust Gases Refrigerant System Electrical Circuits AC and DCChild Entrapment Handling the RefrigeratorNorcold Extended Cooling Unit Service Protection PlanBOX Sidney OH General Instructions All ModelsCertified Vent Kits Ventilation RequirementsExhaust Vent Centered Figure Optimum Installation FigureAlternate Construction Requirements Figure Top and Side Wall Clearance-All Models Side Wall Clearance FigureInstallation Instructions Volt AC Connection Gas ConnectionVolt DC Connection Volt Supply Wiring and Fuse Size Testing the Vehicle’s Gas Supply PipingChassis Bonding Connection Hypot TestDoor Panel Installation Check Out Flame Failure Safety DeviceInstructions for Reversing Door Swing Relocating the Travel Latches Removing and Relocating the Hinge BracketsAlignment of the Doors Start-Up Instructions AC Electric Operation Way and 3-Way Models Lighting Instructions Gas OperationStart-Up Instructions DC Electric Opera- tion 3-Way models Operation Shut-Down All ModesOperating and User Instructions Information Regarding Battery Drain High Humidity Storage Switch Models 482,3 & 462,3 OnlyRefrigerator Storage Volume Interior Light-Models 482,3 & 462,3 OnlyRefrigerator Maintenance Defrosting and Cleaning the Refrigerator InteriorLeveling Freezer CompartmentTo Reinstall the Refrigerator Refrigerator1. Removal and ReplacementChecking Door Seals Refrigerator StorageTrouble Shooting Replacement Parts Service InformationFailure of Refrigeration GE Part Number 214-2 do not SubstitutePage Page Norcold Service Center Limited Warranty