Installation Specifications
Cabinet Layout
◊A grounded three prong
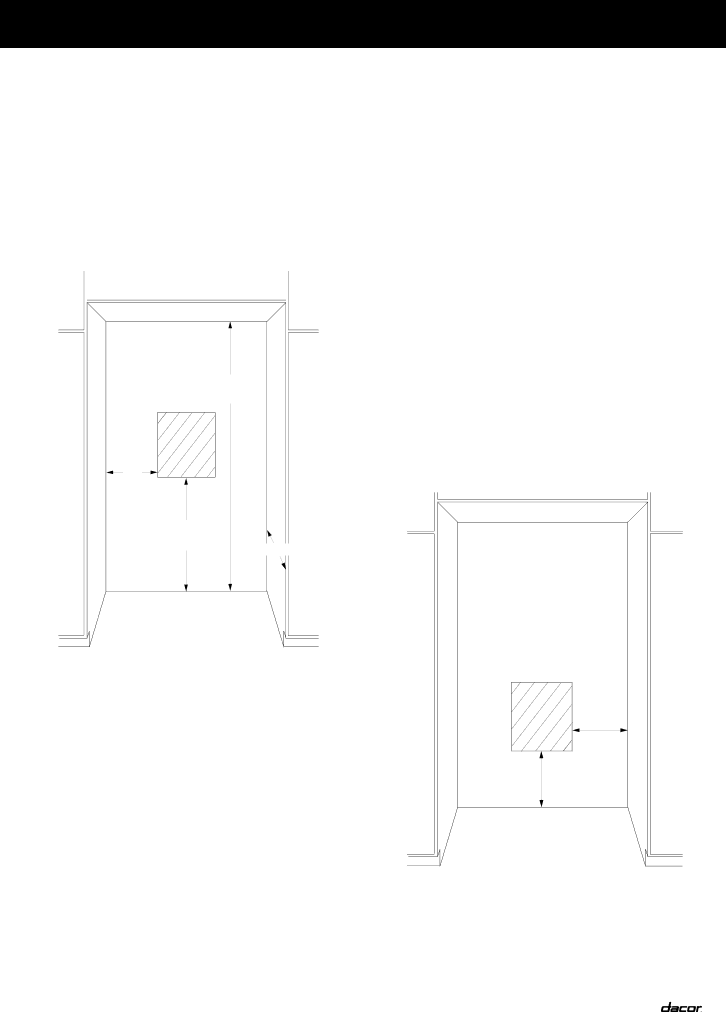
◊The plumbing for the water line can come through the floor flush to or from the back wall. Install the water valve in a location that allows it to be turned off without moving the refrigerator out in the event the refrigerator or water line requires service.
◊For model IF36, see document 100504 for instructions on planning and installing integrated front panels. It is available at www.Dacor.com.
![]() 36” Min. (914 mm)
36” Min. (914 mm) ![]()
![]()
70 ½” Min.
(1791 mm)
16” |
(406 mm) |
30”. |
|
(762 mm) | 24” (610 mm) |
|
Water valve Location -
Approximate Dimensions
Water Supply Requirements
◊All installations must meet local plumbing code requirements.
◊Use 1/4” (6 mm) copper line to connect the refrigerator to the house cold fresh water supply.
◊Install a shut off valve between the refrigerator and water supply. The shut off valve should be a drilled saddle valve. See the diagram above for recommended location.
◊Do not use a piecing type or 3/16” (4.76 mm) saddle valve which will reduce water flow and clog more easily.
◊Allow a minimum of 24” (610 mm) diameter service loop of copper tubing outside the wall or floor for easy connection to the water supply.
Cold water supply
Connect the ice maker to a cold water line with water pressure between 35 and 120 psi. If you have any questions about your water pressure, call your utility company.
Reverse osmosis water supply
IMPORTANT: The pressure of the water supply coming out of a reverse osmosis system going to the water inlet valve of the refrigerator needs to be between 35 and 120 psi (241 and 827 kPa).
If a reverse osmosis water filtration system is connected to your cold water supply, the water pressure to the reverse osmosis system needs to be a minimum of 40 to 60 psi (276 to 414 kPa).
If the water pressure to the reverse osmosis system is less than
40 to 60 psi (276 to 414 kPa):
■Check to see whether the sediment filter in the reverse osmosis system is blocked. Replace the filter if necessary.
■Allow the storage tank on the reverse osmosis system to refill after heavy usage.
■If your refrigerator has a water filter, it may further reduce the water pressure when used in conjunction with a reverse osmosis system. Remove the water filter. See “Water Filtration System.”
If you have questions about your water pressure, call a licensed, qualified plumber.
Electrical Requirements
A 115 Volt, 60 Hz. AC only 15 or 20 amp fused, grounded electrical supply is required. It is recommended that a separate circuit serving only your refrigerator be provided. Use an outlet that cannot be turned off by a switch. Do not use an extension cord.
12” |
(305 mm) |
12” (305 mm)
Electrical Location - Approximate Dimensions
3