Installation
<ENGLISH>
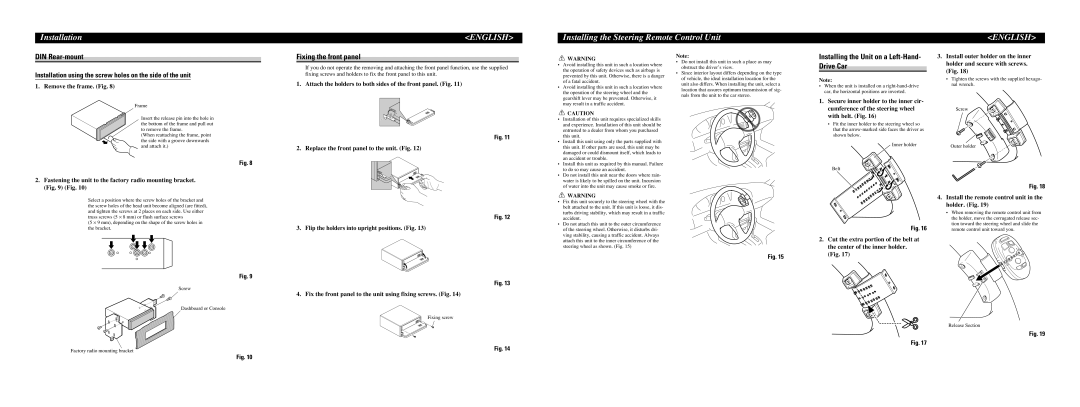
Installing the Steering Remote Control Unit
<ENGLISH>
DIN Rear-mount
Installation using the screw holes on the side of the unit
1. Remove the frame. (Fig. 8)
Fixing the front panel
If you do not operate the removing and attaching the front panel function, use the supplied fixing screws and holders to fix the front panel to this unit.
1. Attach the holders to both sides of the front panel. (Fig. 11)
![]() WARNING
WARNING
• Avoid installing this unit in such a location where |
the operation of safety devices such as airbags is |
prevented by this unit. Otherwise, there is a danger |
of a fatal accident. |
• Avoid installing this unit in such a location where |
the operation of the steering wheel and the |
gearshift lever may be prevented. Otherwise, it |
Note:
•Do not install this unit in such a place as may obstruct the driver’s view.
•Since interior layout differs depending on the type of vehicle, the ideal installation location for the unit also differs. When installing the unit, select a location that assures optimum transmission of sig- nals from the unit to the car stereo.
Installing the Unit on a Left-Hand- Drive Car
Note:
•When the unit is installed on a
3.Install outer holder on the inner holder and secure with screws. (Fig. 18)
•Tighten the screws with the supplied hexago- nal wrench.
Frame
Insert the release pin into the hole in |
| |
the bottom of the frame and pull out |
| |
to remove the frame. |
| |
(When reattaching the frame, point | Fig. 11 | |
the side with a groove downwards | ||
| ||
and attach it.) | 2. Replace the front panel to the unit. (Fig. 12) | |
| ||
| Fig. 8 | |
2. Fastening the unit to the factory radio mounting bracket. |
| |
(Fig. 9) (Fig. 10) |
| |
Select a position where the screw holes of the bracket and |
| |
the screw holes of the head unit become aligned (are fitted), |
| |
and tighten the screws at 2 places on each side. Use either | Fig. 12 | |
truss screws (5 ⋅ 8 mm) or flush surface screws | ||
(5 ⋅ 9 mm), depending on the shape of the screw holes in | 3. Flip the holders into upright positions. (Fig. 13) | |
the bracket. |
Fig. 9
Fig. 13
Screw
4. Fix the front panel to the unit using fixing screws. (Fig. 14)
Dashboard or Console
Fixing screw
Factory radio mounting bracket | Fig. 14 |
may result in a traffic accident. |
![]() CAUTION
CAUTION
•Installation of this unit requires specialized skills and experience. Installation of this unit should be entrusted to a dealer from whom you purchased this unit.
•Install this unit using only the parts supplied with this unit. If other parts are used, this unit may be damaged or could dismount itself, which leads to an accident or trouble.
•Install this unit as required by this manual. Failure to do so may cause an accident.
•Do not install this unit near the doors where rain- water is likely to be spilled on the unit. Incursion of water into the unit may cause smoke or fire.
![]() WARNING
WARNING
•Fix this unit securely to the steering wheel with the belt attached to the unit. If this unit is loose, it dis- turbs driving stability, which may result in a traffic accident.
•Do not attach this unit to the outer circumference of the steering wheel. Otherwise, it disturbs dri- ving stability, causing a traffic accident. Always attach this unit to the inner circumference of the steering wheel as shown. (Fig. 15)
Fig. 15
1.Secure inner holder to the inner cir- cumference of the steering wheel with belt. (Fig. 16)
•Fit the inner holder to the steering wheel so that the
Inner holder
Belt
Fig. 16
2.Cut the extra portion of the belt at the center of the inner holder. (Fig. 17)
Fig. 17
Screw
Outer holder
Fig. 18
4.Install the remote control unit in the holder. (Fig. 19)
•When removing the remote control unit from the holder, move the corrugated release sec- tion toward the steering wheel and slide the remote control unit toward you.
Release Section
Fig. 19
Fig. 10