Care and Maintenance
Battery Replacement
If the battery does not hold a sufficient charge for proper operation of the pipettor, follow these steps for replacement of the battery.
1.Switch the unit "OFF".
2.Remove the top two screws on the back of the pipettor and remove the battery cover.
3.Carefully remove the battery by lifting it straight out of the holder.
4.Install the new battery by pressing the positive (+) end against the contact spring at the bottom of the holder. Guide the negative
5.Replace the cover and the screws. Do not overtighten the screws.
6.Dispose of battery according to local requirements or regulations.
Calibration Check (Mode d1, 1:5, 5mL dilution)
Genuine 3M Pipettor Tips are strongly recommended for verifying pipettor performance. Perform a
1.The pipettor, pipettor tips and test liquid should all be allowed to adjust to room temperature
Note the temperature before starting.
2.
3.Place a 50mL or smaller vessel containing
4.Aspirate 4.0mL of water from the vessel on the analytical balance. Note its weight.
5.Aspirate an additional 1.00 mL from the vessel on the analytical balance. Note its weight.
6.Expel the 5.0mL of water back into the vessel on the analytical balance. Note its weight.
7.Repeat steps 4 - 6 as desired.
8.Calculate the average weight of the 4.0mL aspirations. Repeat this calculation for the 1.00 mL and 5.0mL measurements.
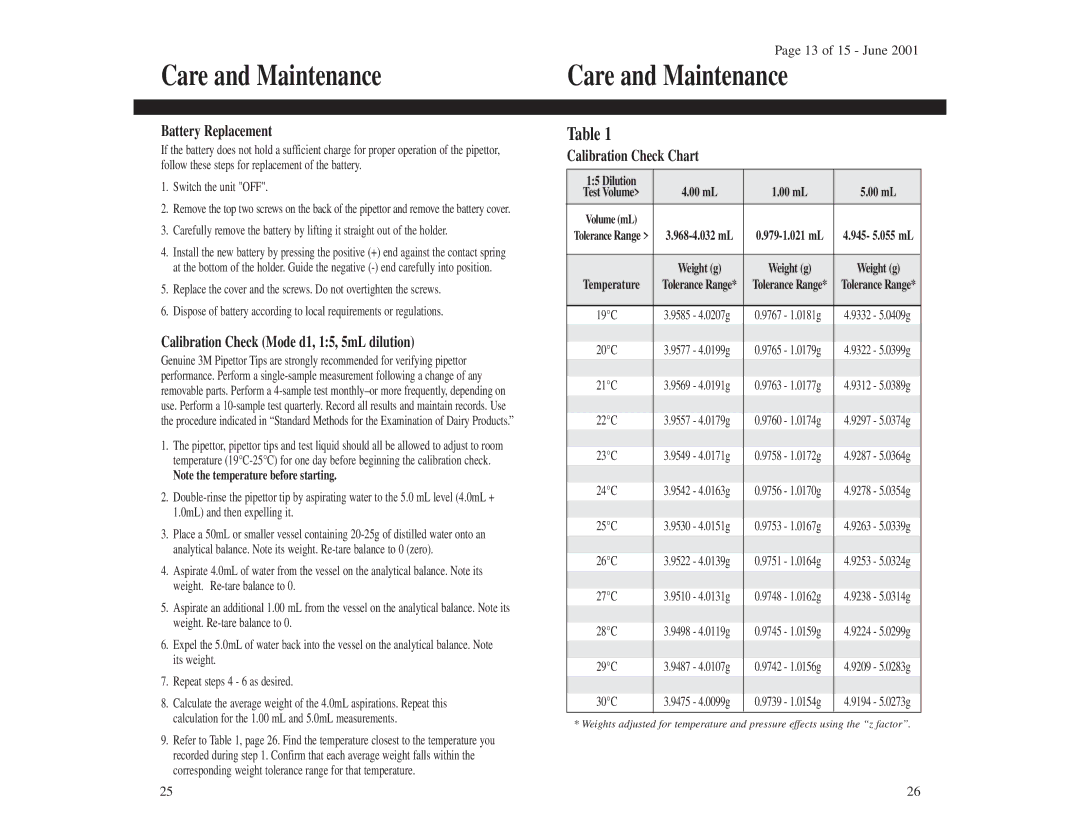
9.Refer to Table 1, page 26. Find the temperature closest to the temperature you recorded during step 1. Confirm that each average weight falls within the corresponding weight tolerance range for that temperature.
Page 13 of 15 - June 2001
Care and Maintenance
Table 1
Calibration Check Chart
1:5 Dilution | 4.00 mL | 1.00 mL | 5.00 mL | |
Test Volume> | ||||
Volume (mL) |
|
|
|
|
Tolerance Range > | 4.945- 5.055 mL | |||
|
|
|
|
|
| Weight (g) | Weight (g) | Weight (g) | |
Temperature | Tolerance Range* | Tolerance Range* | Tolerance Range* | |
|
|
|
|
|
19°C | 3.9585 - 4.0207g | 0.9767 - 1.0181g | 4.9332 - 5.0409g | |
|
|
|
|
|
|
|
|
|
|
20°C | 3.9577 - 4.0199g | 0.9765 - 1.0179g | 4.9322 - 5.0399g | |
|
|
|
|
|
|
|
|
|
|
21°C | 3.9569 - 4.0191g | 0.9763 - 1.0177g | 4.9312 - 5.0389g | |
|
|
|
|
|
|
|
|
|
|
22°C | 3.9557 - 4.0179g | 0.9760 - 1.0174g | 4.9297 - 5.0374g | |
|
|
|
|
|
23°C | 3.9549 - 4.0171g | 0.9758 - 1.0172g | 4.9287 - 5.0364g | |
|
|
|
|
|
|
|
|
|
|
24°C | 3.9542 - 4.0163g | 0.9756 - 1.0170g | 4.9278 - 5.0354g | |
|
|
|
|
|
|
|
|
|
|
25°C | 3.9530 - 4.0151g | 0.9753 - 1.0167g | 4.9263 - 5.0339g | |
|
|
|
|
|
|
|
|
|
|
26°C | 3.9522 - 4.0139g | 0.9751 - 1.0164g | 4.9253 - 5.0324g | |
|
|
|
|
|
|
|
|
|
|
27°C | 3.9510 - 4.0131g | 0.9748 - 1.0162g | 4.9238 - 5.0314g | |
|
|
|
|
|
28°C | 3.9498 - 4.0119g | 0.9745 - 1.0159g | 4.9224 - 5.0299g | |
|
|
|
|
|
|
|
|
|
|
29°C | 3.9487 - 4.0107g | 0.9742 - 1.0156g | 4.9209 - 5.0283g | |
|
|
|
|
|
|
|
|
|
|
30°C | 3.9475 - 4.0099g | 0.9739 - 1.0154g | 4.9194 - 5.0273g | |
|
|
|
|
|
* Weights adjusted for temperature and pressure effects using the “z factor”.
25 | 26 |
