From the front
7. Deleting the Weighing Data
Note: The AD-1688 performs as follows only when connected to a weighing instrument.
Two ways of deleting data are available; deleting the most
9. Function Settings
In the function setting mode, settings of the AD-1688 performance and communication can be changed.
Each function has parameters. By changing the parameter, specify
9.2. Function List
Function | Parameter | Description |
Baud rate | 600, 1200, 2400*, 4800, 9600, 19200 bps |
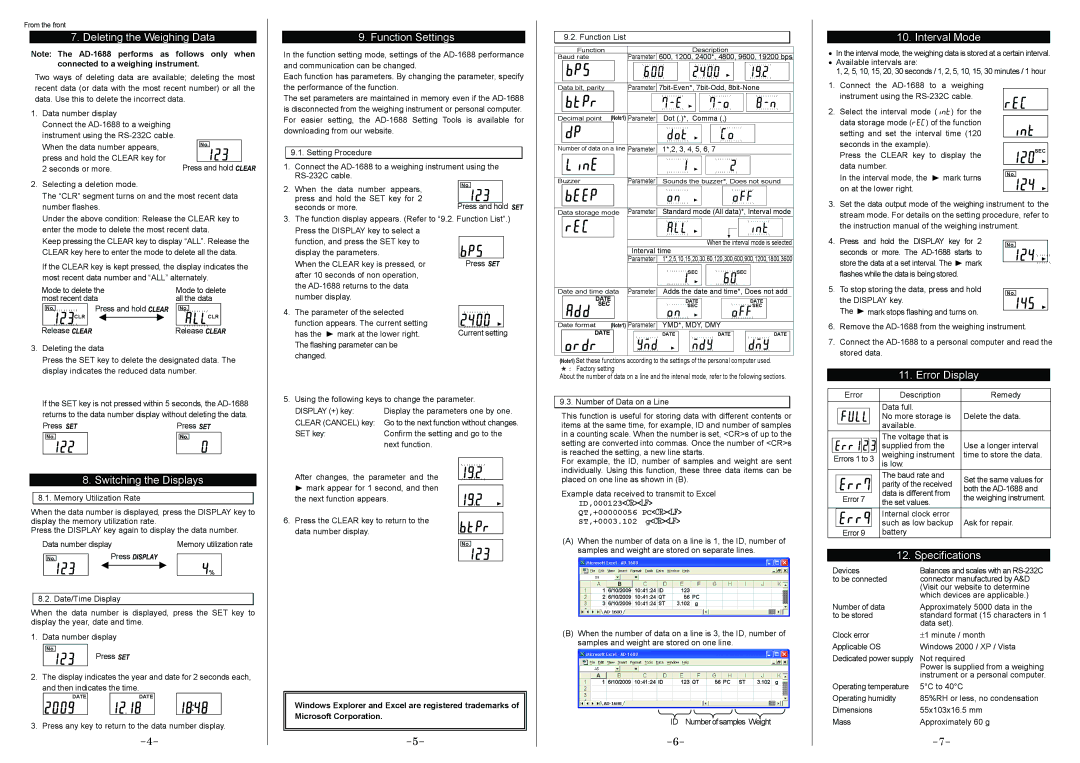
10.Interval Mode
•In the interval mode, the weighing data is stored at a certain interval.
•Available intervals are:
1, 2, 5, 10, 15, 20, 30 seconds / 1, 2, 5, 10, 15, 30 minutes / 1 hour
recent data (or data with the most recent number) or all the data. Use this to delete the incorrect data.
1.Data number display
Connect the AD-1688 to a weighing instrument using the RS-232C cable.
When the data number appears, press and hold the CLEAR key for 2 seconds or more.
2. Selecting a deletion mode. |
The “CLR” segment turns on and the most recent data |
the performance of the function.
The set parameters are maintained in memory even if the AD-1688 is disconnected from the weighing instrument or personal computer. For easier setting, the AD-1688 Setting Tools is available for downloading from our website.
9.1.Setting Procedure
1.Connect the AD-1688 to a weighing instrument using the RS-232C cable.
2. When the data number appears, press and hold the SET key for 2
Data bit, parity | Parameter | 7bit-Even*, 7bit-Odd, 8bit-None |
Decimal point (Note1) | Parameter | Dot (.)*, Comma (,) |
Number of data on a line | Parameter | 1*,2, 3, 4, 5, 6, 7 |
Buzzer | Parameter Sounds the buzzer*, Does not sound |
1.Connect the AD-1688 to a weighing instrument using the RS-232C cable.
2.Select the interval mode (int) for the data storage mode (reC) of the function setting and set the interval time (120 seconds in the example).
Press the CLEAR key to display the data number.
In the interval mode, the  mark turns on at the lower right.

 SEC
SEC
No.
number flashes. |
Under the above condition: Release the CLEAR key to |
enter the mode to delete the most recent data. |
Keep pressing the CLEAR key to display “ALL”. Release the |
CLEAR key here to enter the mode to delete all the data. |
If the CLEAR key is kept pressed, the display indicates the most recent data number and “ALL” alternately.
Mode to delete the | Mode to delete |
most recent data | all the data |
No. | Press and hold | No. |
| CLR | CLR |
Release | | Release |
3.Deleting the data
Press the SET key to delete the designated data. The display indicates the reduced data number.
If the SET key is not pressed within 5 seconds, the AD-1688 returns to the data number display without deleting the data.
8.Switching the Displays
8.1.Memory Utilization Rate
When the data number is displayed, press the DISPLAY key to display the memory utilization rate.
Press the DISPLAY key again to display the data number.
Data number display | Memory utilization rate |
No. | Press | |
| | % |
8.2. Date/Time Display
When the data number is displayed, press the SET key to display the year, date and time.
1. Data number display
No.
Press 

2. The display indicates the year and date for 2 seconds each, and then indicates the time.
3. Press any key to return to the data number display.
-4-
seconds or more. 3. The function display appears. (Refer to “9.2. Function List”.)
Press the DISPLAY key to select a | |
function, and press the SET key to | |
display the parameters. | | |
When the CLEAR key is pressed, or | Press |
after 10 seconds of non operation, | |
the AD-1688 returns to the data | |
number display. | | |
4. The parameter of the selected | |
function appears. The current setting | Current setting |
has the | mark at the lower right. |
The flashing parameter can be | |
changed. | | | |
5. Using the following keys to change the parameter. |
DISPLAY (+) key: | Display the parameters one by one. |
CLEAR (CANCEL) key: Go to the next function without changes.
SET key: | Confirm the setting and go to the |
| next function. |
After changes, the parameter and the  mark appear for 1 second, and then
the next function appears.
6. Press the CLEAR key to return to the data number display.
No.
Windows Explorer and Excel are registered trademarks of Microsoft Corporation.
-5-
Data storage mode | Parameter | Standard mode (All data)*, Interval mode |
| | Interval time | When the interval mode is selected |
| | | |
| | Parameter | 1*,2,5,10,15,20,30,60,120,300,600,900,1200,1800,3600 |
| | | SEC | | SEC |
Date and time data | Parameter | Adds the date and time*, Does not add |
DATE | | | DATE | | DATE |
SEC | | | |
| | SEC | | SEC |
Date format | (Note1) | Parameter | YMD*, MDY, DMY | |
DATE | | | DATE | DATE | DATE |
(Note1) Set these functions according to the settings of the personal computer used.
: Factory setting
About the number of data on a line and the interval mode, refer to the following sections.
9.3. Number of Data on a Line
This function is useful for storing data with different contents or items at the same time, for example, ID and number of samples in a counting scale. When the number is set, <CR>s of up to the setting are converted into commas. Once the number of <CR>s is reached the setting, a new line starts.
For example, the ID, number of samples and weight are sent individually. Using this function, these three data items can be placed on one line as shown in (B).
Example data received to transmit to Excel
ID,000123<CR><LF>
QT,+00000056 PC<CR><LF>
ST,+0003.102 g<CR><LF>
(A)When the number of data on a line is 1, the ID, number of samples and weight are stored on separate lines.
(B)When the number of data on a line is 3, the ID, number of samples and weight are stored on one line.
ID Number of samples Weight
-6-
3.Set the data output mode of the weighing instrument to the stream mode. For details on the setting procedure, refer to the instruction manual of the weighing instrument.
4. Press and hold the DISPLAY key for 2 | No. |
|
seconds or more. The AD-1688 starts to store the data at a set interval. The  mark flashes while the data is being stored.
5. To stop storing the data, press and hold | No. |
the DISPLAY key.
The  mark stops flashing and turns on.
6.Remove the AD-1688 from the weighing instrument.
7.Connect the AD-1688 to a personal computer and read the stored data.
11. Error Display
| Error | Description | Remedy |
| | Data full. | |
| | No more storage is | Delete the data. |
| | available. | |
| | The voltage that is | Use a longer interval |
| | supplied from the |
| Errors 1 to 3 | weighing instrument | time to store the data. |
| | is low. | |
| | The baud rate and | Set the same values for |
| | parity of the received |
| | both the AD-1688 and |
| | data is different from |
| Error 7 | the weighing instrument. |
| the set values. |
| | |
| | Internal clock error | |
| | such as low backup | Ask for repair. |
| Error 9 | battery | |
12. Specifications |
Devices | Balances and scales with an RS-232C |
to be connected | connector manufactured by A&D |
| (Visit our website to determine |
| which devices are applicable.) |
Number of data | Approximately 5000 data in the |
to be stored | standard format (15 characters in 1 |
| data set). |
Clock error | ±1 minute / month |
Applicable OS | Windows 2000 / XP / Vista |
Dedicated power supply | Not required |
| Power is supplied from a weighing |
| instrument or a personal computer. |
Operating temperature | 5°C to 40°C |
Operating humidity | 85%RH or less, no condensation |
Dimensions | 55x103x16.5 mm |
Mass | Approximately 60 g |
| -7- |