EtherHub 1500 System
Field | Description |
|
|
SNMP Community Names | The community strings authorized for trap management access. All |
| community strings used for IP and IPX Trap Managers must be listed in |
| this table. |
|
|
Community Name | A community entry authorized for trap management access. |
|
|
Access | Management access is restricted to |
|
|
Status | The status of the current entry can be set to VALID or INVALID. |
|
|
IP Trap Managers | IP management stations selected to receive trap messages from the |
| system. |
|
|
IP Address | IP address of the management station. |
|
|
Community Name | The community string required for trap management access. |
|
|
Status | The status of the current entry can be set to VALID or INVALID. |
|
|
IPX Trap Managers | IPX management stations selected to receive trap messages from the |
| system. |
|
|
Net Number | Identifies the IPX network number for the connected slot. |
|
|
Node ID | MAC address of the authorized trap manager. |
Community Name | The community string required for trap management access. |
|
|
Status | The status of the current entry can be set to VALID or INVALID. |
Downloading System Software - Use the Download command from the System Menu to load available software updates into the agent's flash ROM. The download file should be an EtherHub binary file from Accton Technology Corporation; otherwise the agent will not accept it.
Invoking this command brings up the Download dialog box. When all entries are confirmed, the display will change to show the progress of the download process. After downloading the new software, the agent will automatically restart itself. The following describes each entry in the dialog box:
Field | Description |
|
|
Timeout | Time to wait for a response. |
|
|
Retry | Number of attempts to make contact. |
|
|
Filename | The binary file to download. |
|
|
Transferred Block | Current number of data block being transferred. |
|
|
Total Blocks | Total number of blocks to transfer. |
Restarting the Agent - Use the Restart command from the System menu to reset a selected agent. LEDs on the agent will light up sequentially as it executes the initialization test.
Reverting Configuration to Factory Settings - Use the Factory Settings command from the System menu to change all configuration settings back to the factory defaults.
Save Configuration - Saves configuration settings made during current session. Reset Configuration - Restores configuration settings saved the last time.
Advanced Reference Guide
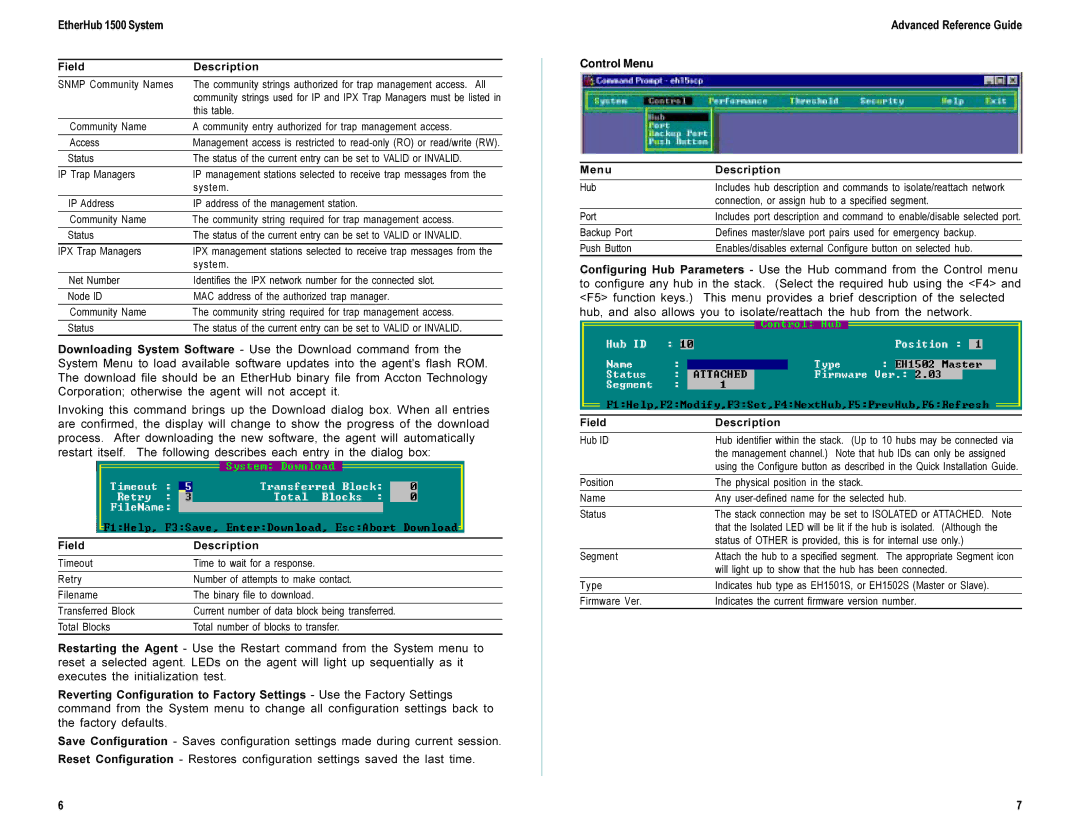
Control Menu
Menu | Description |
|
|
Hub | Includes hub description and commands to isolate/reattach network |
| connection, or assign hub to a specified segment. |
|
|
Port | Includes port description and command to enable/disable selected port. |
|
|
Backup Port | Defines master/slave port pairs used for emergency backup. |
|
|
Push Button | Enables/disables external Configure button on selected hub. |
Configuring Hub Parameters - Use the Hub command from the Control menu to configure any hub in the stack. (Select the required hub using the <F4> and <F5> function keys.) This menu provides a brief description of the selected hub, and also allows you to isolate/reattach the hub from the network.
Field | Description |
|
|
Hub ID | Hub identifier within the stack. (Up to 10 hubs may be connected via |
| the management channel.) Note that hub IDs can only be assigned |
| using the Configure button as described in the Quick Installation Guide. |
|
|
Position | The physical position in the stack. |
|
|
Name | Any |
|
|
Status | The stack connection may be set to ISOLATED or ATTACHED. Note |
| that the Isolated LED will be lit if the hub is isolated. (Although the |
| status of OTHER is provided, this is for internal use only.) |
Segment | Attach the hub to a specified segment. The appropriate Segment icon |
| will light up to show that the hub has been connected. |
|
|
Type | Indicates hub type as EH1501S, or EH1502S (Master or Slave). |
Firmware Ver. | Indicates the current firmware version number. |
6 | 7 |