Part NO. VD.T19V5.001
Acer TravelMate 420 Series
Revision History
Date Chapter Updates
Disclaimer
Copyright
Conventions
Preface
Page
Table of Contents
Chpater Troubleshooting
Chapter Jumper and Connector Locations
Appendix C Test Compatible Components 121
Features
Chapter
Way scroll button Chapter
Keyboard and Pointing Device
One type II CardBus PC Card slots Upgradeable memory
System Block Diagram
Top View
Board Layout
FIR
Bottom View
Outlook View
Front View
Icon Description
Chapter
Left Panel
Right Panel
Rear Panel
Bottom Panel
Icon Function Description
Indicators
Lock Key Description
Lock Keys
Embedded Numeric Keypad
Desired Access Num Lock On Num Lock Off
Key Icon Description
Windows Keys
Hot Keys
Chapter
Euro Symbol
Click on Start, Settings, Control Panel
Click on the Language tab and click on Details
Launch Keys
Launch Key Default application
Mail Detection
Touchpad
Touchpad Basics
Function Left Button Right Button Scroll Button Tap
Function Left Button Right Button Scroll Button Tap
Second Level Cache
Hardware Specifications and Configurations
Specification
Processor
Hard Disk Drive Interface
Memory Combinations
LAN Interface
Modem Interface
IDE/ATAPI
DVD-ROM Interface
CD CD-DA, CD+EG, CD-MIDI, CD-TEXT, CD-ROM, CD-ROM XA, Mixed
Vendor & model name Toshiba SD2212
Parallel Port
Video Resolutions Mode for both LCD and CRT
Audio Interface
Video Interface
Keyboard
USB Port
Pcmcia Port
System Board Major Chips
TX38D91VC1FAC
Battery
LCD Inverter Specification
CPT CLAA141XF01
Duty Ton Period
Electrical Characteristics
Dacbrig 0
Electrical specification
Thermal
Dacbrig 0 V, PWM
AC Adapter
Environmental Requirements
Power Management
Address Map
Mechanical Specification
VGA Bios
Memory Address Map
Mobility Radeon
IRQ Assignment Map
IRQ14
DMA Channel Assignment
IRQ12
IRQ13
Chapter
Navigating the Bios Utility
Bios Setup Utility
Chapter
Info
This menu provides you the information of the system
Parameter Description
Parameter Description
Main
Parameter Description Format/Option
DMA1/ DMA3
System Devices
Parameter Description Options
DMA
Oot Info Xit
Security
Parameter Description Option
Clear or Set
Removing a Password
Page
Boot
Exit
System Diagnostic Diskette
Bios Flash Utility
Page
Running Diagnostics Program
Page
Chapter
Page
Chapter
Chapter
Chapter
Machine Disassembly and Replacement
Before You Begin
General Information
Disassembly Procedure Flowchart
Safety Screw M2.5X0.45+6FP-ZKNL
Screw List
Screw M2.0X0.4P+3FP-NI
Removing the Battery Pack
Slide the optical drive latch Then remove the optical drive
Removing the Optical Module/HDD Module and Memory
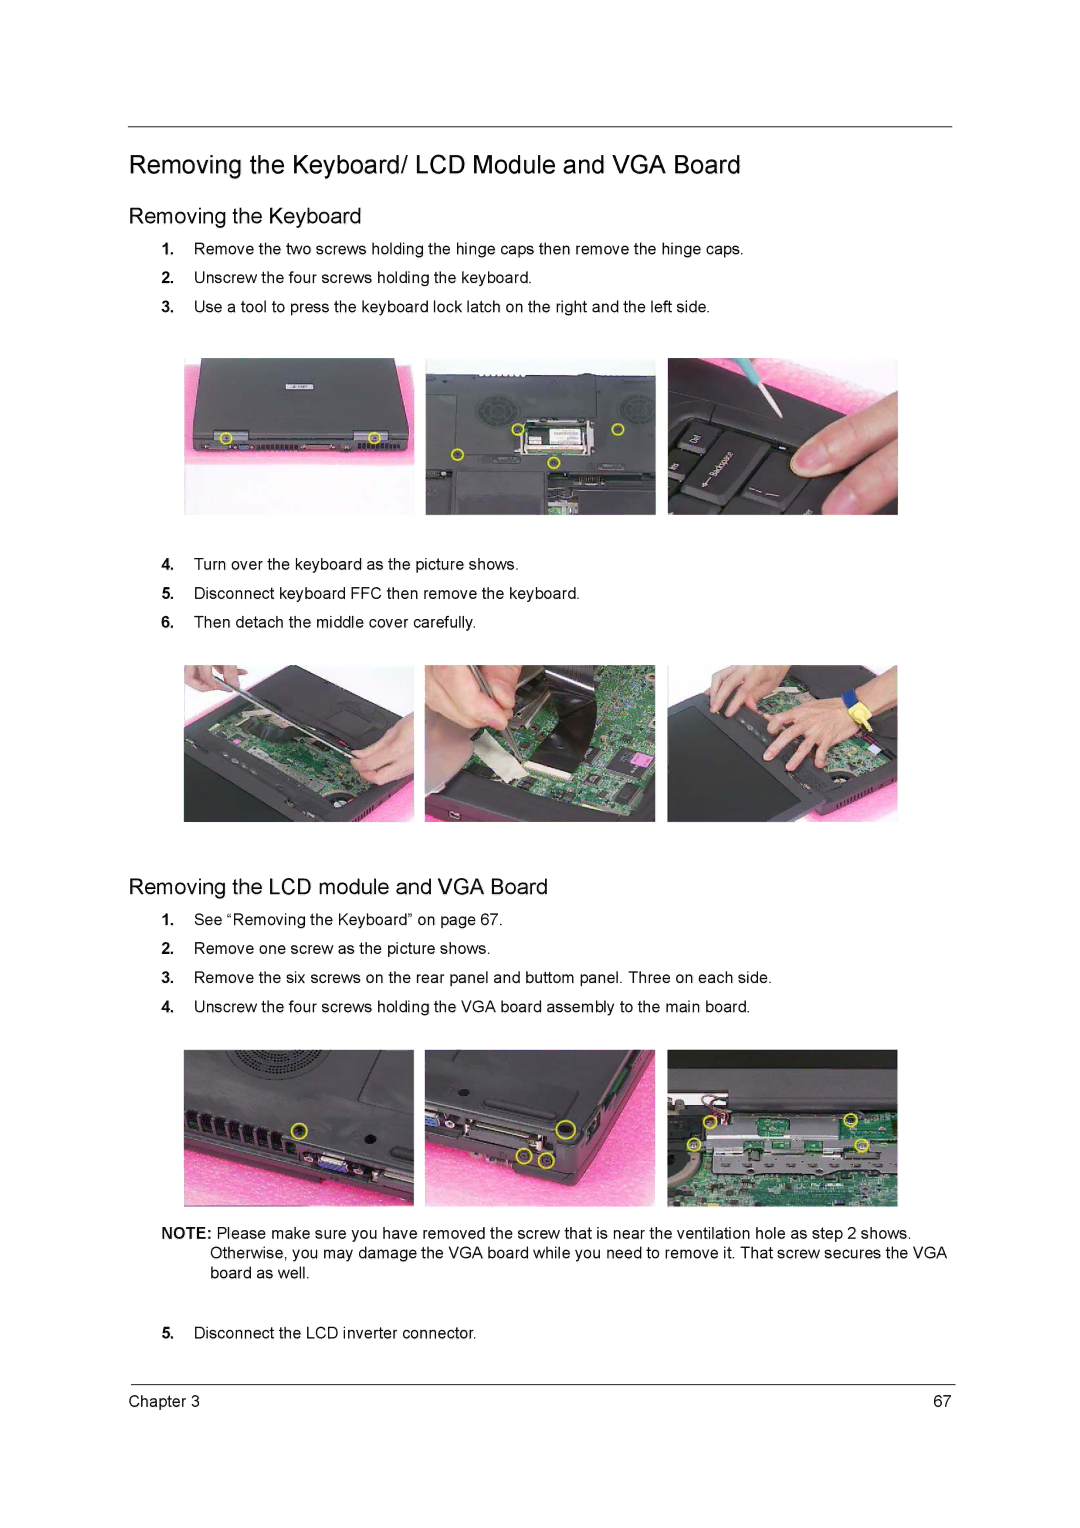
Removing the Keyboard
Removing the Keyboard/ LCD Module and VGA Board
Chapter
Disassembling the Main Unit
Chapter
Page
Chapter
Page
Disassembling the LCD Module
Disassembling the HDD Module
Disassembling the External Modules
Chapter
Symptoms Verified Go To
Troubleshooting
System Check Procedures
External Diskette Drive Check
External CD-ROM/DVD-ROM Drive Check
Keyboard or Auxiliary Input Device Check
Memory Check Power System Check
Check the Power Adapter
Display Check
Touchpad Check
Sound Check
Power-On Self-Test Post Error Message
Setup
Index of Error Messages
Error Message List
Error Messages FRU/Action in Sequence
02F0 CPU ID
Power-Related Symptoms
Index of Symptom-to-FRU Error Message
LCD-Related Symptoms
Indicator-Related Symptoms
Power Management-Related Symptoms
PCMCIA-Related Symptoms
Memory-Related Symptoms
Speaker-Related Symptoms
LCD FPC
Peripheral-Related Symptoms
Keyboard/Touchpad-Related Symptoms
Modem-Related Symptoms
Intermittent Problems
Dimm
Undetermined Problems
Code Beeps Post Routine Description
Post Task Routines
Code Beeps Post Routine Description
Chapter
Code Beeps For Boot Block in Flash ROM
Index of Flash Bios Error Message
Index of flashing Bios Error Message using PHLASH.EXE
Error Message Action in Sequence
Chapter
Top View
Jumper and Connector Locations
Setting
Power Button Onsystem on OFF System OFF
None Stand by Hibernate
Bottom View
100 Chapter
FRU Field Replaceable Unit List
Exploded Diagram
Chapter 103
Logic UP Assy Wireless
Chapter 105
DVD Assy CD-ROM Assy
Chapter 107
Combo Assy
UP Assy Logic Assywire Less BOARD-MDC Card
Battery LI-ION 9 CELLS-PANASONIC
UP Assy Logic Assywire Less BOARD-TOUCHPAD Button Board
UP Assy Logic Assywire Less BOARD-TOUCHPAD
Chapter 109
Dimm Cover
UP Assy Logic Assywire Less Support Bracket
UP Assy Logic Assywire Less
Lower Case
Chapter 111
IBM Cascade HDD 2.5 30G
HDD Connector
FDD FPC FDD Case FDD Mylar FDD Back Cover
IBM Cascade HDD 2.5 20G
Chapter 113
LCD Inverter
LCD 15.0 XGA Hannstar HSD150PX14-A
LCD 15 Sxga IBM ITSX95C
LCD 15 Sxga Hitachi TX38D91VC1FAC
Chapter 115
Combo DVD-ROM Drive 8X Hitachi GDR-8081N
CD-ROM Drive 24X Teac CD-224E-C85
ASSY, CD DVD-ROM Drive 8X Toshiba SR-C2612
ROM Assy DVD-ROM Drive 8X Liteon LSD-081
Chapter 117
Appendix a
TravelMate 420 Series
Appendix a 118
Appendix a
Main Features
Appendix a 120
Appendix B
Test Compatible Components
Microsoft Windows XP Home Environment Test
Specifications
Link HUB
Appendix B 123
USB JAZ 2GB
USB HUB
HP 10MB
Appendix B 125
Microsoft Windows XP Pro Environment Test
Pcmcia
Appendix B 127
Microsoft Windows 2000 Environment Test
128
Appendix C
Online Support Information
130
Core voltage 23 package 23 type
Index
Index

