Release the lever to lock it in one of the five stop positions.
NOTE. There is a blue spacer (24) located under the blade. It can be removed to increase the incremental cutting heights
by an extra 6mm at all 5 settings of the height adjustment lever (16).
Instructions on how to remove this spacer are given in Step 19.
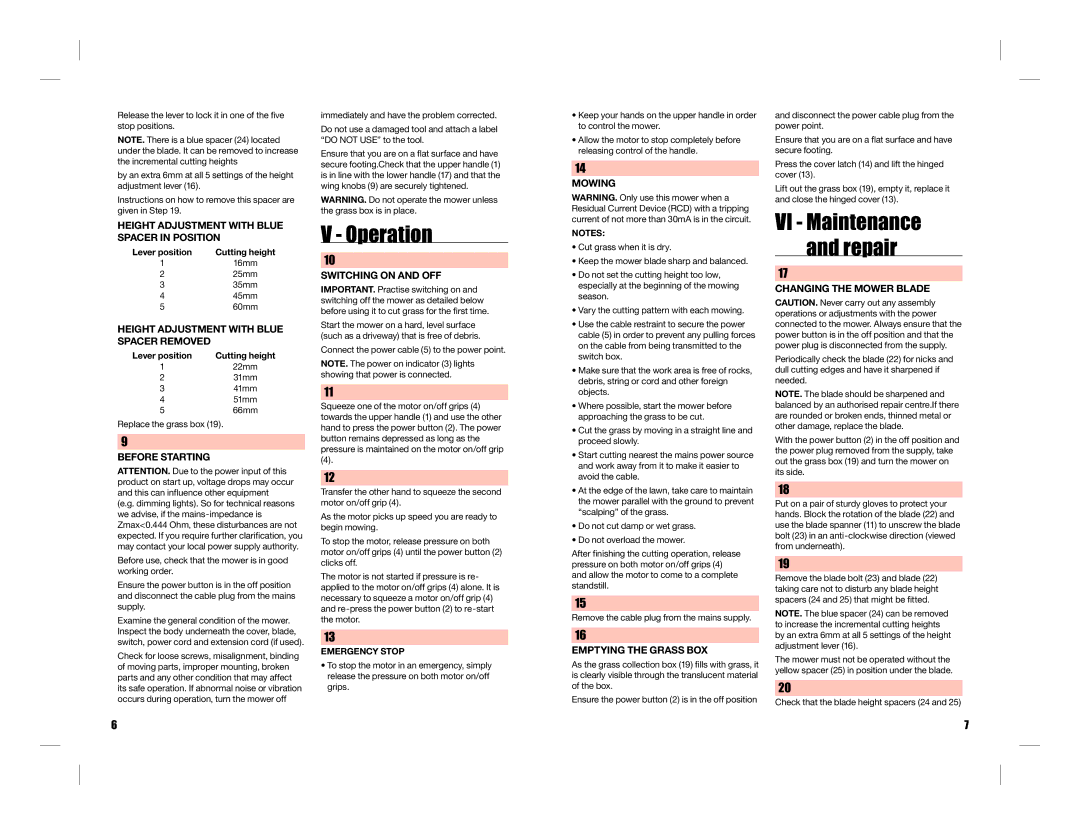
HEIGHT ADJUSTMENT WITH BLUE SPACER IN POSITION
Lever position | Cutting height |
1 | 16mm |
2 | 25mm |
3 | 35mm |
4 | 45mm |
5 | 60mm |
HEIGHT ADJUSTMENT WITH BLUE SPACER REMOVED
Lever position | Cutting height |
1 | 22mm |
2 | 31mm |
3 | 41mm |
4 | 51mm |
5 | 66mm |
Replace the grass box (19).
9
BEFORE STARTING
ATTENTION. Due to the power input of this product on start up, voltage drops may occur and this can influence other equipment (e.g. dimming lights). So for technical reasons we advise, if the mains-impedance is Zmax<0.444 Ohm, these disturbances are not expected. If you require further clarification, you may contact your local power supply authority.
Before use, check that the mower is in good working order.
Ensure the power button is in the off position and disconnect the cable plug from the mains supply.
Examine the general condition of the mower. Inspect the body underneath the cover, blade, switch, power cord and extension cord (if used).
Check for loose screws, misalignment, binding of moving parts, improper mounting, broken parts and any other condition that may affect its safe operation. If abnormal noise or vibration occurs during operation, turn the mower off
immediately and have the problem corrected.
Do not use a damaged tool and attach a label “DO NOT USE” to the tool.
Ensure that you are on a flat surface and have secure footing.Check that the upper handle (1) is in line with the lower handle (17) and that the wing knobs (9) are securely tightened.
WARNING. Do not operate the mower unless the grass box is in place.
V - Operation
10
SWITCHING ON AND OFF
IMPORTANT. Practise switching on and switching off the mower as detailed below before using it to cut grass for the first time.
Start the mower on a hard, level surface (such as a driveway) that is free of debris.
Connect the power cable (5) to the power point.
NOTE. The power on indicator (3) lights showing that power is connected.
11
Squeeze one of the motor on/off grips (4) towards the upper handle (1) and use the other hand to press the power button (2). The power button remains depressed as long as the pressure is maintained on the motor on/off grip
(4).
12
Transfer the other hand to squeeze the second motor on/off grip (4).
As the motor picks up speed you are ready to begin mowing.
To stop the motor, release pressure on both motor on/off grips (4) until the power button (2) clicks off.
The motor is not started if pressure is re- applied to the motor on/off grips (4) alone. It is necessary to squeeze a motor on/off grip (4) and re-press the power button (2) to re-start the motor.
13
EMERGENCY STOP
•To stop the motor in an emergency, simply release the pressure on both motor on/off grips.
•Keep your hands on the upper handle in order to control the mower.
•Allow the motor to stop completely before releasing control of the handle.
14
MOWING
WARNING. Only use this mower when a Residual Current Device (RCD) with a tripping current of not more than 30mA is in the circuit.
NOTES:
•Cut grass when it is dry.
•Keep the mower blade sharp and balanced.
•Do not set the cutting height too low, especially at the beginning of the mowing season.
•Vary the cutting pattern with each mowing.
•Use the cable restraint to secure the power cable (5) in order to prevent any pulling forces on the cable from being transmitted to the switch box.
•Make sure that the work area is free of rocks, debris, string or cord and other foreign objects.
•Where possible, start the mower before approaching the grass to be cut.
•Cut the grass by moving in a straight line and proceed slowly.
•Start cutting nearest the mains power source and work away from it to make it easier to avoid the cable.
•At the edge of the lawn, take care to maintain the mower parallel with the ground to prevent “scalping” of the grass.
•Do not cut damp or wet grass.
•Do not overload the mower.
After finishing the cutting operation, release pressure on both motor on/off grips (4) and allow the motor to come to a complete standstill.
15
Remove the cable plug from the mains supply.
16
EMPTYING THE GRASS BOX
As the grass collection box (19) fills with grass, it is clearly visible through the translucent material of the box.
Ensure the power button (2) is in the off position
and disconnect the power cable plug from the power point.
Ensure that you are on a flat surface and have secure footing.
Press the cover latch (14) and lift the hinged cover (13).
Lift out the grass box (19), empty it, replace it and close the hinged cover (13).
VI - Maintenance and repair
17
CHANGING THE MOWER BLADE
CAUTION. Never carry out any assembly operations or adjustments with the power connected to the mower. Always ensure that the power button is in the off position and that the power plug is disconnected from the supply.
Periodically check the blade (22) for nicks and dull cutting edges and have it sharpened if needed.
NOTE. The blade should be sharpened and balanced by an authorised repair centre.If there are rounded or broken ends, thinned metal or other damage, replace the blade.
With the power button (2) in the off position and the power plug removed from the supply, take out the grass box (19) and turn the mower on its side.
18
Put on a pair of sturdy gloves to protect your hands. Block the rotation of the blade (22) and use the blade spanner (11) to unscrew the blade bolt (23) in an anti-clockwise direction (viewed from underneath).
19
Remove the blade bolt (23) and blade (22) taking care not to disturb any blade height spacers (24 and 25) that might be fitted.
NOTE. The blue spacer (24) can be removed to increase the incremental cutting heights by an extra 6mm at all 5 settings of the height adjustment lever (16).
The mower must not be operated without the yellow spacer (25) in position under the blade.
20
Check that the blade height spacers (24 and 25)