Step 4

Turn the Diamond enclosure over with the hard drive mounting holes facing up. Use the included flat head screws to secure the hard drive onto the bottom of the enclosure and turn in the screw to the “LOCK” position.

Cable Connections When Used as an External Hard Drive

Note: Be sure the Diamond cipher key is inserted into the drive enclosure prior to turning on the power of the drive enclosure. The hard drive will not be detected by the computer if the power to the drive enclosure is turned on without the Cipher key. Under such condition, the power on the drive enclosur will have to be turned off and turned back on again with the Cipher key already inserted into the drive enclosure in order to detect the hard drive.

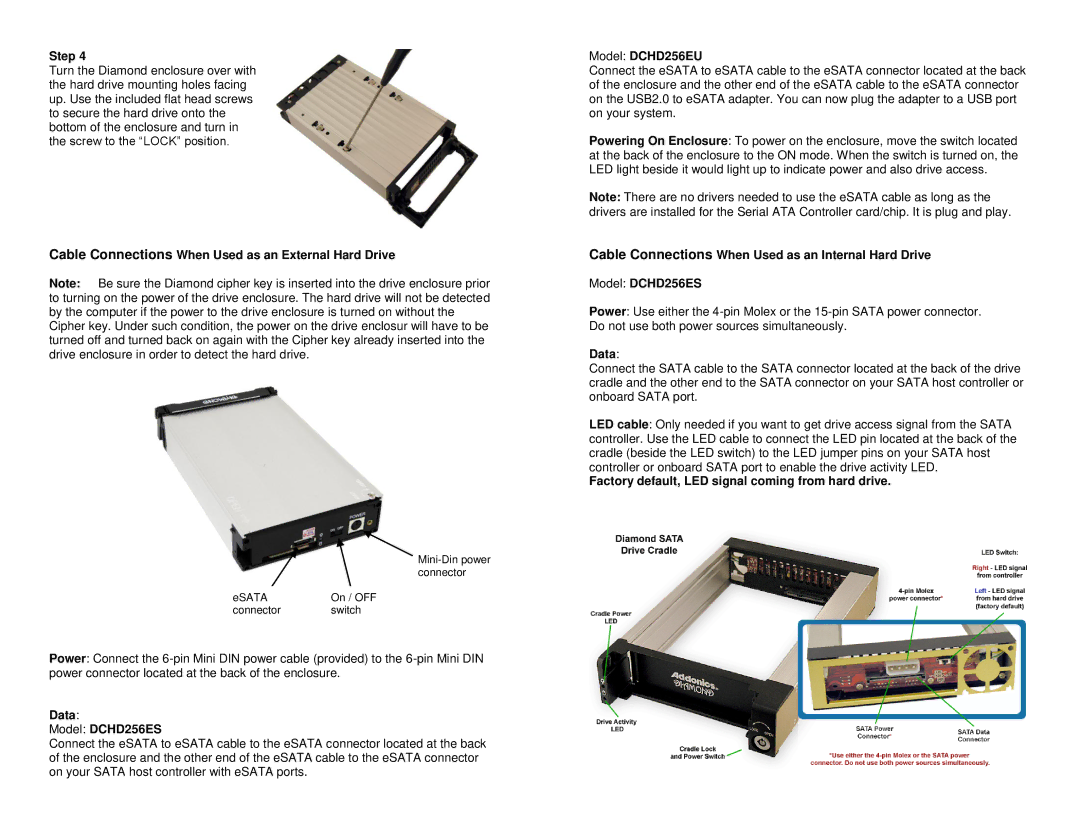
Mini-Din power connector

eSATA


On / OFF

connector


switch


Power: Connect the 6-pin Mini DIN power cable (provided) to the 6-pin Mini DIN power connector located at the back of the enclosure.

Data:

Model: DCHD256ES

Connect the eSATA to eSATA cable to the eSATA connector located at the back of the enclosure and the other end of the eSATA cable to the eSATA connector on your SATA host controller with eSATA ports.

Model: DCHD256EU

Connect the eSATA to eSATA cable to the eSATA connector located at the back of the enclosure and the other end of the eSATA cable to the eSATA connector on the USB2.0 to eSATA adapter. You can now plug the adapter to a USB port on your system.

Powering On Enclosure: To power on the enclosure, move the switch located at the back of the enclosure to the ON mode. When the switch is turned on, the LED light beside it would light up to indicate power and also drive access.

Note: There are no drivers needed to use the eSATA cable as long as the drivers are installed for the Serial ATA Controller card/chip. It is plug and play.

Cable Connections When Used as an Internal Hard Drive

Model: DCHD256ES

Power: Use either the 4-pin Molex or the 15-pin SATA power connector. Do not use both power sources simultaneously.

Data:

Connect the SATA cable to the SATA connector located at the back of the drive cradle and the other end to the SATA connector on your SATA host controller or onboard SATA port.

LED cable: Only needed if you want to get drive access signal from the SATA controller. Use the LED cable to connect the LED pin located at the back of the cradle (beside the LED switch) to the LED jumper pins on your SATA host controller or onboard SATA port to enable the drive activity LED.

Factory default, LED signal coming from hard drive.

Page 3
Image 3
Addonics Technologies Cable Connections When Used as an External Hard Drive, Data Model DCHD256ES, Model DCHD256EU

DCHD256ES, DCHD256EU specifications

Addonics Technologies is renowned for its innovative storage solutions, and the DCHD256ES and DCHD256EU are two standout products in their lineup. These dual-channel hard disk controllers are designed to enhance storage capabilities while ensuring data integrity and performance.

The DCHD256ES and DCHD256EU models are equipped with dual-port interfaces that enable simultaneous data transfers. This feature significantly boosts overall data throughput, making them ideal for applications that require high-speed data storage and retrieval, such as video surveillance systems or large database management. With a robust architecture that supports multiple drive configurations, these controllers can seamlessly accommodate a variety of hard disk drives and solid-state drives.

One of the key technologies incorporated in both models is the support for SATA III interface, which allows for maximum data transfer speeds of up to 6 Gbps. This next-generation interface ensures that users can take full advantage of their drives' capabilities, leading to faster backups and data access times. Additionally, the controllers support advanced features like hot-swapping, which permits users to replace drives without shutting down the system—a critical feature for maintaining uptime in mission-critical environments.

Another important characteristic of the DCHD256ES and DCHD256EU is their compatibility with RAID configurations. They support various RAID levels, including RAID 0, 1, and 5, providing users the flexibility to choose the level of redundancy and performance that best meets their needs. RAID 1, for instance, offers data mirroring, enhancing data protection, while RAID 0 improves performance by striping data across multiple drives.

The end-user experience is further optimized with the inclusion of advanced error-correction technologies that enhance data integrity. Built-in features like SMART monitoring enable users to monitor drive health, alerting them to potential failures before they lead to data loss.

In summary, the Addonics Technologies DCHD256ES and DCHD256EU are powerful dual-channel hard disk controllers that bring advanced features, robust performance, and high reliability to storage solutions. With their support for RAID configurations, dual-port interfaces, and high-speed SATA III connectivity, they are well-suited for demanding applications across various industries. These controllers provide a perfect blend of speed, capacity, and data protection, making them an excellent choice for anyone looking to enhance their storage capabilities.