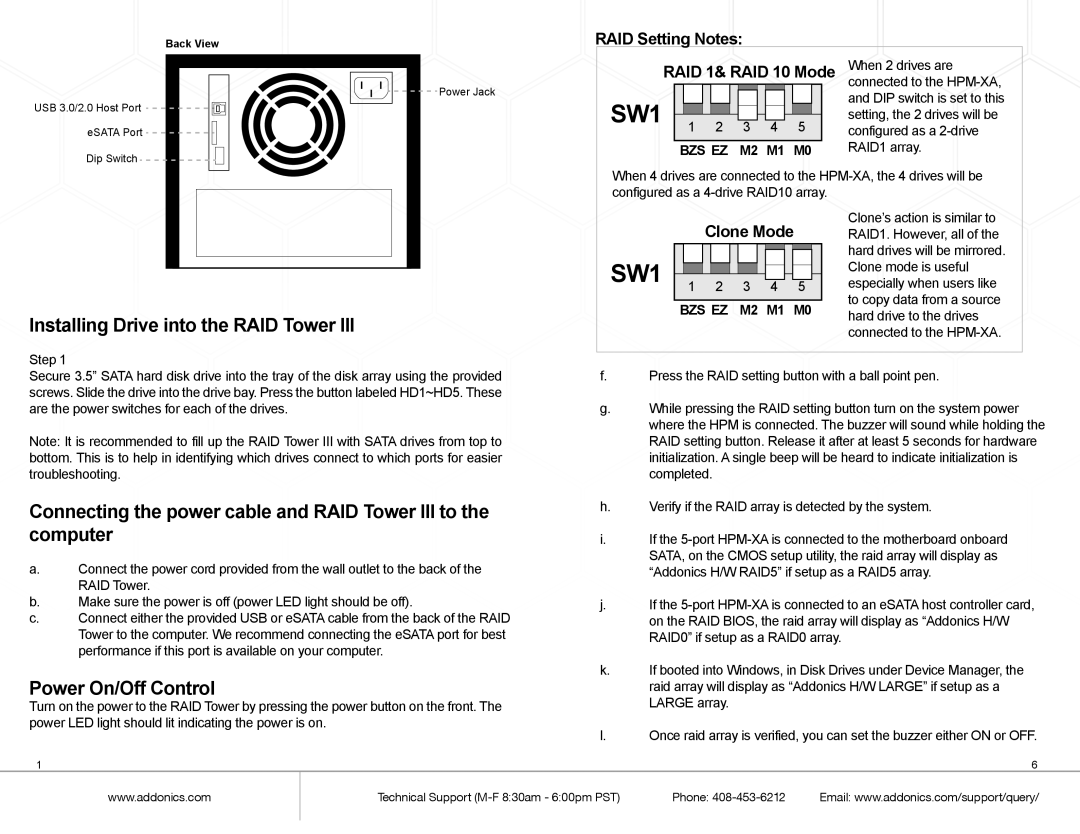
Back View
RAID Setting Notes:
USB 3.0/2.0 Host Port ![]()
![]()
![]()
![]()
![]()
![]()
![]() eSATA Port
eSATA Port ![]()
![]()
![]()
![]()
![]()
Dip Switch ![]()
![]()
![]()
![]()
![]()
![]()
![]()
![]() Power Jack
Power Jack
RAID 1& RAID 10 Mode
SW1 | 1 2 3 4 5 |
| BZS EZ M2 M1 M0 |
When 2 drives are connected to the
When 4 drives are connected to the
SW1
Clone Mode
1 | 2 | 3 | 4 | 5 |
BZS EZ | M2 M1 M0 | |||
Clone’s action is similar to RAID1. However, all of the hard drives will be mirrored. Clone mode is useful especially when users like to copy data from a source
Installing Drive into the RAID Tower III
Step 1
Secure 3.5” SATA hard disk drive into the tray of the disk array using the provided screws. Slide the drive into the drive bay. Press the button labeled HD1~HD5. These are the power switches for each of the drives.
Note: It is recommended to fill up the RAID Tower III with SATA drives from top to bottom. This is to help in identifying which drives connect to which ports for easier troubleshooting.
Connecting the power cable and RAID Tower III to the computer
a.Connect the power cord provided from the wall outlet to the back of the RAID Tower.
b.Make sure the power is off (power LED light should be off).
c.Connect either the provided USB or eSATA cable from the back of the RAID Tower to the computer. We recommend connecting the eSATA port for best performance if this port is available on your computer.
Power On/Off Control
Turn on the power to the RAID Tower by pressing the power button on the front. The power LED light should lit indicating the power is on.
1
hard drive to the drives connected to the
f.Press the RAID setting button with a ball point pen.
g.While pressing the RAID setting button turn on the system power where the HPM is connected. The buzzer will sound while holding the
RAID setting button. Release it after at least 5 seconds for hardware initialization. A single beep will be heard to indicate initialization is completed.
h.Verify if the RAID array is detected by the system.
i.If the
j.If the
k.If booted into Windows, in Disk Drives under Device Manager, the raid array will display as “Addonics H/W LARGE” if setup as a LARGE array.
l.Once raid array is verified, you can set the buzzer either ON or OFF.
6
www.addonics.com
Technical Support | Phone: | Email: www.addonics.com/support/query/ |