Cleaning and Maintaining Your Refrigerator

Condenser

The condenser tubing inside the cabinet does not require frequent cleaning; however, satisfactory cooling depends on adequate ventilation over the coils. Be sure that nothing obstructs the required air flow openings in front of the cabinet. At least once or twice a year brush or vacuum lint and dirt from the grille. Also at least once or twice a year brush or vacuum lint and dirt from the condenser for efficient performance by unscrewing the grille on the bottom front of the cabinet.

Cabinet

The painted cabinet can be washed with mild soap and water and thoroughly rinsed with clear water. Never use abrasive scouring powders.

Interior

Wash interior compartment with mild soap and water. Do not use an abrasive powder, solvent, polish cleaner or undiluted detergent.

Door Gasket

The vinyl gasket may be cleaned with mild soap and water, a baking soda solution or a mild scouring powder.

Light Tube Replacement

WARNING! DISCONNECT THE POWER CORD BEFORE ATTEMPTING LIGHT TUBE REPLACEMENT. Failure to do so may result in an electrical shock that could severely injure you.

This product uses two, 6 watt light tubes to illuminate the interior of the refrigerator. The light tubes are very reliable electrical components, but should either or both light tubes not function properly, please call the dealer you purchased your refrigerator from for replacement light tubes. Use only original equipment light tubes from your dealer or manufacturer.

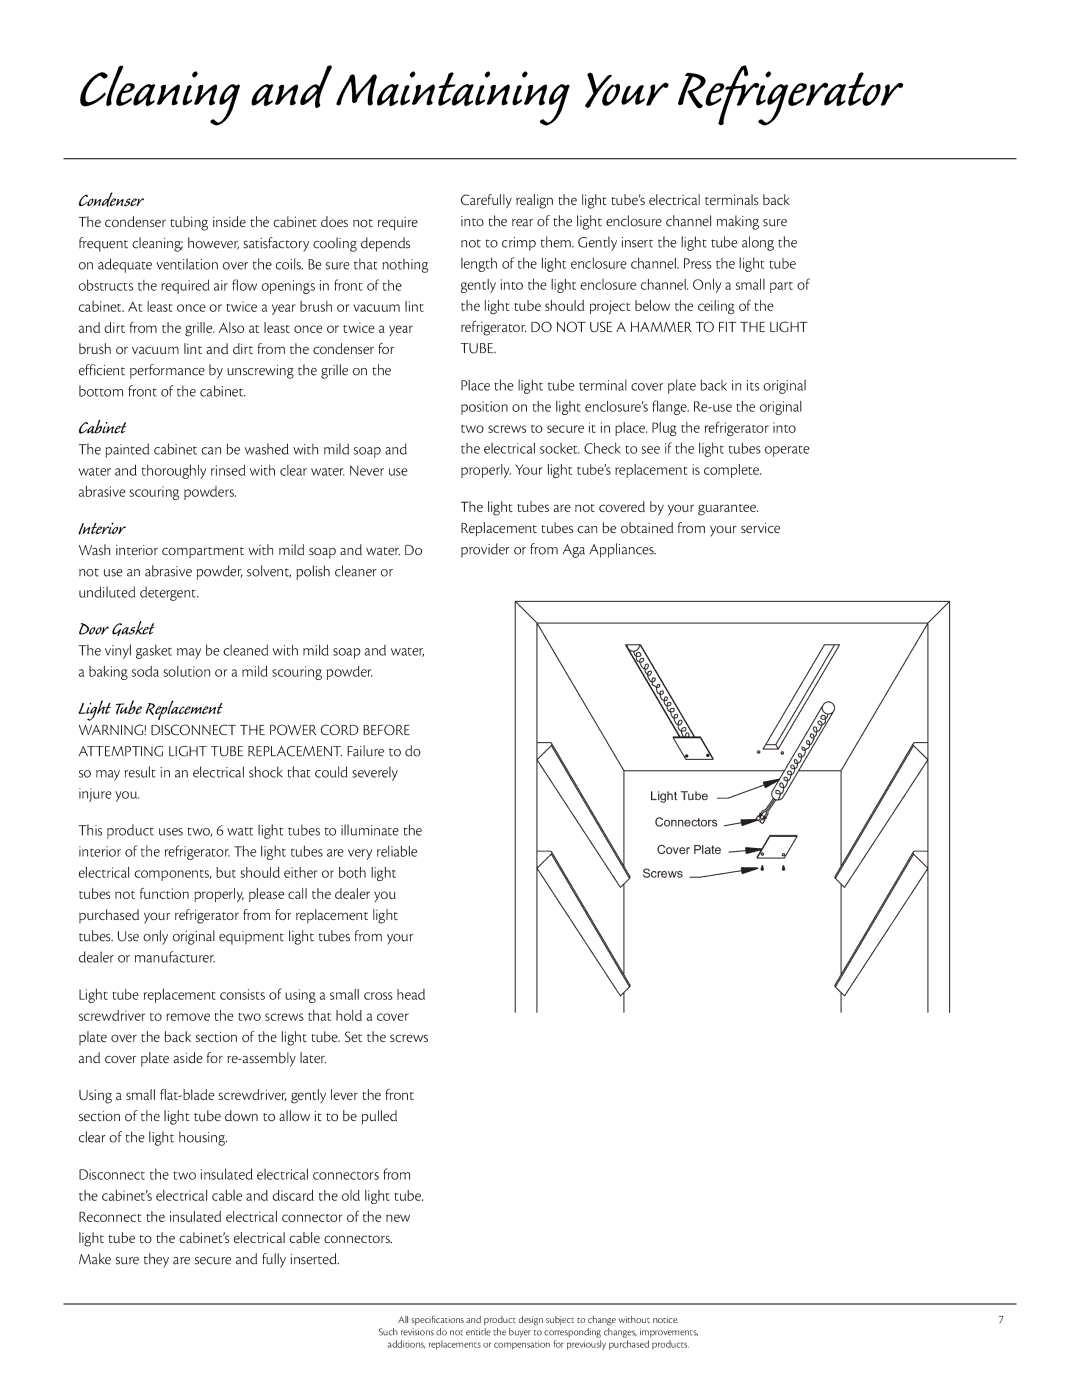
Light tube replacement consists of using a small cross head screwdriver to remove the two screws that hold a cover plate over the back section of the light tube. Set the screws and cover plate aside for re-assembly later.

Using a small flat-blade screwdriver, gently lever the front section of the light tube down to allow it to be pulled clear of the light housing.

Disconnect the two insulated electrical connectors from the cabinet’s electrical cable and discard the old light tube. Reconnect the insulated electrical connector of the new light tube to the cabinet’s electrical cable connectors. Make sure they are secure and fully inserted.

Carefully realign the light tube’s electrical terminals back into the rear of the light enclosure channel making sure not to crimp them. Gently insert the light tube along the length of the light enclosure channel. Press the light tube gently into the light enclosure channel. Only a small part of the light tube should project below the ceiling of the refrigerator. DO NOT USE A HAMMER TO FIT THE LIGHT TUBE.

Place the light tube terminal cover plate back in its original position on the light enclosure’s flange. Re-use the original two screws to secure it in place. Plug the refrigerator into the electrical socket. Check to see if the light tubes operate properly. Your light tube’s replacement is complete.

The light tubes are not covered by your guarantee. Replacement tubes can be obtained from your service provider or from Aga Appliances.

Light Tube

Connectors

Cover Plate

Screws

All specifications and product design subject to change without notice.

7

Such revisions do not entitle the buyer to corresponding changes, improvements, additions, replacements or compensation for previously purchased products.

Page 7
Image 7
Aga Ranges 61ARA 115V manual Condenser, Cabinet, Interior, Door Gasket, Light Tube Replacement

61ARA 115V specifications

The Aga Ranges 61ARA 115V is a marvel of kitchen engineering, merging traditional design with modern functionality. Known for its iconic style and robust construction, this range brings a touch of elegance to any culinary space while ensuring efficient and reliable performance.

The 61ARA model is equipped with six powerful burners that allow for simultaneous cooking of multiple dishes, facilitating efficiency in any kitchen. The burners come in various sizes, allowing precise control over the heat; this is particularly beneficial for tasks ranging from simmering sauces to boiling pasta. The presence of griddle plates enhances versatility, enabling users to grill or prepare breakfast items with ease.

A standout feature of the 61ARA is its dual-fuel capability, combining the precision of gas cooking with the consistent and moist heat of an electric oven. This dual-fuel setup allows for more control over the cooking process, as gas provides instant heat while electric ovens maintain stable temperatures for baking.

The spacious oven of the Aga Ranges 61ARA 115V boasts a generous capacity, accommodating large roasts, casseroles, and batch baking. Equipped with advanced convection technology, this oven ensures even heat distribution, leading to perfectly baked goods and evenly roasted meats. The self-cleaning feature simplifies maintenance, allowing busy chefs to focus on cooking rather than cleaning.

In terms of energy efficiency, the 61ARA is designed with modern consumption standards in mind. The combination of efficient burners and highly insulated ovens minimizes energy usage without compromising performance. This eco-conscious design is perfect for the modern family that values sustainability alongside high-performance cooking.

The aesthetic appeal of the Aga Ranges 61ARA is undeniable. It is available in a variety of finishes and customizable options, allowing it to seamlessly blend with any kitchen decor. Its classic look, combined with modern technology, makes it not just a cooking appliance but also a statement piece in the kitchen.

Overall, the Aga Ranges 61ARA 115V combines heritage and innovation, offering a robust dining experience. With its advanced features, efficient technologies, and timeless design, it remains a top choice for both amateur cooks and seasoned chefs alike. Investing in the 61ARA means investing in a culinary tradition that enhances home cooking with quality and style, ensuring delicious meals for years to come.