Overall Troubleshooting (sheet 1)

Start "Overall

Troubleshooting"

Turn off supply, disconnect the load and push the sense switch on the rear panel in (local). Turn on the supply

Display On?


No


Fan On?


Yes


Yes


Go to "No Display"


Troubleshooting


Fan on?


No


Yes


See "Self Test Error


Error message


Yes


Codes/Messages",


displayed


Table 3-2


?


No


Using front panel keys, program full scale voltage and current. Check the voltage at the supply’s output terminals with a DMM.


1.

Check ac input and line cord


2.

Check line fuse


3. Turn off supply, remove top cover, check line

No


voltage select jumpers on T1.


4. Turn on supply, check ac power and ac bias


voltages at T1 secondary


Turn off the supply and remove top cover to access the A1 board. Turn on the supply and check voltage at heatsink of A1Q770 (TP 12) with respect to common (TP 9). See Fig 6-5 Sheet 1.


1. Check ac bias voltage at T1


secondary and cable W7. See Fig

A1Q700 Heatsink


No


6-2 in 665xA service manual.


+24V?


2. Check A1F700, 701, D702-


705, C711 and R709.


Yes


1.Check Fan B1 and cable connection to A1J601

2.Check fan speed control circuit A1Q700, A1U702 and associated components. See Fig 6-5 sheet 1.

Output voltage

within spec

?

No B To Sheet 4

Yes


A

To Sheet 2


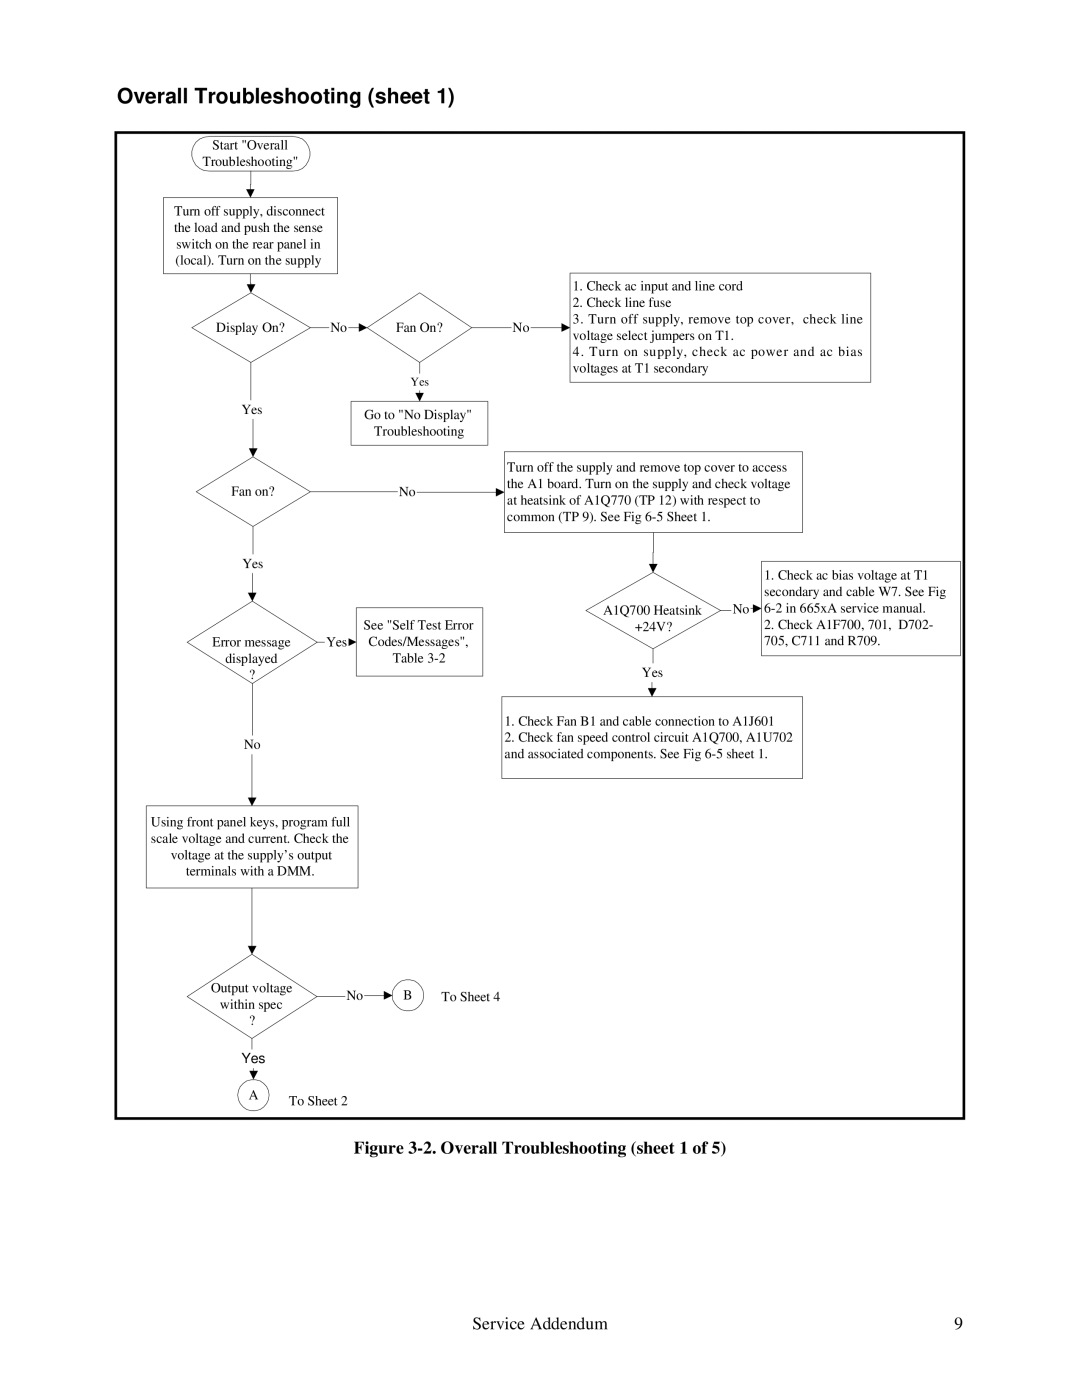
Figure 3-2. Overall Troubleshooting (sheet 1 of 5)

Service Addendum

9

Page 9
Image 9
Agilent Technologies E4350B, E4351B service manual Overall Troubleshooting sheet 1

E4351B, E4350B specifications

Agilent Technologies, a leader in electronic measurement, offers a range of advanced solutions, including the E4350B and E4351B switching systems. These models are specifically designed to meet the increasing demands of modern testing environments, providing high reliability and precision for a variety of applications.

The Agilent E4350B is known for its low resistance switching capabilities, making it an ideal choice for applications requiring accurate and repeatable measurements. It supports up to 16 channels of low resistance testing, allowing engineers to simulate complex electrical paths and identify potential issues in circuit designs. With an optional temperature measurement capability, users can monitor the thermal performance of components directly during tests.

On the other hand, the E4351B model enhances flexibility with a modular design, offering an extensive range of input and output configurations. This instrument is particularly well-suited for automated test systems, providing the ability to connect multiple devices and manage them seamlessly. Its high-speed switching technology enables quick toggling between channels, ensuring that large datasets can be acquired swiftly without compromising accuracy.

Both models employ advanced contact technology, which minimizes the potential for signal degradation, ensuring that users receive reliable data with minimal noise interference. This feature is crucial in applications where signal integrity is paramount, such as in research and development or quality assurance processes.

Enhanced user interfaces simplify operations for both novice and experienced technicians. The built-in touchscreen and intuitive navigation allow for easy setup and operation, significantly reducing the learning curve. Furthermore, the comprehensive software support provided by Agilent facilitates integration with various programming environments, allowing for custom test sequences tailored to specific needs.

Moreover, both E4350B and E4351B systems are built with durability in mind. The robust construction ensures long-term reliability, reducing downtime and maintenance costs. This makes them ideal candidates for both laboratory settings and field operations where consistent performance is critical.

In summary, Agilent Technologies’ E4350B and E4351B models are distinguished by their precision, flexibility, and robust performance. Their advanced features and user-friendly design make them suitable for a wide variety of applications, from routine testing to complex R&D projects. By leveraging modern switching technologies, these systems set a high standard for electronic measurement, aiding engineers in developing reliable electronic solutions.