Joist/Stud

Joist/Stud


Collar/Damper

Screws


Collar/Damper


Figure 4

Wall/Ceiling Material


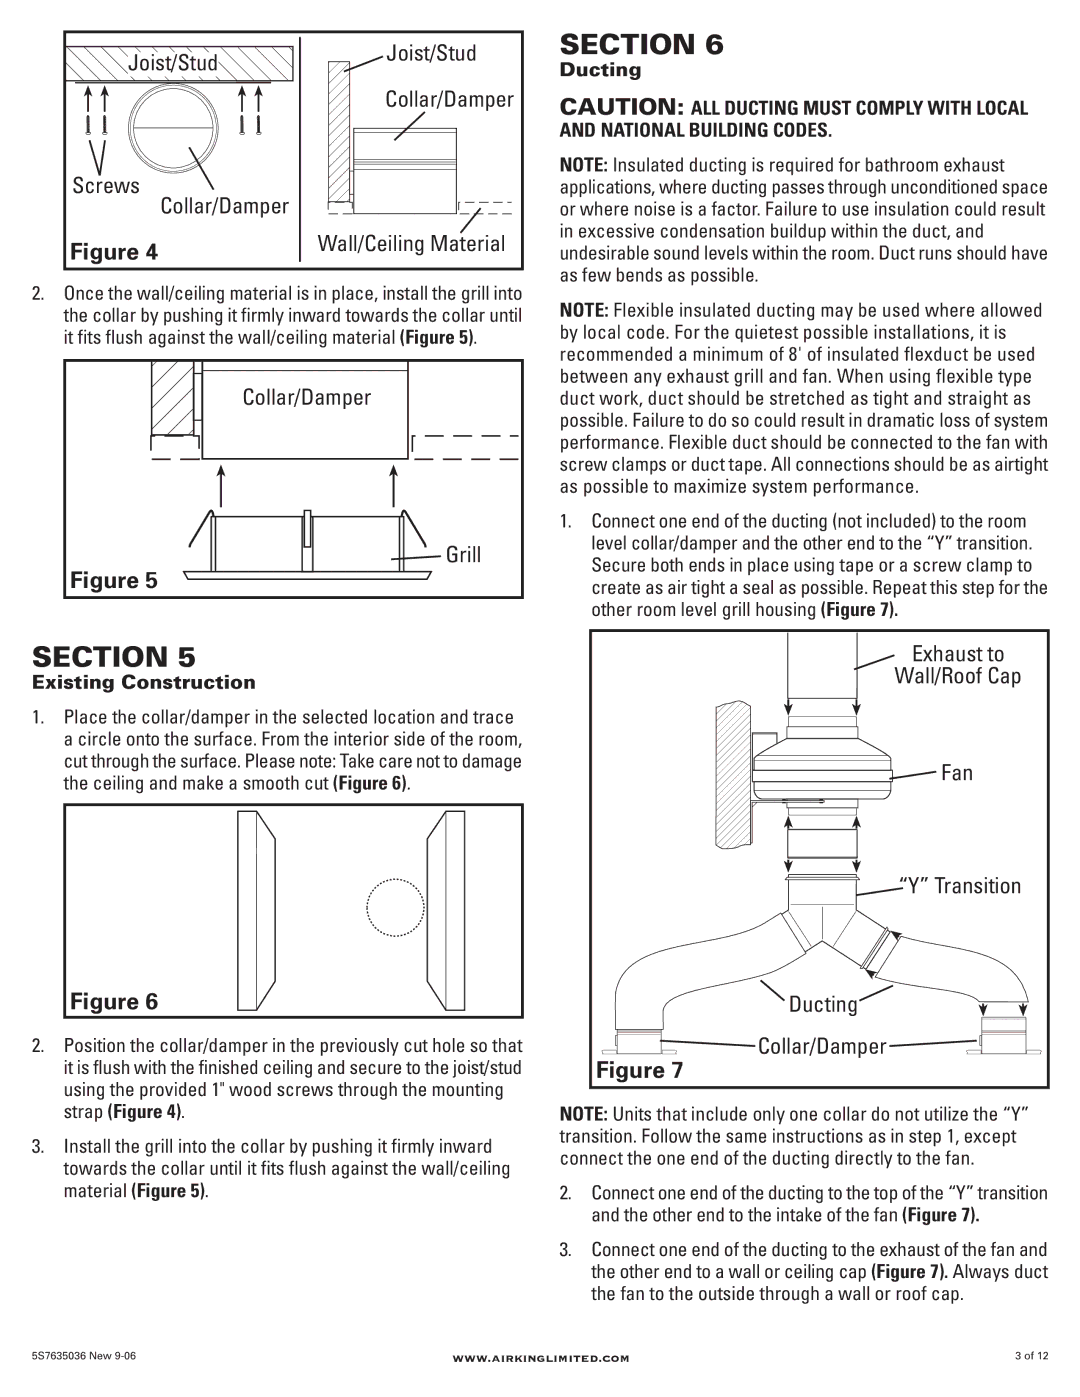
2.Once the wall/ceiling material is in place, install the grill into the collar by pushing it firmly inward towards the collar until it fits flush against the wall/ceiling material (Figure 5).

Collar/Damper

Grill

Figure 5

SECTION 5

Existing Construction

1.Place the collar/damper in the selected location and trace a circle onto the surface. From the interior side of the room, cut through the surface. Please note: Take care not to damage the ceiling and make a smooth cut (Figure 6).

Figure 6

2.Position the collar/damper in the previously cut hole so that it is flush with the finished ceiling and secure to the joist/stud using the provided 1" wood screws through the mounting strap (Figure 4).

3.Install the grill into the collar by pushing it firmly inward towards the collar until it fits flush against the wall/ceiling material (Figure 5).

SECTION 6

Ducting

CAUTION: ALL DUCTING MUST COMPLY WITH LOCAL AND NATIONAL BUILDING CODES.

NOTE: Insulated ducting is required for bathroom exhaust applications, where ducting passes through unconditioned space or where noise is a factor. Failure to use insulation could result in excessive condensation buildup within the duct, and undesirable sound levels within the room. Duct runs should have as few bends as possible.

NOTE: Flexible insulated ducting may be used where allowed by local code. For the quietest possible installations, it is recommended a minimum of 8' of insulated flexduct be used between any exhaust grill and fan. When using flexible type duct work, duct should be stretched as tight and straight as possible. Failure to do so could result in dramatic loss of system performance. Flexible duct should be connected to the fan with screw clamps or duct tape. All connections should be as airtight as possible to maximize system performance.

1.Connect one end of the ducting (not included) to the room level collar/damper and the other end to the “Y” transition. Secure both ends in place using tape or a screw clamp to create as air tight a seal as possible. Repeat this step for the other room level grill housing (Figure 7).

Exhaust to

Wall/Roof Cap

Fan

“Y” Transition

Ducting

Collar/Damper

Figure 7

NOTE: Units that include only one collar do not utilize the “Y” transition. Follow the same instructions as in step 1, except connect the one end of the ducting directly to the fan.

2.Connect one end of the ducting to the top of the “Y” transition and the other end to the intake of the fan (Figure 7).

3.Connect one end of the ducting to the exhaust of the fan and the other end to a wall or ceiling cap (Figure 7). Always duct the fan to the outside through a wall or roof cap.

5S7635036 New 9-06

www.airkinglimited.com

3 of 12

Page 3
Image 3
Air King AIK24Y, AIK26Y, AIK16X, AIK14X, AIG6, AIG4 Joist/Stud, Screws Collar/Damper, Wall/Ceiling Material, Grill, Transition

AIF6Y, AIF4X, AIF8X, AIF10X, AIG4 specifications

Air King has established itself as a leader in the ventilation and air quality industry, with a diverse range of fans designed to meet various needs. Among its robust lineup, models AIF8X, AIF4X, AIK14X, AIG4, and AIK16X stand out for their unique features and advanced technologies, catering to different environments from residential to commercial settings.

The Air King AIF8X is a powerful yet compact fan designed for high airflow efficiency. With a 3-speed motor, it allows users to customize their airflow according to specific requirements. The fan’s durable steel construction ensures longevity, while its easy-to-install design makes it a favorite among DIY enthusiasts and professional contractors alike.

Next in line is the AIF4X model, which features a lightweight and portable design. It is ideal for small spaces where flexibility is essential. The AIF4X is equipped with a built-in carry handle and an adjustable tilt head, allowing users to direct airflow where needed. Its energy-efficient motor operates quietly, making it suitable for use in offices or bedrooms without disturbing the peace.

The AIK14X is engineered with advanced noise-reduction technology, making it one of the quietest fans available in its category. This model is particularly popular in environments requiring concentration, such as libraries or study rooms. Its sleek design is complemented by a powerful airflow capacity, making it effective in cooling larger spaces without the usual noise associated with high-output fans.

The AIG4 fans are well-known for their corrosion-resistant properties, making them an excellent choice for humid environments like bathrooms or kitchens. The AIG4 boasts a powerful motor and features integrated timers, which automatically shut the fan off after a predetermined time, promoting energy efficiency.

Finally, the AIK16X merges functionality with modern design. It features an adjustable wall-mounting option, making it perfect for areas where floor space is limited. Its multi-speed operation ensures that users can tailor airflow for comfort during different seasons.

In summary, Air King’s AIF8X, AIF4X, AIK14X, AIG4, and AIK16X fans showcase a blend of innovation, user-centric design, and reliability. Whether for personal comfort or commercial applications, these models deliver superior performance, ensuring that you enjoy a fresh and well-ventilated environment.