Ducting

Duct

Collar

Figure 6

SECTION 4

Wiring

CAUTION: MAKE SURE POWER IS SWITCHED OFF AT SERVICE PANEL BEFORE STARTING INSTALLATION.

CAUTION: ALL ELECTRICAL CONNECTIONS MUST BE MADE IN ACCORDANCE WITH LOCAL CODES, ORDINANCES, OR NATIONAL ELECTRICAL CODE. IF YOU ARE UNFAMILIAR WITH METHODS OF INSTALLING ELECTRICAL WIRING, SECURE THE SERVICES OF A QUALIFIED ELECTRICIAN.

NOTE: This unit includes a side access panel for wiring that does not require the removal of the fan’s blower assembly. If you choose to wire the unit from the inside, you will need to remove the blower assembly and internal wiring compartment. Both methods are equally effective.

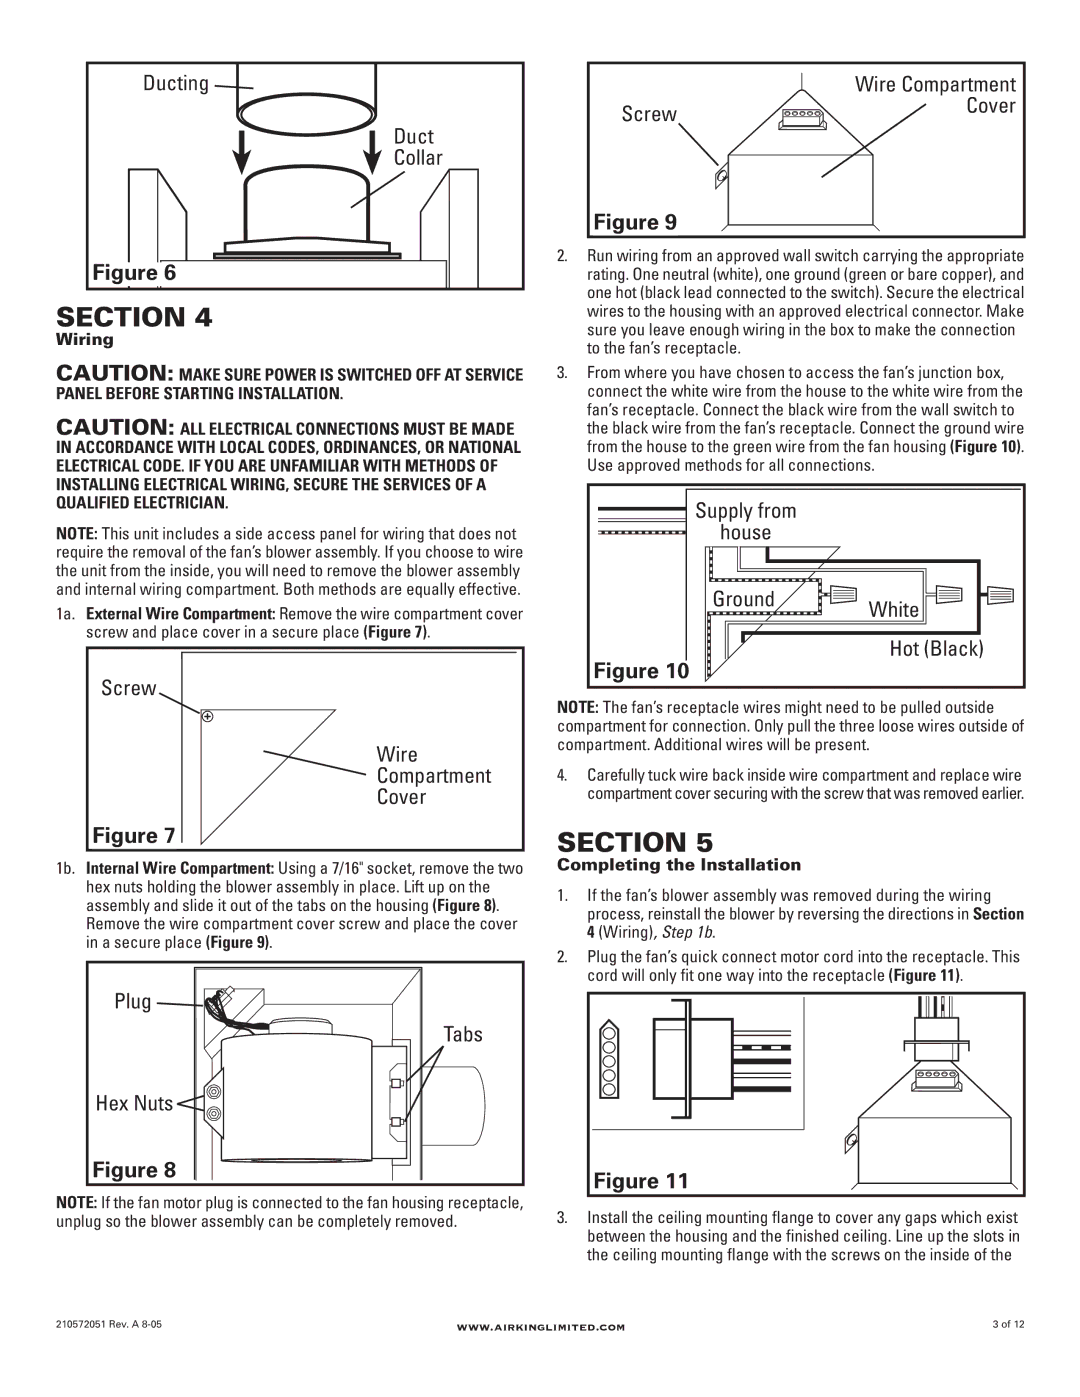
1a. External Wire Compartment: Remove the wire compartment cover screw and place cover in a secure place (Figure 7).

Screw

Wire

Compartment

Cover

Figure 7

1b. Internal Wire Compartment: Using a 7/16" socket, remove the two hex nuts holding the blower assembly in place. Lift up on the assembly and slide it out of the tabs on the housing (Figure 8). Remove the wire compartment cover screw and place the cover in a secure place (Figure 9).

Plug

Tabs

Hex Nuts

Figure 8

NOTE: If the fan motor plug is connected to the fan housing receptacle, unplug so the blower assembly can be completely removed.


Wire Compartment

Screw

Cover


Figure 9

2.Run wiring from an approved wall switch carrying the appropriate rating. One neutral (white), one ground (green or bare copper), and one hot (black lead connected to the switch). Secure the electrical wires to the housing with an approved electrical connector. Make sure you leave enough wiring in the box to make the connection to the fan’s receptacle.

3.From where you have chosen to access the fan’s junction box, connect the white wire from the house to the white wire from the fan’s receptacle. Connect the black wire from the wall switch to the black wire from the fan’s receptacle. Connect the ground wire from the house to the green wire from the fan housing (Figure 10). Use approved methods for all connections.

Supply from


house


Ground

White


Figure 10

Hot (Black)


NOTE: The fan’s receptacle wires might need to be pulled outside compartment for connection. Only pull the three loose wires outside of compartment. Additional wires will be present.

4.Carefully tuck wire back inside wire compartment and replace wire compartment cover securing with the screw that was removed earlier.

SECTION 5

Completing the Installation

1.If the fan’s blower assembly was removed during the wiring process, reinstall the blower by reversing the directions in Section 4 (Wiring), Step 1b.

2.Plug the fan’s quick connect motor cord into the receptacle. This cord will only fit one way into the receptacle (Figure 11).

Figure 11

3.Install the ceiling mounting flange to cover any gaps which exist between the housing and the finished ceiling. Line up the slots in the ceiling mounting flange with the screws on the inside of the

210572051 Rev. A 8-05

www.airkinglimited.com

3 of 12

Page 3
Image 3
Air King AK150LS, AK300LS, AK200LS manual Ducting, Wire, Plug Tabs Hex Nuts, Screw Cover, White

AK200LS, AK300LS, AK150LS specifications

The Air King AK series, including the AK300LS, AK200LS, and AK150LS, exemplifies the brand's dedication to innovation and performance in residential and commercial ventilation systems. Each model offers unique features tailored to diverse needs, ensuring optimal air circulation and overall comfort.

The AK300LS is recognized for its powerful airflow capabilities, making it an ideal choice for larger spaces. With a robust motor designed to deliver high performance, this model can efficiently ventilate areas up to 300 square feet. The unit features a smooth, quiet operation, ensuring minimal disruption in environments such as offices and homes. Its installation-friendly design allows for versatile mounting options, while adjustable speed settings provide users with control over their ventilation preferences.

The AK200LS offers a balanced approach, combining efficiency with moderate airflow capacity suitable for medium-sized rooms. This model stands out with its energy-efficient motor that helps to reduce electricity costs while maintaining excellent airflow. The AK200LS features an easy-to-use control panel, allowing users to adjust speed and settings seamlessly. Its lightweight construction simplifies installation and maintenance, making it a preferred choice for both residential and light commercial applications.

For those seeking a more compact solution, the AK150LS delivers effective ventilation in smaller spaces without sacrificing performance. This model is designed for areas up to 150 square feet, ideal for bathrooms, kitchens, or utility rooms. The AK150LS operates quietly, making it perfect for noise-sensitive environments. Its low-profile design blends easily into any decor, while still delivering a refreshing airflow. Energy efficiency is emphasized, contributing to long-term savings and eco-friendly operation.

All three models in the Air King AK series are built with durability in mind. They utilize high-quality materials and components, ensuring longevity and reliability. Moreover, the products are designed with ease of maintenance as a priority, featuring accessible filters that can be easily cleaned or replaced.

In summary, the Air King AK300LS, AK200LS, and AK150LS are each equipped with features that cater to specific ventilation needs, showcasing advanced technologies that promote energy efficiency and user convenience. These models not only enhance indoor air quality but also contribute to a more comfortable living and working environment, making them standout options in the market for effective ventilation solutions.