Figure 6

SECTION 4

Ducting

CAUTION: ALL DUCTING MUST COMPLY WITH LOCAL AND NATIONAL BUILDING CODES.

1.Connect the ducting to the fan’s duct collar (Figure 7). Secure in place using tape or screw clamp. Always duct the fan to the outside through a wall or roof cap.

Figure 7

NOTE: If damper detaches from unit, reattach by snapping the collar back onto the unit. It is designed to only fit one way.

SECTION 5

Wiring

CAUTION: MAKE SURE POWER IS SWITCHED OFF AT SERVICE PANEL BEFORE STARTING INSTALLATION.

CAUTION: ALL ELECTRICAL CONNECTIONS MUST BE MADE IN ACCORDANCE WITH LOCAL CODES, ORDINANCES, OR NATIONAL ELECTRICAL CODE. IF YOU ARE UNFAMILIAR WITH METHODS OF INSTALLING ELECTRICAL WIRING, SECURE THE SERVICES OF A QUALIFIED ELECTRICIAN.

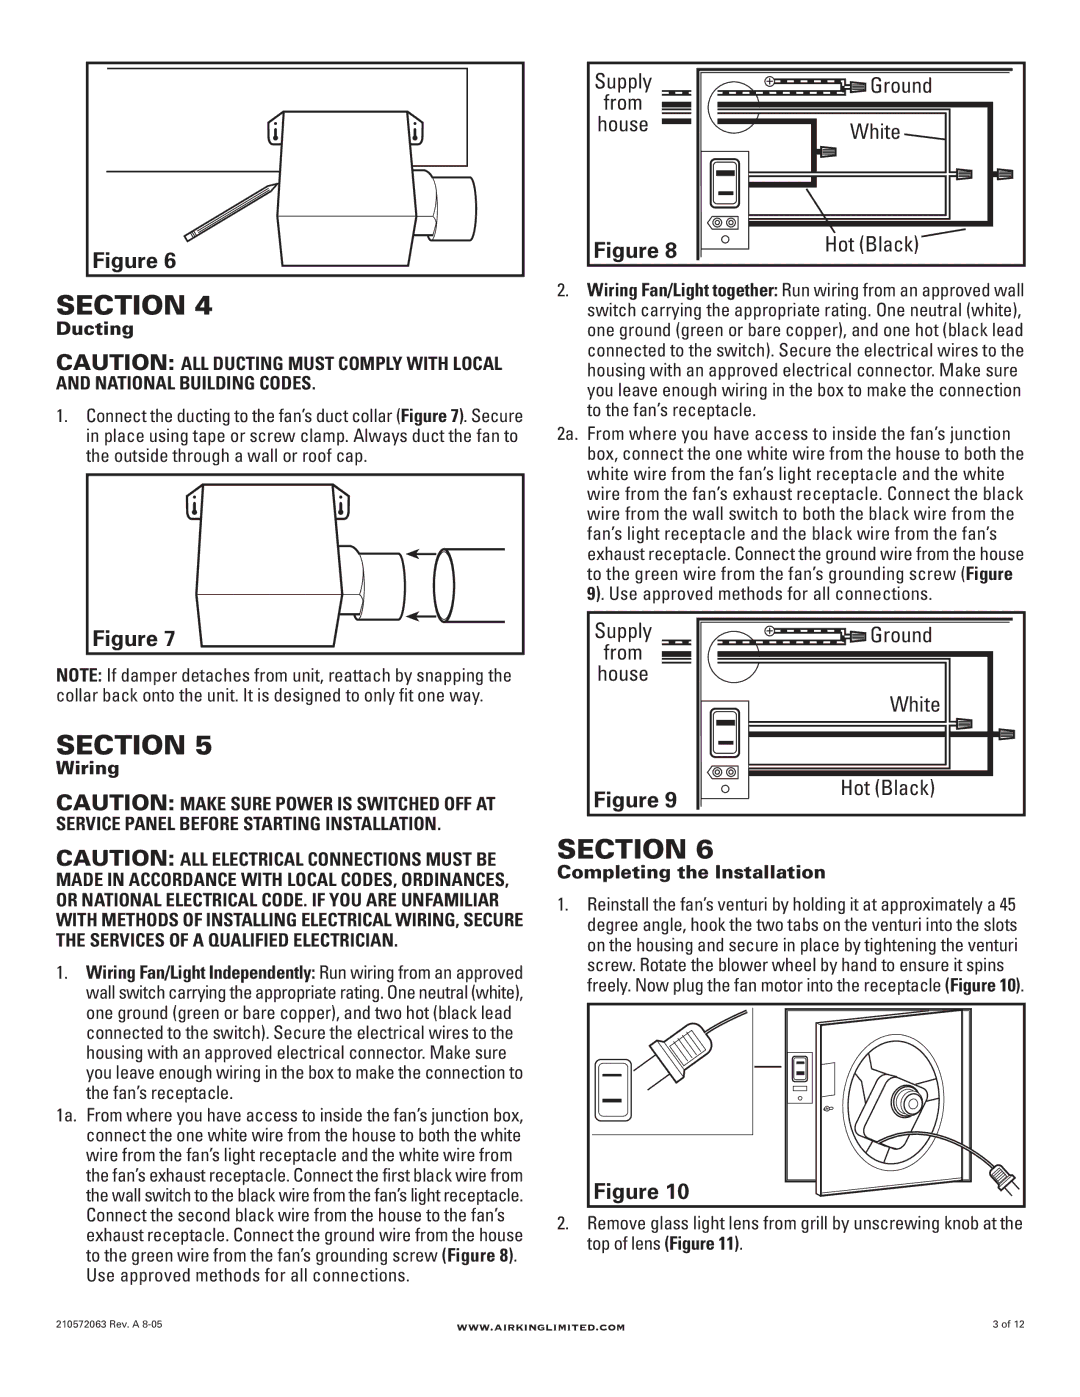
1.Wiring Fan/Light Independently: Run wiring from an approved wall switch carrying the appropriate rating. One neutral (white), one ground (green or bare copper), and two hot (black lead connected to the switch). Secure the electrical wires to the housing with an approved electrical connector. Make sure you leave enough wiring in the box to make the connection to the fan’s receptacle.

1a. From where you have access to inside the fan’s junction box, connect the one white wire from the house to both the white wire from the fan’s light receptacle and the white wire from the fan’s exhaust receptacle. Connect the first black wire from the wall switch to the black wire from the fan’s light receptacle. Connect the second black wire from the house to the fan’s exhaust receptacle. Connect the ground wire from the house to the green wire from the fan’s grounding screw (Figure 8). Use approved methods for all connections.

Supply

Ground

from


house

White


Figure 8

Hot (Black)


2.Wiring Fan/Light together: Run wiring from an approved wall switch carrying the appropriate rating. One neutral (white), one ground (green or bare copper), and one hot (black lead connected to the switch). Secure the electrical wires to the housing with an approved electrical connector. Make sure you leave enough wiring in the box to make the connection to the fan’s receptacle.

2a. From where you have access to inside the fan’s junction box, connect the one white wire from the house to both the white wire from the fan’s light receptacle and the white wire from the fan’s exhaust receptacle. Connect the black wire from the wall switch to both the black wire from the fan’s light receptacle and the black wire from the fan’s exhaust receptacle. Connect the ground wire from the house to the green wire from the fan’s grounding screw (Figure 9). Use approved methods for all connections.

Supply

Ground

from


house


White

Figure 9

Hot (Black)


SECTION 6

Completing the Installation

1.Reinstall the fan’s venturi by holding it at approximately a 45 degree angle, hook the two tabs on the venturi into the slots on the housing and secure in place by tightening the venturi screw. Rotate the blower wheel by hand to ensure it spins freely. Now plug the fan motor into the receptacle (Figure 10).

Figure 10

2.Remove glass light lens from grill by unscrewing knob at the top of lens (Figure 11).

210572063 Rev. A 8-05

www.airkinglimited.com

3 of 12

Page 3
Image 3
Air King DRLC709, DRLC703, DRLC701, DRLC702 manual White, Hot Black, Ground

DRLC709, DRLC702, DRLC701, DRLC703 specifications

The Air King DRLC series is a collection of high-performance ceiling and wall mount fans designed to enhance airflow and ventilation in various spaces. This series includes models DRLC703, DRLC701, DRLC709, and DRLC702, each with distinct features and technologies catering to diverse requirements while maintaining high efficiency and reliability.

The DRLC703 model is celebrated for its robust performance and versatile installation options. It features a powerful motor that delivers exceptional airflow while operating quietly, making it ideal for both residential and commercial use. The fan also includes a three-speed motor control, allowing users to adjust the airflow according to their comfort levels. Additionally, the durable construction ensures longevity and minimal maintenance.

Meanwhile, the DRLC701 offers a sleek design combined with advanced energy-efficient technology. This model utilizes a unique blade design that maximizes airflow while minimizing noise. Its integrated pull chain allows for easy speed adjustments and operation, making it user-friendly. The energy-efficient motor not only saves on electricity bills but also contributes to environmental sustainability.

The DRLC709 stands out with its innovative remote control capability, providing users with the convenience of operating the fan from anywhere in the room. This model is equipped with LED lighting, making it a great addition to both living spaces and work environments. Like other models in the series, the DRLC709 is designed for easy installation and includes multiple mounting options to suit various ceiling heights and room layouts.

Lastly, the DRLC702 combines elegance with functionality, featuring an elegant finish that complements any décor. It comes with reversible motor technology, allowing for year-round usage by facilitating both airflow circulation in the summer and warmth distribution in the winter. This model also prioritizes user convenience with an intuitive control panel.

Each Air King DRLC model emphasizes quality construction, energy efficiency, and user-friendly features, making them ideal choices for improving air circulation and comfort in homes, offices, and commercial spaces. The series showcases Air King's commitment to delivering reliable and technologically advanced products that meet the needs of customers while contributing to a sustainable future. With their combination of performance, style, and efficiency, the DRLC703, DRLC701, DRLC709, and DRLC702 are excellent additions to any setting.