INSTALLATION INSTRUCTIONS

CAUTION: MAKE SURE POWER IS SWITCHED OFF AT SERVICE PANEL BEFORE STARTING INSTALLATION.

SECTION 1

Preparing the Exhaust Fan

1.Unpack fan from the carton and confirm that all pieces are present. In addition to the exhaust fan you should have:

1 - Grill with Glass Light Lens

1 - Damper Assembly (attached)

2 - #8 Screws

2 - Lockwashers

4 - Mounting Rails

1 - Instruction/Safety Sheet

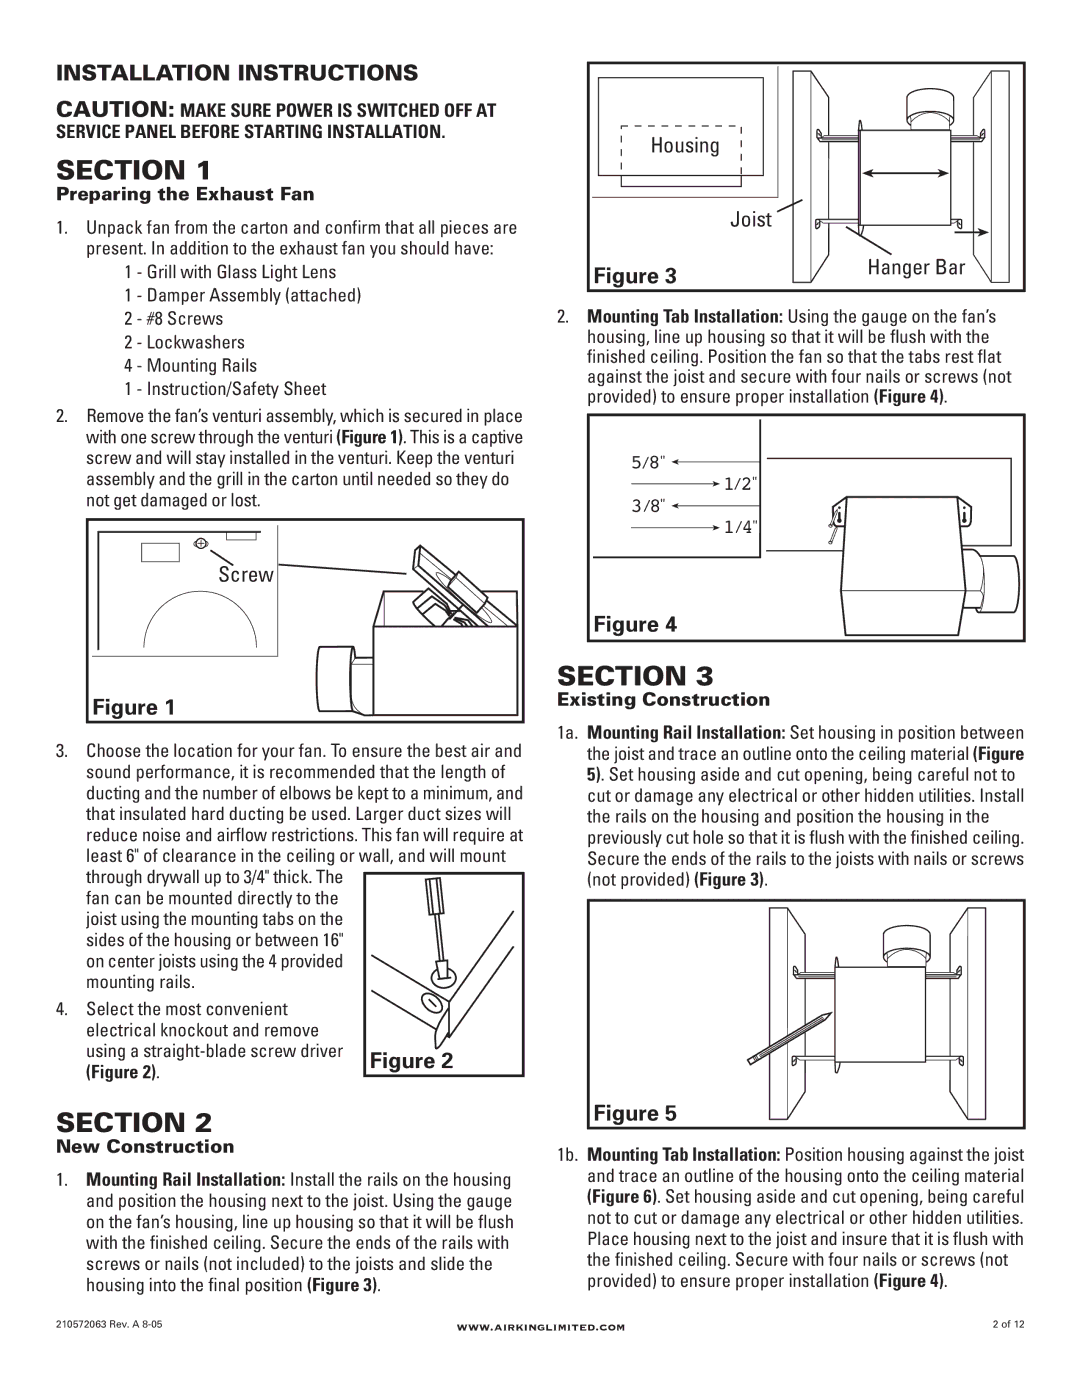
2.Remove the fan’s venturi assembly, which is secured in place with one screw through the venturi (Figure 1). This is a captive screw and will stay installed in the venturi. Keep the venturi assembly and the grill in the carton until needed so they do not get damaged or lost.

Screw

Figure 1

3.Choose the location for your fan. To ensure the best air and sound performance, it is recommended that the length of ducting and the number of elbows be kept to a minimum, and that insulated hard ducting be used. Larger duct sizes will reduce noise and airflow restrictions. This fan will require at least 6" of clearance in the ceiling or wall, and will mount through drywall up to 3/4" thick. The

fan can be mounted directly to the joist using the mounting tabs on the sides of the housing or between 16" on center joists using the 4 provided mounting rails.

4.Select the most convenient electrical knockout and remove

using a straight-blade screw driver

Figure 2

(Figure 2).


SECTION 2

New Construction

1.Mounting Rail Installation: Install the rails on the housing and position the housing next to the joist. Using the gauge on the fan’s housing, line up housing so that it will be flush with the finished ceiling. Secure the ends of the rails with screws or nails (not included) to the joists and slide the housing into the final position (Figure 3).

Housing


Joist

Figure 3

Hanger Bar


2.Mounting Tab Installation: Using the gauge on the fan’s housing, line up housing so that it will be flush with the finished ceiling. Position the fan so that the tabs rest flat against the joist and secure with four nails or screws (not provided) to ensure proper installation (Figure 4).

/ "

5 8

/ "

1 2

/ "

3 8

/ "

1 4

Figure 4

SECTION 3

Existing Construction

1a. Mounting Rail Installation: Set housing in position between the joist and trace an outline onto the ceiling material (Figure 5). Set housing aside and cut opening, being careful not to cut or damage any electrical or other hidden utilities. Install the rails on the housing and position the housing in the previously cut hole so that it is flush with the finished ceiling. Secure the ends of the rails to the joists with nails or screws (not provided) (Figure 3).

Figure 5

1b. Mounting Tab Installation: Position housing against the joist and trace an outline of the housing onto the ceiling material (Figure 6). Set housing aside and cut opening, being careful not to cut or damage any electrical or other hidden utilities. Place housing next to the joist and insure that it is flush with the finished ceiling. Secure with four nails or screws (not provided) to ensure proper installation (Figure 4).

210572063 Rev. A 8-05

www.airkinglimited.com

2 of 12

Page 2
Image 2
Air King DRLC702, DRLC703, DRLC701, DRLC709 manual Installation Instructions, Housing Joist, Screw, Hanger Bar

DRLC709, DRLC702, DRLC701, DRLC703 specifications

The Air King DRLC series is a collection of high-performance ceiling and wall mount fans designed to enhance airflow and ventilation in various spaces. This series includes models DRLC703, DRLC701, DRLC709, and DRLC702, each with distinct features and technologies catering to diverse requirements while maintaining high efficiency and reliability.

The DRLC703 model is celebrated for its robust performance and versatile installation options. It features a powerful motor that delivers exceptional airflow while operating quietly, making it ideal for both residential and commercial use. The fan also includes a three-speed motor control, allowing users to adjust the airflow according to their comfort levels. Additionally, the durable construction ensures longevity and minimal maintenance.

Meanwhile, the DRLC701 offers a sleek design combined with advanced energy-efficient technology. This model utilizes a unique blade design that maximizes airflow while minimizing noise. Its integrated pull chain allows for easy speed adjustments and operation, making it user-friendly. The energy-efficient motor not only saves on electricity bills but also contributes to environmental sustainability.

The DRLC709 stands out with its innovative remote control capability, providing users with the convenience of operating the fan from anywhere in the room. This model is equipped with LED lighting, making it a great addition to both living spaces and work environments. Like other models in the series, the DRLC709 is designed for easy installation and includes multiple mounting options to suit various ceiling heights and room layouts.

Lastly, the DRLC702 combines elegance with functionality, featuring an elegant finish that complements any décor. It comes with reversible motor technology, allowing for year-round usage by facilitating both airflow circulation in the summer and warmth distribution in the winter. This model also prioritizes user convenience with an intuitive control panel.

Each Air King DRLC model emphasizes quality construction, energy efficiency, and user-friendly features, making them ideal choices for improving air circulation and comfort in homes, offices, and commercial spaces. The series showcases Air King's commitment to delivering reliable and technologically advanced products that meet the needs of customers while contributing to a sustainable future. With their combination of performance, style, and efficiency, the DRLC703, DRLC701, DRLC709, and DRLC702 are excellent additions to any setting.