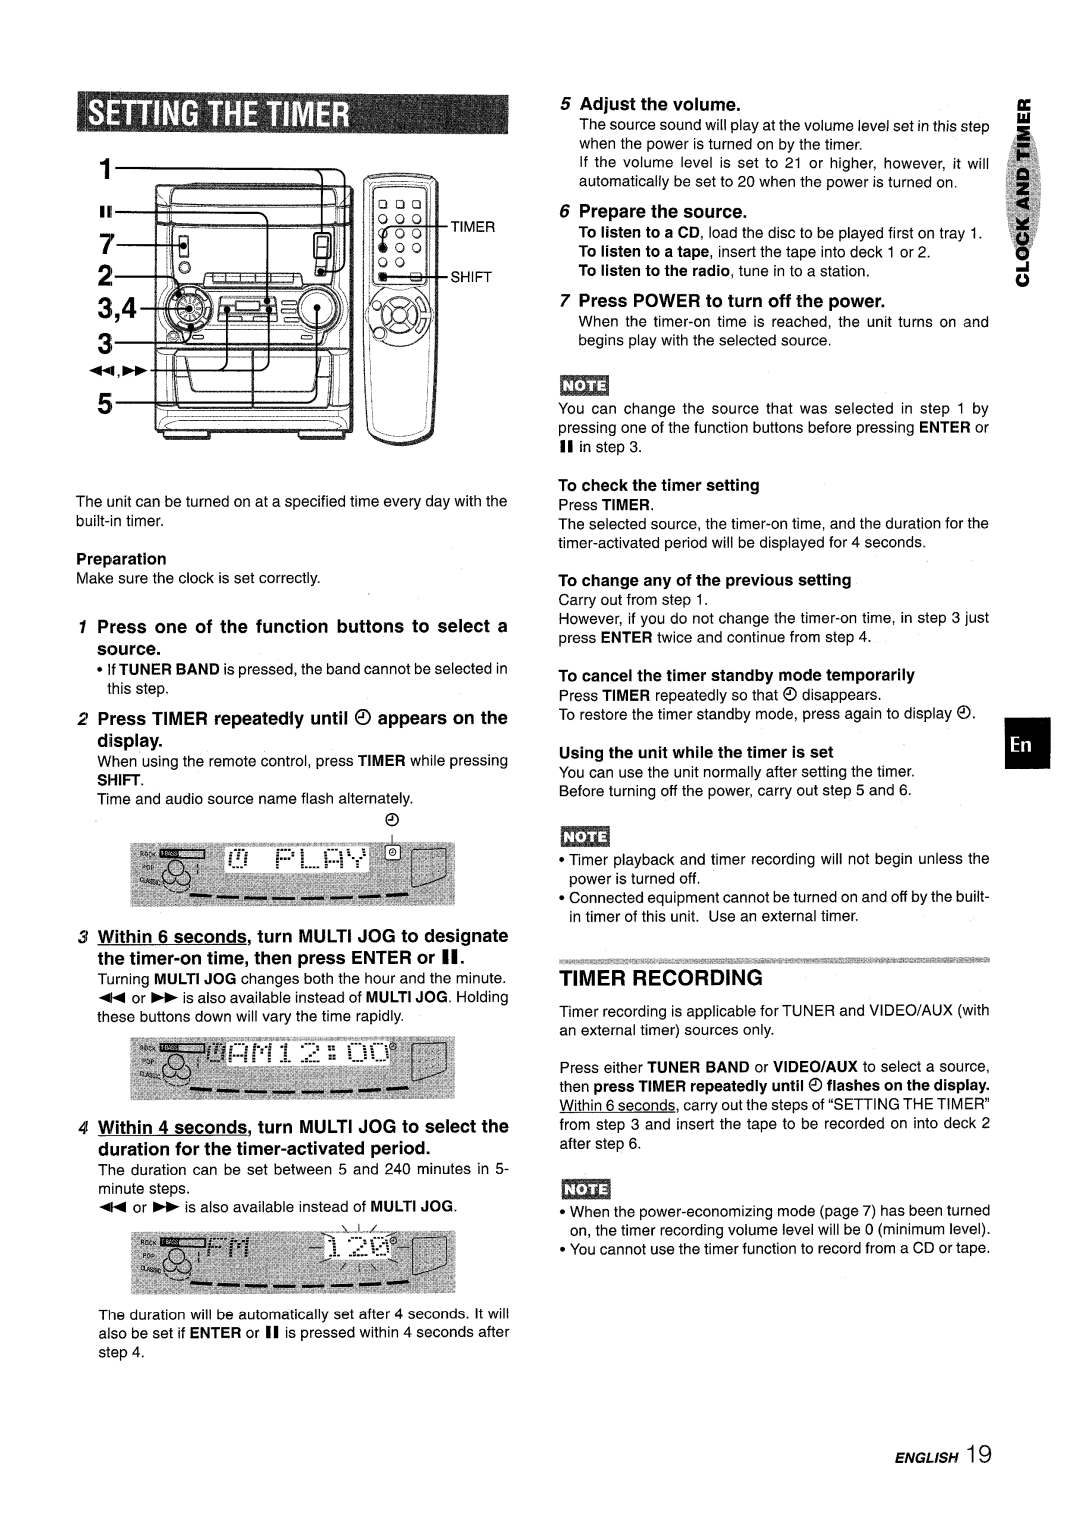
The unit can be turned on at a specified time every day with the built-in timer.

Preparation

Make sure the clock is set correctly.

Press one of the function buttons to select a source.

If TUNER BAND is pressed, the band cannot be selected in this step.

Press TIMER repeatedly until @ appears on the display.

When using the remote control, press TIMER while pressing Sf-fll=-r.

Time and audio source name flash alternately.

o

Within 6 seconds, turn MULTI JOG to designate the timer-on time, then press ENTER or H1.

Turning MULTI JOG changes both the hour and the minute.

+or - is also available instead of MULTI JOG. Holding these buttons down will vary the time rapidly.

Within 4 seconds, turn MULTI JOG to select the duration for the timer-activated period.

The duration can be set between 5 and 240 minutes in 5- minute steps.

-or - is also available instead of MULTI JOG.

The duration will be automatically set after 4 seconds. It will also be set if ENTER or II is pressed within 4 seconds after step 4.

5 Adjust the volume.

The source sound will play at the volume level set in this step when the power is turned on by the timer.

If the volume level is set to 21 or higher, however, it will automatically be set to 20 when the power is turned on,

6 Prepare the source.

To listen to a CD, load the disc to be played first on tray 1. To listen to a tape, insert the tape into deck 1 or 2.

To listen to the radio, tune in to a station.

7 Press POWER to turn off the power.

When the timer-on time is reached; the unit turns on and begins play with the selected source,

m

You can change the source that was selected in step 1 by pressing one of the function buttons before pressing ENTER or II in step 3.

To check the timer setting

Press TIMER.

The selected source, the timer-on time, and the duration for the timer-activated period will be displayed for 4 seconds.

To change any of the previous setting

Carry out from step 1.

However, if you do not change the timer-on time, in step 3 just press ENTER twice and continue from step 4.

To cancel the timer standby mode temporarily

Press TIMER repeatedly so that @ disappears.

To restore the timer standby mode, press again to display ~).

Using the unit while the timer is set

You can use the unit normally after setting the timer. Before turning off the power, ‘carry out step 5 and 6.

m

Timer playback and timer recording will not begin unless the power is turned off.

Connected equipment cannot be turned on and off by the built- in timer of this unit. Use an external timer.

Timer recording is applicable for TUNER and VI DEO/AUX (with an external timer) sources only.

Press either TUNER BAND or VIDEO/AUX to select a source, then press TIMER repeatedly until @ flashes on the display. Within 6 seconds, carry out the steps of “SETTINGTHE TIMER from step 3 and insert the tape to be recorded on into deck 2 after step 6.

When the power-economizing mode (page 7) has been turned

on, the timer recording volume level will be O (minimum level). c You cannot use the timer function to record from a CD or tape.

R

J&

J#%,

g%!

.~. .~% -9

:$*$

f$$$

a-y 8

6

ENGLISH 19

Page 19
Image 19
Aiwa NSX-A555 Press one of the function buttons to select a source, Press Timer repeatedly until @ appears on the display

NSX-A555 specifications

The Aiwa NSX-A555 is a sophisticated and compact audio system that epitomizes the power of sound and advanced technology. Launched in the late 1990s, the NSX-A555 quickly gained a reputation for its impressive features, making it a desirable choice for audiophiles and casual listeners alike.

One of the standout characteristics of the Aiwa NSX-A555 is its robust audio output, delivering a powerful 100 watts per channel. This formidable power enables the system to fill any room with rich, clear sound, making it perfect for parties, casual listening, or immersing yourself in your favorite music. The system incorporates a dual cassette deck, which allows for easy recording and playback of tapes, catering to both nostalgia and functionality.

In addition to its cassette capabilities, the Aiwa NSX-A555 boasts a built-in CD player that supports various formats, enhancing convenience and versatility. The CD player features a programmable function, allowing users to create custom playlists to suit their mood. Its sleek design includes an intuitive front-panel interface, making navigation through discs and playlists effortless.

The audio system is also equipped with advanced sound technologies, such as Aiwa's "Mega Bass" feature, which enhances low-frequency sounds, providing a deeper and more engaging listening experience. Additionally, it includes equalizer presets that allow users to tailor the sound output to their preferences or to the genre of music being played.

The Aiwa NSX-A555 supports radio frequencies, featuring an FM/AM tuner that provides access to a variety of stations, offering listeners an abundance of audio content. The system features digital tuning, ensuring precise access to both AM and FM channels, complemented by a built-in clock and timer functions, enhancing overall usability.

The aesthetic design of the NSX-A555 is equally impressive, showcasing a modern and sleek appearance that fits well in any environment. Its compact dimensions allow for versatile placement options, whether on a bookshelf, desktop, or entertainment center.

In summary, the Aiwa NSX-A555 is a well-rounded audio system that combines powerful sound output, advanced technologies, and user-friendly features. Its dual cassette capability, built-in CD player, Mega Bass enhancement, and digital tuner make it an excellent choice for anyone looking to elevate their audio experience. This system represents a blend of functionality and style, maintaining its appeal in the world of home audio systems. Whether you're revisiting classic albums or enjoying modern tracks, the Aiwa NSX-A555 remains a celebrated choice for music enthusiasts.