O

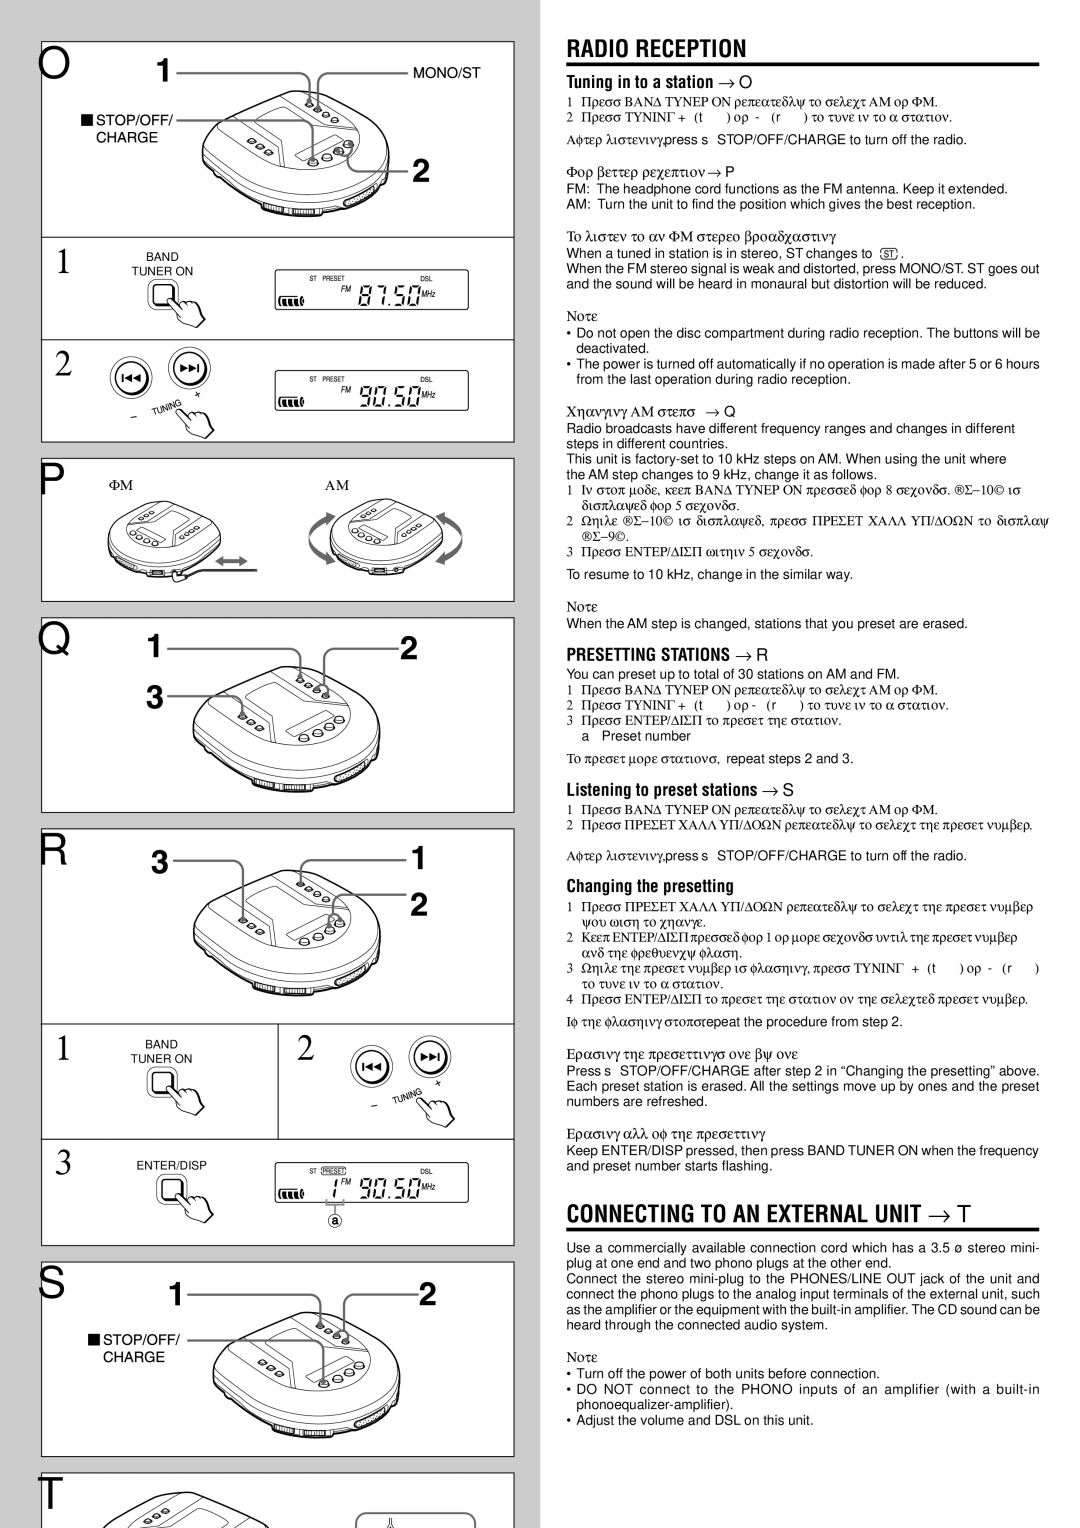
1 BAND TUNER ON

2


P FM

AM


Q

R

1

BAND

2

TUNER ON

3 ENTER/DISP

S

RADIO RECEPTION

Tuning in to a station → O

1Press BAND TUNER ON repeatedly to select AM or FM.

2Press TUNING +(t) or - (r) to tune in to a station.

After listening, press sSTOP/OFF/CHARGE to turn off the radio.

For better reception → P

FM: The headphone cord functions as the FM antenna. Keep it extended.

AM: Turn the unit to find the position which gives the best reception.

To listen to an FM stereo broadcasting

When a tuned in station is in stereo, ST changes to .

When the FM stereo signal is weak and distorted, press MONO/ST. ST goes out and the sound will be heard in monaural but distortion will be reduced.

Note

Do not open the disc compartment during radio reception. The buttons will be deactivated.

The power is turned off automatically if no operation is made after 5 or 6 hours from the last operation during radio reception.

Changing AM steps → Q

Radio broadcasts have different frequency ranges and changes in different steps in different countries.

This unit is factory-set to 10 kHz steps on AM. When using the unit where the AM step changes to 9 kHz, change it as follows.

1In stop mode, keep BAND TUNER ON pressed for 8 seconds. “S-10” is displayed for 5 seconds.

2While “S-10” is displayed, press PRESET CALL UP/DOWN to display “S-9”.

3Press ENTER/DISP within 5 seconds.

To resume to 10 kHz, change in the similar way.

Note

When the AM step is changed, stations that you preset are erased.

PRESETTING STATIONS → R

You can preset up to total of 30 stations on AM and FM.

1Press BAND TUNER ON repeatedly to select AM or FM.

2Press TUNING +(t) or -(r) to tune in to a station.

3Press ENTER/DISP to preset the station. a Preset number

To preset more stations, repeat steps 2 and 3.

Listening to preset stations → S

1Press BAND TUNER ON repeatedly to select AM or FM.

2Press PRESET CALL UP/DOWN repeatedly to select the preset number.

After listening, press sSTOP/OFF/CHARGE to turn off the radio.

Changing the presetting

1Press PRESET CALL UP/DOWN repeatedly to select the preset number you wish to change.

2Keep ENTER/DISP pressed for 1 or more seconds until the preset number and the frequency flash.

3While the preset number is flashing, press TUNING +(t) or -(r) to tune in to a station.

4Press ENTER/DISP to preset the station on the selected preset number.

If the flashing stops, repeat the procedure from step 2.

Erasing the presettings one by one

Press sSTOP/OFF/CHARGE after step 2 in “Changing the presetting” above. Each preset station is erased. All the settings move up by ones and the preset numbers are refreshed.

Erasing all of the presetting

Keep ENTER/DISP pressed, then press BAND TUNER ON when the frequency and preset number starts flashing.

CONNECTING TO AN EXTERNAL UNIT → T

Use a commercially available connection cord which has a 3.5 ø stereo mini- plug at one end and two phono plugs at the other end.

Connect the stereo mini-plug to the PHONES/LINE OUT jack of the unit and connect the phono plugs to the analog input terminals of the external unit, such as the amplifier or the equipment with the built-in amplifier. The CD sound can be heard through the connected audio system.

Note

Turn off the power of both units before connection.

DO NOT connect to the PHONO inputs of an amplifier (with a built-in phonoequalizer-amplifier).

Adjust the volume and DSL on this unit.

T

Page 7
Image 7
Aiwa XP-R120 Radio Reception, Connecting to AN External Unit → T, Tuning in to a station → O, Changing the presetting

XP-R120 specifications

The Aiwa XP-R120 is a compact and versatile portable stereo cassette player that has captured the hearts of audio enthusiasts with its impressive blend of features and functionality. Released during a time when portable audio was gaining immense popularity, the XP-R120 offers a unique combination of classic design and modern technology, making it a beloved choice among retro audio fans.

One of the standout characteristics of the Aiwa XP-R120 is its design. The player features a sleek and lightweight construction, making it easy to carry around. Available in various colors, the stylish exterior is complemented by a user-friendly interface. The large, intuitive buttons allow for easy operation, ensuring that users can quickly navigate through their audio options.

At its core, the XP-R120 boasts a high-quality cassette deck that provides exceptional sound clarity and fidelity. It supports both normal and chrome tapes, ensuring users can enjoy their favorite music without compromise. The integrated Dolby B noise reduction system further enhances the listening experience by minimizing tape hiss and improving overall audio quality.

The Aiwa XP-R120 also comes with a built-in digital tuner that supports AM and FM radio stations, giving users the flexibility to enjoy live broadcasts alongside their cassette tapes. Preset tuning allows easy access to favorite stations, while the telescopic antenna ensures optimal reception even in challenging environments.

One of the more exciting features of the XP-R120 is its ability to record audio directly from the radio or another source via an external microphone. This feature is especially appealing for those looking to preserve live performances or capture their own music. The recording function produces admirable sound quality, which is often a key concern for aspiring musicians and podcasters alike.

To enhance portability, the Aiwa XP-R120 is powered by standard AA batteries, ensuring that users can enjoy their music on the go without worrying about charging cables. Additionally, the player includes a headphone jack, allowing users to enjoy their music privately without disturbing others.

In conclusion, the Aiwa XP-R120 perfectly embodies the spirit of portable audio with its impressive sound quality, elegant design, and convenient features. This cassette player not only appeals to nostalgia but also serves practical purposes for modern audio lovers, making it a timeless choice in the world of portable media.