PROGRAMMED EDIT RECORDING

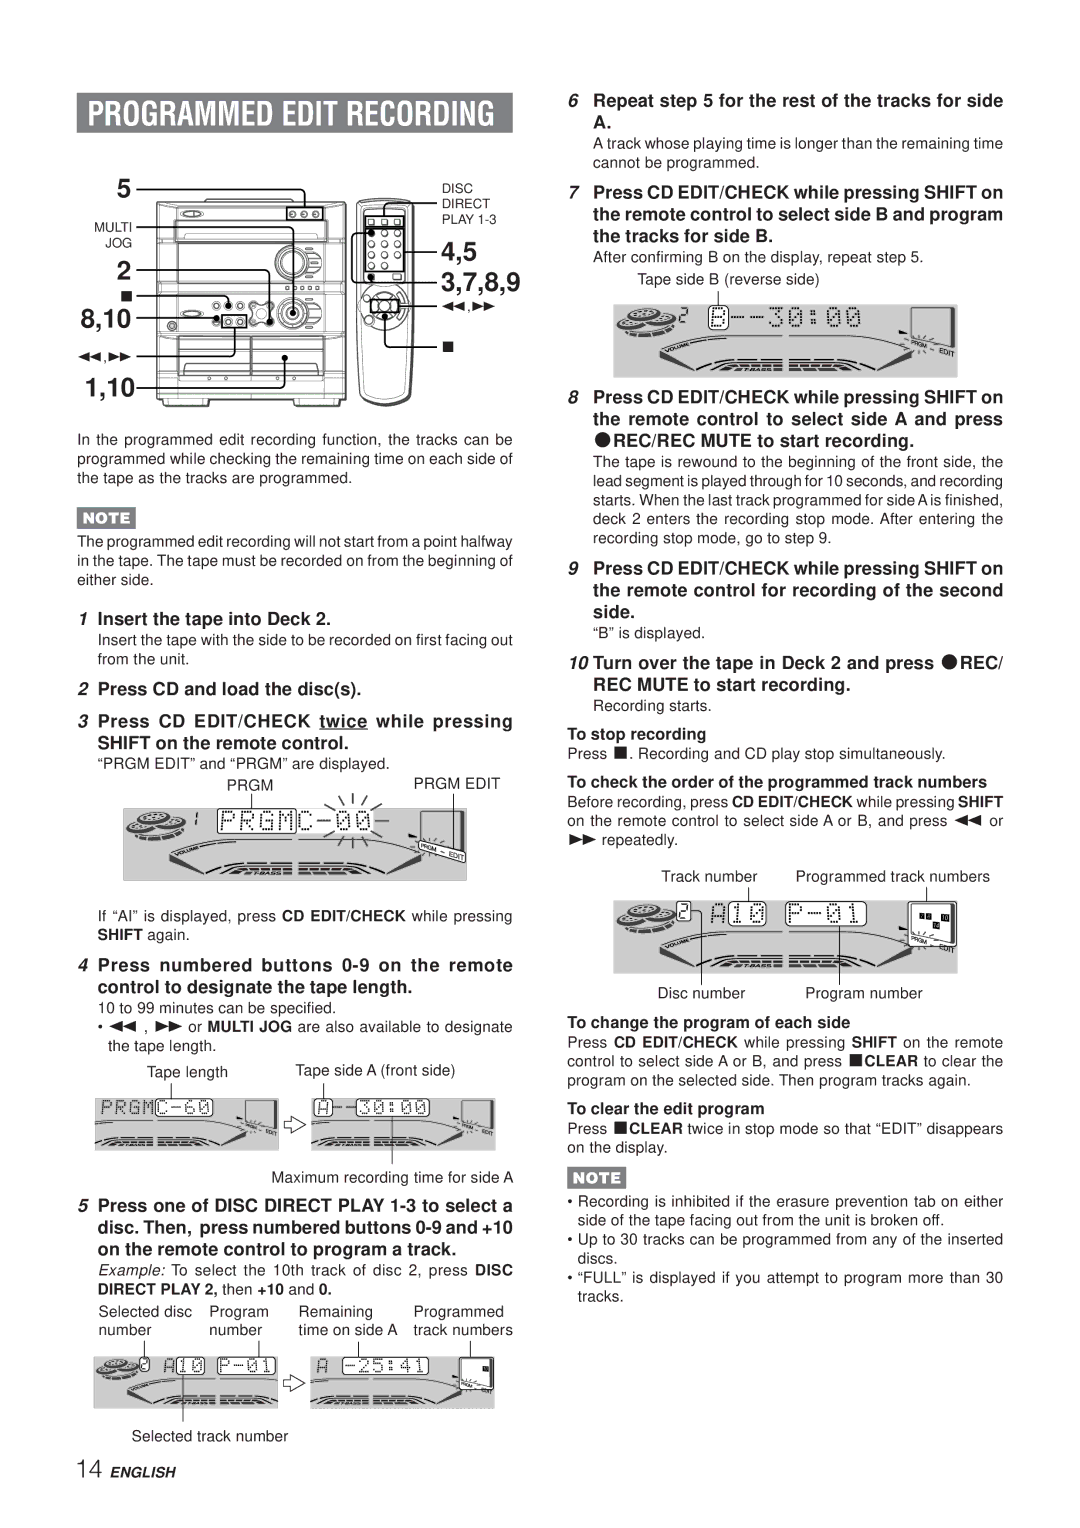
5

DISC


DIRECT

MULTI

PLAY 1-3


JOG

4,5

2

3,7,8,9

s

f,g

8,10


f,g

s


1,10

In the programmed edit recording function, the tracks can be programmed while checking the remaining time on each side of the tape as the tracks are programmed.

NOTE

The programmed edit recording will not start from a point halfway in the tape. The tape must be recorded on from the beginning of either side.

1Insert the tape into Deck 2.

Insert the tape with the side to be recorded on first facing out from the unit.

2Press CD and load the disc(s).

3Press CD EDIT/CHECK twice while pressing

SHIFT on the remote control. “PRGM EDIT” and “PRGM” are displayed.

PRGM

PRGM EDIT

If “AI” is displayed, press CD EDIT/CHECK while pressing SHIFT again.

4Press numbered buttons 0-9 on the remote

control to designate the tape length.

10 to 99 minutes can be specified.

f , g or MULTI JOG are also available to designate the tape length.

Tape length

Tape side A (front side)

Maximum recording time for side A

5Press one of DISC DIRECT PLAY 1-3 to select a disc. Then, press numbered buttons 0-9 and +10

on the remote control to program a track.

Example: To select the 10th track of disc 2, press DISC DIRECT PLAY 2, then +10 and 0.

Selected disc

Program

Remaining

Programmed

number

number

time on side A

track numbers

Selected track number

6Repeat step 5 for the rest of the tracks for side

A.

A track whose playing time is longer than the remaining time cannot be programmed.

7Press CD EDIT/CHECK while pressing SHIFT on the remote control to select side B and program

the tracks for side B.

After confirming B on the display, repeat step 5.

Tape side B (reverse side)

8Press CD EDIT/CHECK while pressing SHIFT on the remote control to select side A and press

wREC/REC MUTE to start recording.

The tape is rewound to the beginning of the front side, the lead segment is played through for 10 seconds, and recording starts. When the last track programmed for side A is finished, deck 2 enters the recording stop mode. After entering the recording stop mode, go to step 9.

9Press CD EDIT/CHECK while pressing SHIFT on the remote control for recording of the second

side.

“B” is displayed.

10 Turn over the tape in Deck 2 and press wREC/

REC MUTE to start recording.

Recording starts.

To stop recording

Press s. Recording and CD play stop simultaneously.

To check the order of the programmed track numbers

Before recording, press CD EDIT/CHECK while pressing SHIFT on the remote control to select side A or B, and press f or

grepeatedly.

Track number

Programmed track numbers

Disc number

Program number

To change the program of each side

Press CD EDIT/CHECK while pressing SHIFT on the remote control to select side A or B, and press sCLEAR to clear the program on the selected side. Then program tracks again.

To clear the edit program

Press sCLEAR twice in stop mode so that “EDIT” disappears on the display.

NOTE

Recording is inhibited if the erasure prevention tab on either side of the tape facing out from the unit is broken off.

Up to 30 tracks can be programmed from any of the inserted discs.

“FULL” is displayed if you attempt to program more than 30 tracks.

14 ENGLISH

Page 14
Image 14
Aiwa Z-A60 operating instructions Repeat for the rest of the tracks for side, To change the program of each side

Z-A60 specifications

The Aiwa Z-A60 is a notable addition to the landscape of portable audio devices, renowned for its compact design and advanced features that cater to audiophiles and casual listeners alike. This versatile cassette player, introduced in the early days of personal audio, stands out not only for its aesthetic appeal but also for its innovative technologies that enhance the listening experience.

One of the key features of the Aiwa Z-A60 is its impressive sound quality, achieved through high-fidelity playback capabilities. The device is equipped with a powerful amplifier that drives its speakers, ensuring clear and robust audio reproduction across a wide frequency range. The integrated Dolby Noise Reduction system further improves sound clarity by reducing tape hiss, allowing music enthusiasts to enjoy their favorite tracks without intrusive background noise.

Portability is a significant aspect of the Aiwa Z-A60's design. Its lightweight body and compact dimensions make it easy to carry, enabling users to enjoy their music on the go. The player features an ergonomic design that fits comfortably in hand, and the intuitive button layout, including dedicated controls for play, rewind, and fast forward, ensures a seamless user experience.

In addition to its exceptional sound quality and portability, the Aiwa Z-A60 is designed with durability in mind. The sturdy construction of the device means it can withstand the rigors of everyday use, making it a reliable companion for music lovers. Moreover, the player boasts a long-lasting battery life, allowing users to enjoy extended listening sessions without the need for frequent recharging.

Another noteworthy characteristic of the Aiwa Z-A60 is its versatility in playback options. The device supports various cassette types, accommodating both pre-recorded and blank tapes, which encourages users to explore a diverse range of audio formats. This flexibility appeals to collectors and those who appreciate the nostalgia of analog music.

The Aiwa Z-A60 also includes features such as a headphone jack, allowing for personal listening experiences without disturbing others. An automatic stop mechanism ensures that the tape stops playing once it reaches the end, preserving the longevity of both the cassette tapes and the player itself.

In summary, the Aiwa Z-A60 is a commendable device that combines high-quality audio performance with portability and durability. Its innovative features, including Dolby Noise Reduction and versatile playback capabilities, cater to the needs of a wide range of users. For those looking to enjoy music in a practical and stylish manner, the Aiwa Z-A60 stands as an enduring choice in the world of portable audio technology.